Getting Started - Outposts - Designing a death trap

I'll be referencing https://www.youtube.com/watch?v=Nfux3xblVcg. All images will be using this video. If you want to watch the VOD start at 18:45 to get the introduction to building. Note: The screenshots and features shown in this video are not the latest build of the game. Therefore certain features may be different to what is shown but overall I would expect it to be relatively close to the final product.
So to start out you will need to purchase a plot of land.
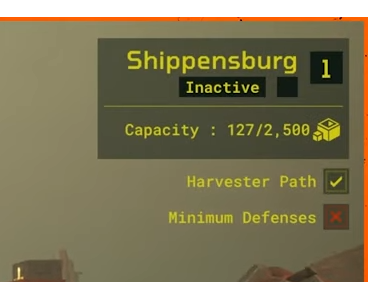
Shippensburg - The name of the Outpost
1 - The current prestige level of the base
Inactive - whether or not raiders can raid the base. Note: raiders cannot raid a base that is being worked on.
Capacity - a ratio showing the amount of resources used over the amount of resources available.
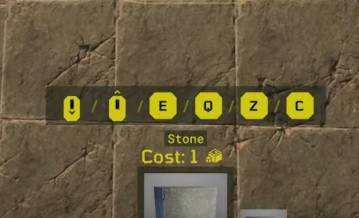
In this image we can see that the resource cost of Stone is 1. Therefore, we can deduce that Shippensburg is limited to 2,500 stone blocks. In addition to this, in the video we can see that a purchased plot is not empty and that the blocks that are already placed are eating up resources.
Harvester - a robot (aka HRV or Harvey) that walks through the base collecting genetic material
Harvester path - a path (yellow dotted line) that the Harvester can take to get from the shipping station (next to spawn) and to the genetic material. Note: The path that the HRV uses will almost always be the path that a raider will take to get to the genmat (genetic material). The harvester will always try to use the shortest path available.
Minimum Defenses - the fewest number of traps within an outpost before the Outpost is considered valid and can be made available for match making. If we compare the previous image of the UI with the one below, we can see another part of the UI that was not visible before.
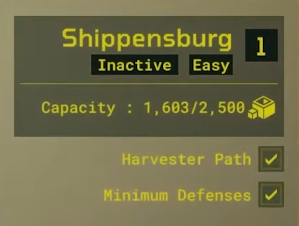
Difficulty - Easy/Medium/Hard. We can infer that the difficulty of the map is determined after the minimum defenses requirement is met.
Comments
----
Spend time and resources making the front of your outpost look nice. It is going to make all the difference in the world when raiders choose which outpost to raid.
Make the outpost fun to play! An Outpost will do well if it's fun even if it isn't super deadly. If you see a particular strategy being complained about in the forums, I highly recommend avoiding that if at all possible. An outpost that is not fun to play does not fair well, beware!
When purchasing a plot, I recommend purchasing the largest plot if you can afford it. And if you can't afford it then consider raiding until you can.
I highly recommend reading through Hugo's post on what is known so far because after purchasing a plot the next step is to start unlocking guards and traps for building.
https://forums.bhvr.com/Meet-Your-Maker/discussion/362583/pre-open-beta-known-information-megathread-updated-01-02-2023-big-update-another-update-today#latest
I'm not going to say what you should unlock first. Instead I want you to think about layering your traps and guards. Everything that can kill a raider will give them a warning with ample time for them to react. If you can get a raider to over-extend then you can force them into a corner where you can kill them with either a guard or a trap.
Raiders are vulnerable
Use misdirection
Be careful not to
Once you've made your base, there is a replay station 27:21 in the youtube video. I recommend watching each and every raid attempt. Once you've watched a few people raid your base you'll know exactly how to improve the Outpost to make it more deadly. And once you have perfected your death trap, then it's time to purchase another plot of land and take all the lessons you learned and make an entirely new outpost from scratch and bring a friend because making outposts is more fun together!
Great job, @konchok love to see others making posts explaining things in more detail. Also thanks for linking my post about all we know atm.