
AMGC
AMGC
About
- Username
- AMGC
- Joined
- Visits
- 377
- Last Active
Comments
-
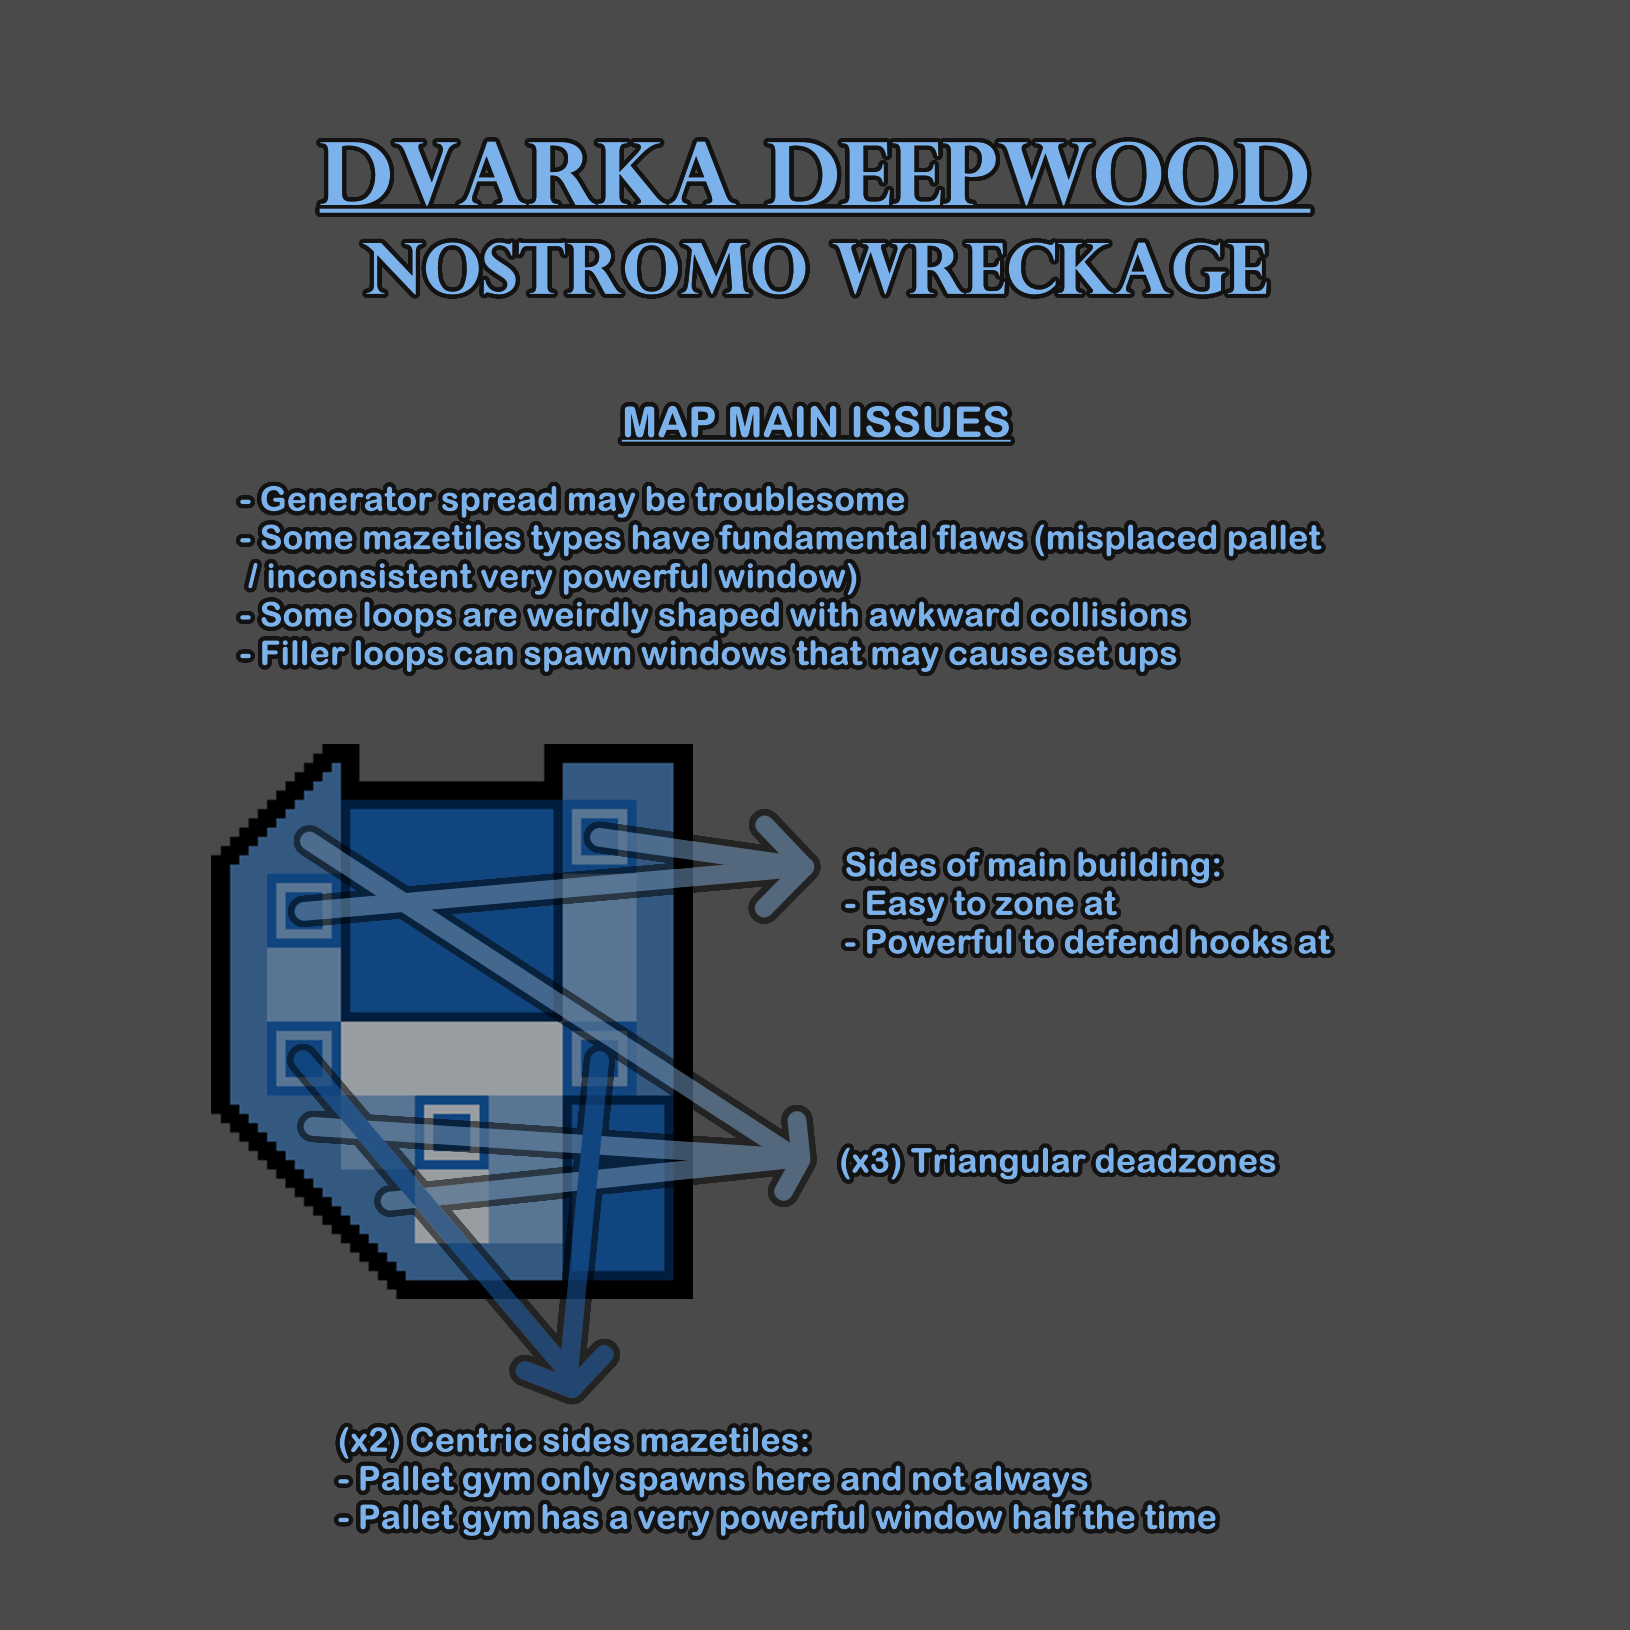
Nostromo Wreckage is the licensed map from the Dvarka Deepwood realm and it introduced many charming features like the freezing traps at main building or the secret chamber of the keycard easter egg. The size of the map is maybe slightly too large for the generator spread. The main building is the largest in the game and while that is not an issue, the sides of it have such cornered space that it is very strong to defend hooks around the Nostromo.
Some of the filler loops have weird shapes that while mostly being okay, collisions sometimes get in the way. The filler loops also spawn windows in this realm and they can potentially create set ups with other structures. There are a few deadzones caused by the peculiar edge map.
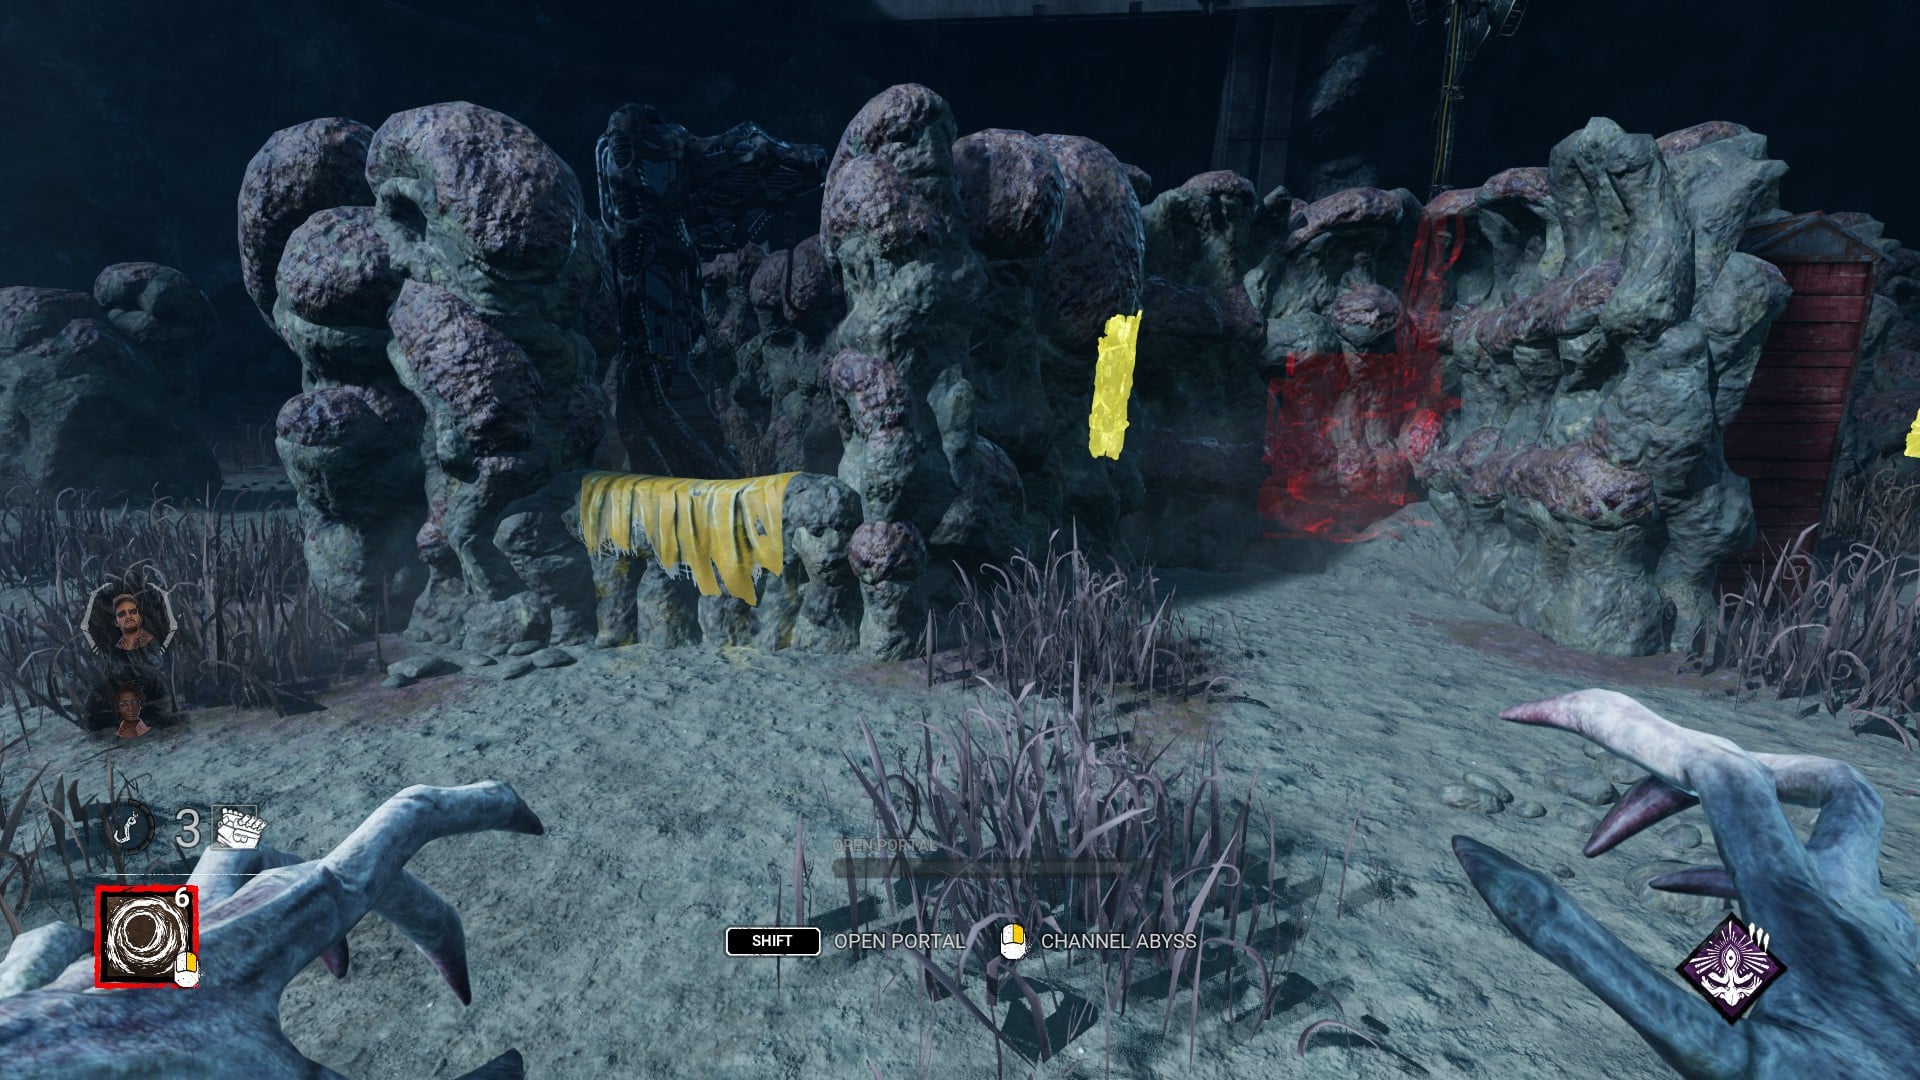
The jungle gym of Dvarka Deepwood has one variation with the pallet next to the window, despite it being the official jungle gym and not an instance of the "impostor gym". This pattern of window and pallet is not exactly new, it was once a bug on a PTB for all the jungle gyms in The MacMillan Estate. This iteration makes the tile less interactive and it is not favored by the players.
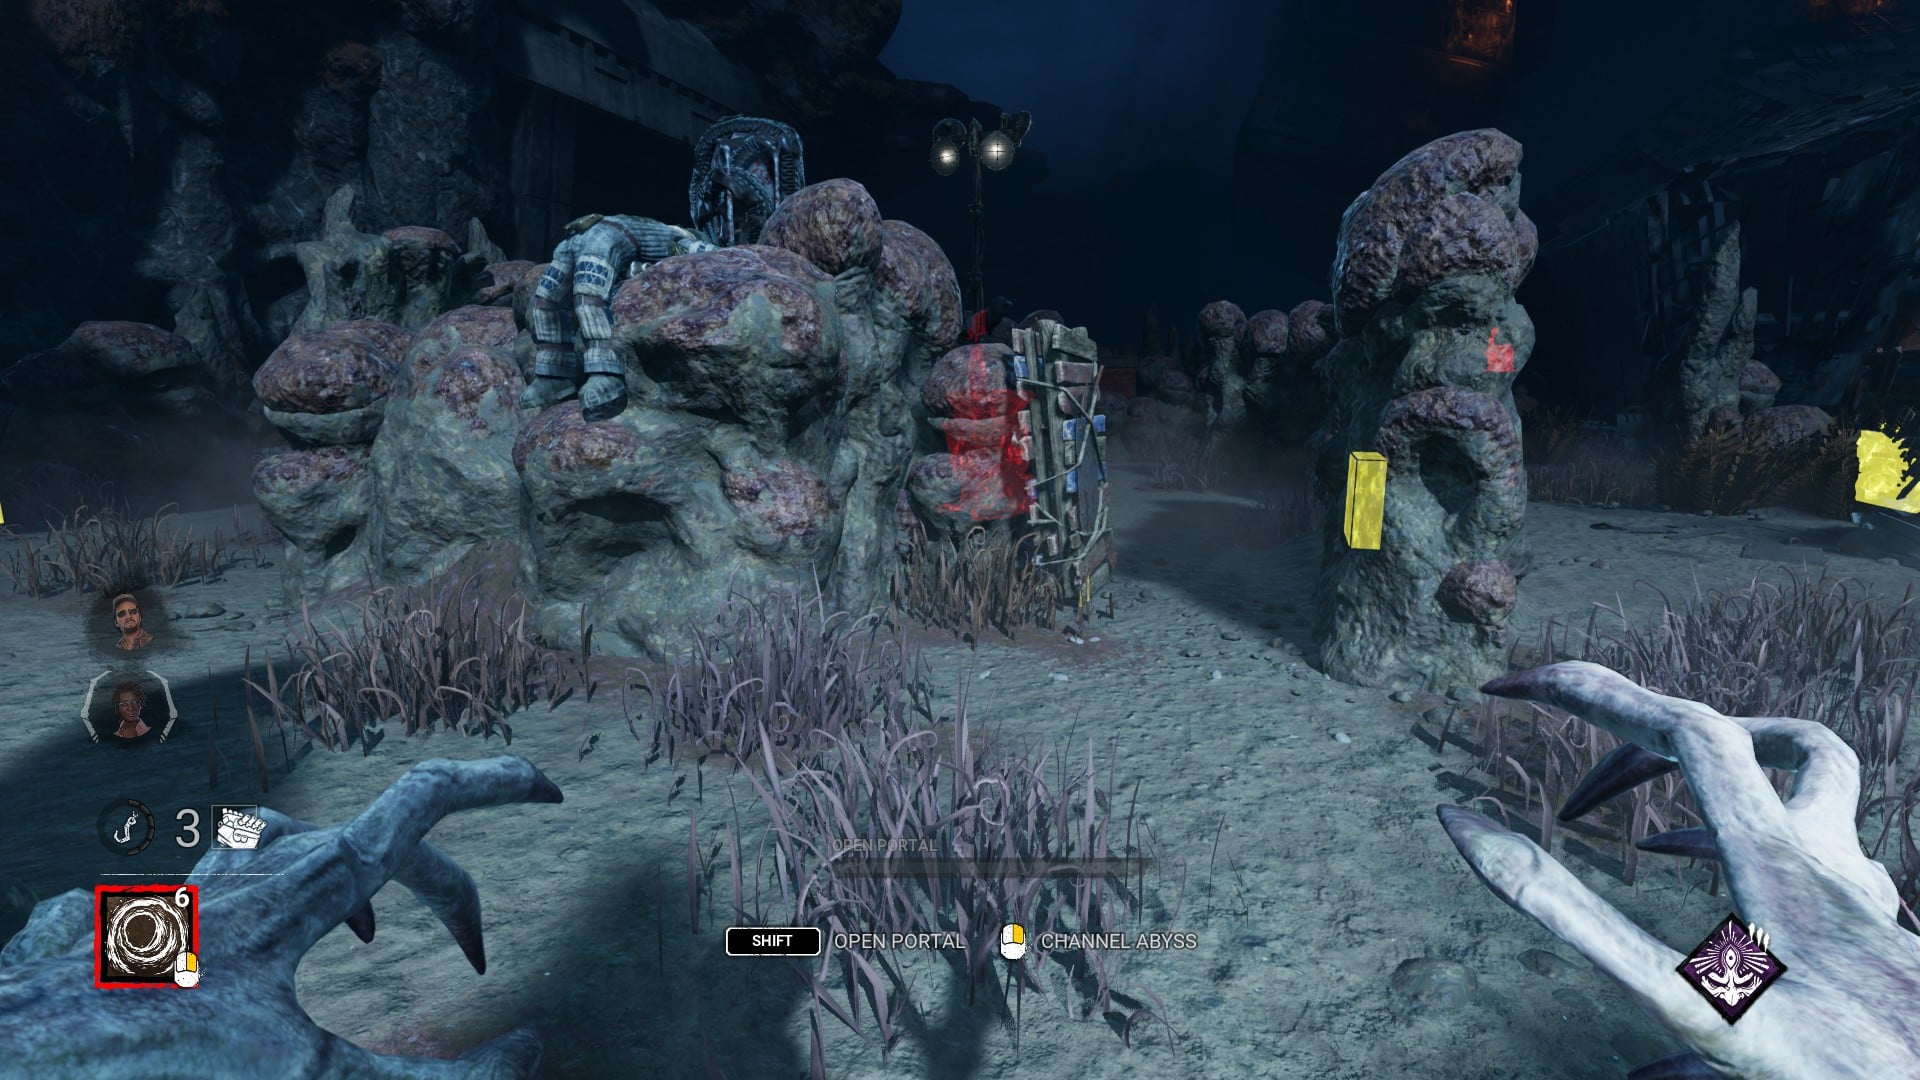
The pallet gym of Dvarka Deepwood is highly peculiar given that half the time it spawns an insanely powerful window that singlehandlely shifts the strength of the safety in the entire map (since it doesn't always spawn and half the time it is missing the window). The finest survivors can stay out of chase and vault the window without blocking it. While Nostromo has 5 mazetiles (the middle one, an altered "four lane", being fixed and different from the rest), the pallet gym for some reason only spawns at the ones near the center on the sides and not always.
Nostromo Wreckage needs to polish some collisions (maybe adjusting the friction), relocate the pallet on the weird variation of the jungle gym, reconsider the strength or logic of the window at the pallet gym and potentially address the generator spread or hook defense issues.
-
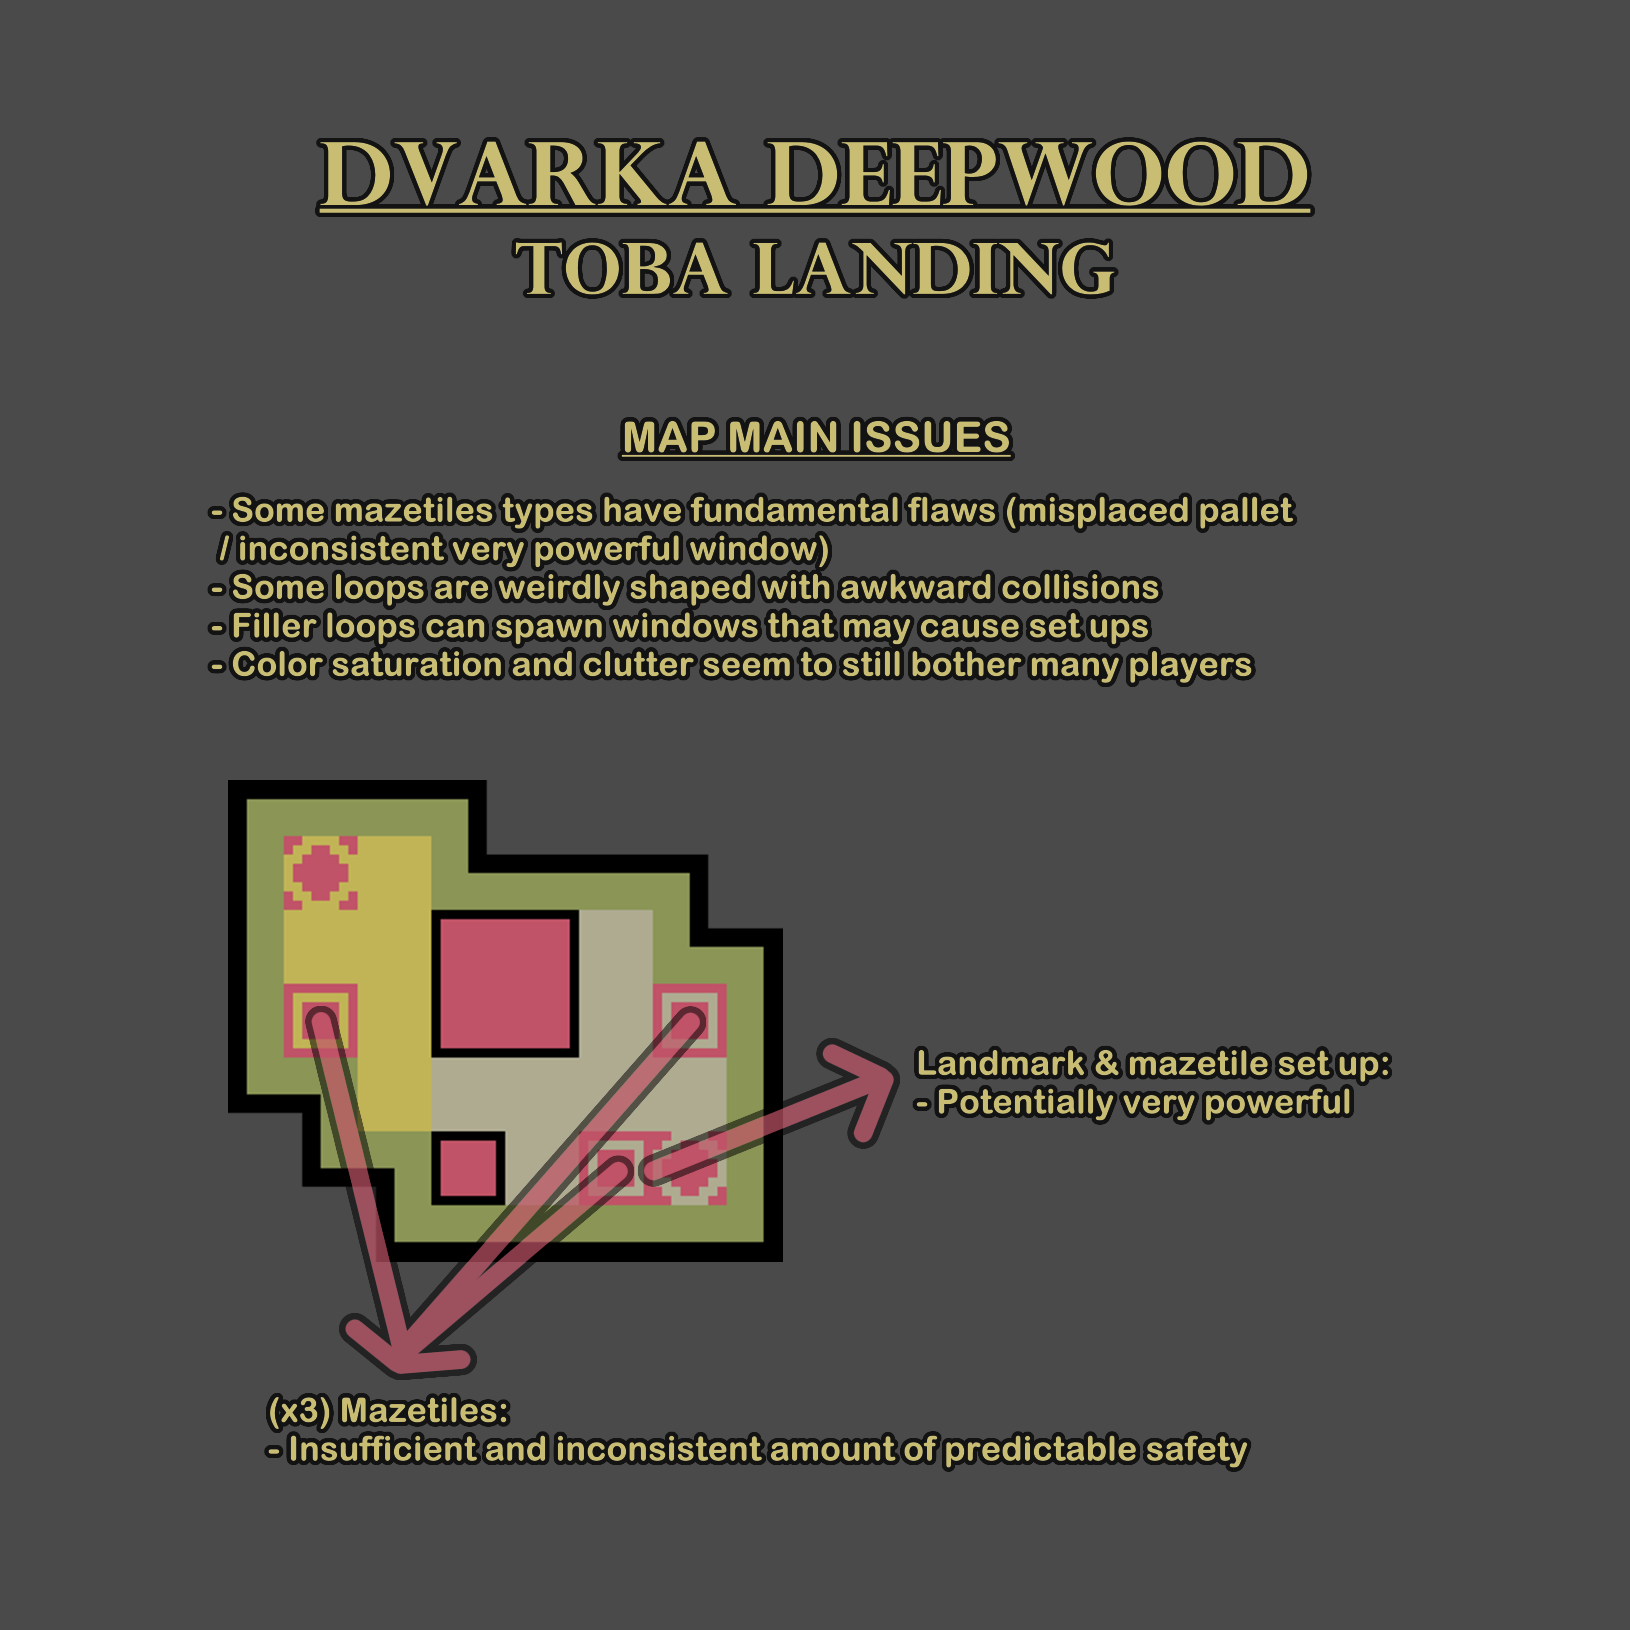
Toba Landing is the original map from the Dvarka Deepwood realm and it introduced many charming features like plenty of small slopes or the alien flower landmark that opens itself whenever a player is within the tile (giving long distance information to aware players). The map improved a lot after its release by reducing the clutter but it seems like many players are still troubled by the many obstacles as well as the saturated color palette (which may blend with the scratchmarks and auras).
Some of the filler loops have weird shapes that while mostly being okay, collisions sometimes get in the way. The filler loops also spawn windows in this realm and they can potentially create set ups with other structures.
There are only 3 mazetiles so the predictable safety of the map is questionable. One of the landmarks is connected to one of the mazetiles, depending on the types they can form a very powerful set up.
The jungle gym of Dvarka Deepwood has one variation with the pallet next to the window, despite it being the official jungle gym and not an instance of the "impostor gym". This pattern of window and pallet is not exactly new, it was once a bug on a PTB for all the jungle gyms in The MacMillan Estate. This iteration makes the tile less interactive and it is not favored by the players.
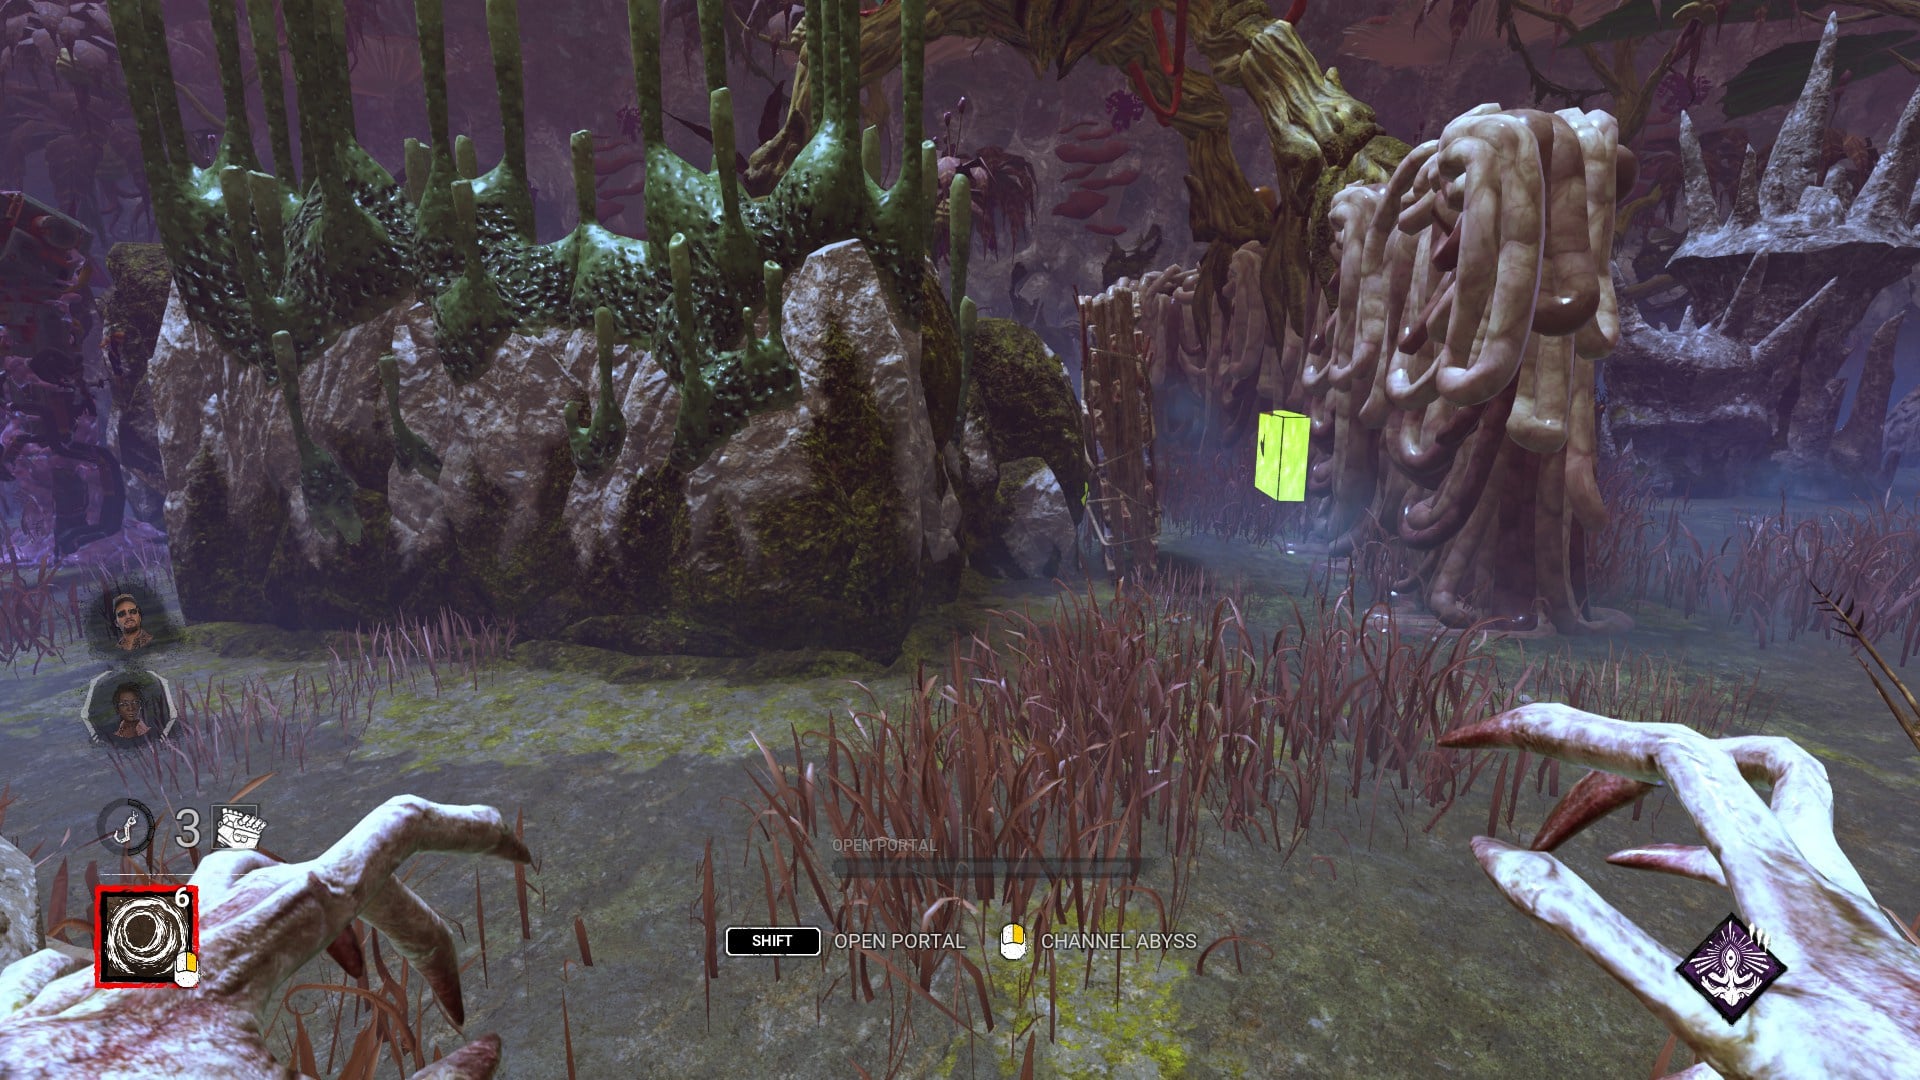
The pallet gym of Dvarka Deepwood is highly peculiar given that half the time it spawns an insanely powerful window that singlehandlely shifts the strength of the safety in the entire map (since it doesn't always spawn and half the time it is missing the window). The finest survivors can stay out of chase and vault the window without blocking it.
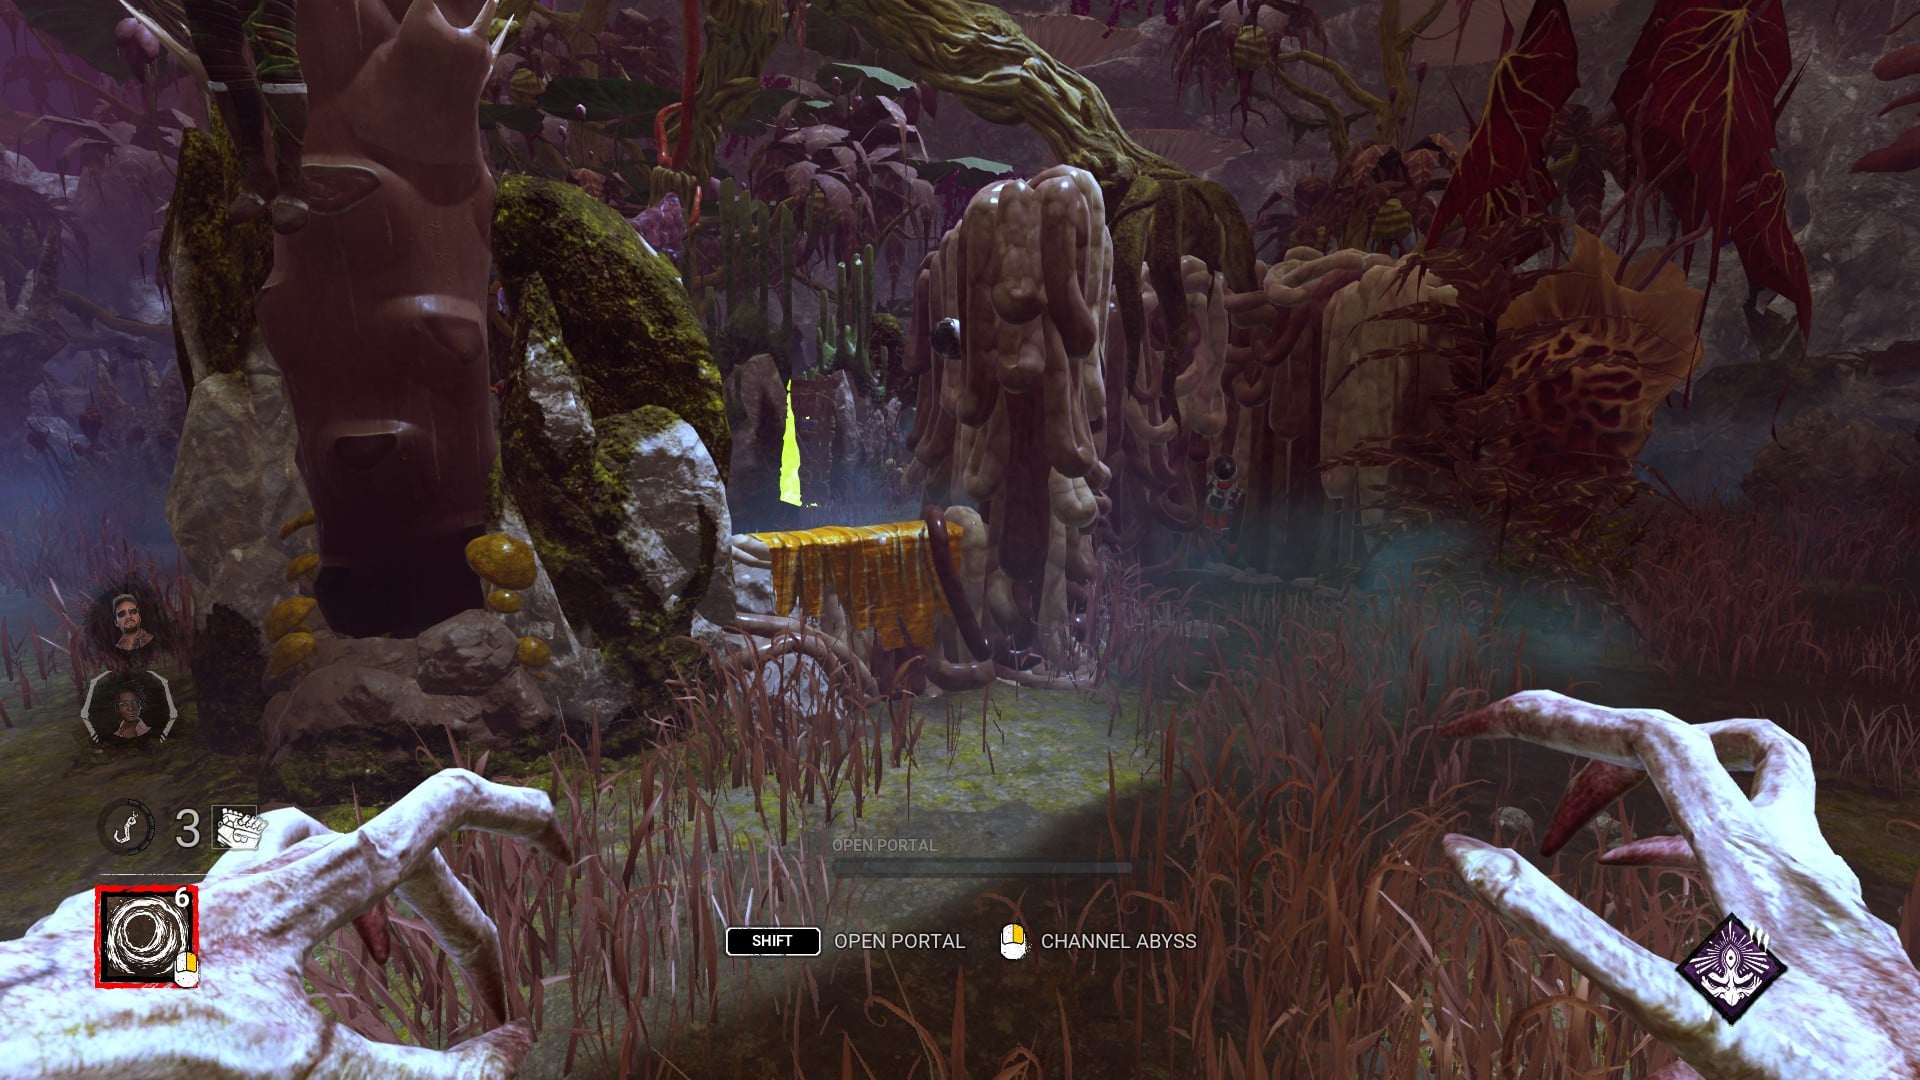
Toba Landing needs to polish some collisions (maybe adjusting the friction), relocate the pallet on the weird variation of the jungle gym, reconsider the strength or logic of the window at the pallet gym and add a 4th mazetile while separating the landmark & mazetile set up in the layout.
-
The Shattered Square is a lot better after its rework and could even be considered balanced, but that would be a vacuous title since the generation of safety is enormously inconsistent and it can favor either side. A major issue of the realm is the red hued lightning that makes all kind of gameplay elements hard to keep track of (scratchmarks, blood, auras, etc).
The pallet count differs from one trial to another, sometimes generating unpleasant deadzones. There are some very safe filler loops mixed with the semi safe ones, so not only the amount of filler pallets but also which filler loops spawned are relevant to the outcome of the trial. Main building for some reason can rarely spawns 2 pallets now, which never happened before.
The shack walls and some of the mazetiles walls allow the the shadows of the players to go through, removing mindgame potential in a very unnatural way. There are only 3 mazetiles which heavily cripple the predictable safety of the map and it is also odd given how there are 7 types in the realm and less than half will be displayed.
The tree landmark is a guaranteed deadzone despite having two instances where it could spawn a pallet, latest reason for it to be barren again was that the pallet loop was too peripheral and could be incredibly close to other loops on adjacent tiles. The long landmark (gallow or market place) seem to be spawning 1 guaranteed pallet now, tho it wasn't always like that and it may not even be hard coded and rather a conditioned coincidence (since it has the fixed deadzone of the tree near it and it covers two tiles, it may be forced by the pallet density to get that pallet).
The 3 house landmarks count with 4 types and they are absurdly inconsistent in the safety they provide. The stable is always a deadzone, the house ruins have a fixed window and may or may not get a pallet; the small house #1 gets either a pallet or a window and the small house #2 can get a pallet or be a deadzone. With all these possibilities, these 3 landmarks can go from 2 deadzones and just 1 window or 1 pallet to a total of 2 windows & 2 pallets or 1 window & 3 pallets. With these, not just the filler loops and the mazetiles but also the landmarks are inconsistent.
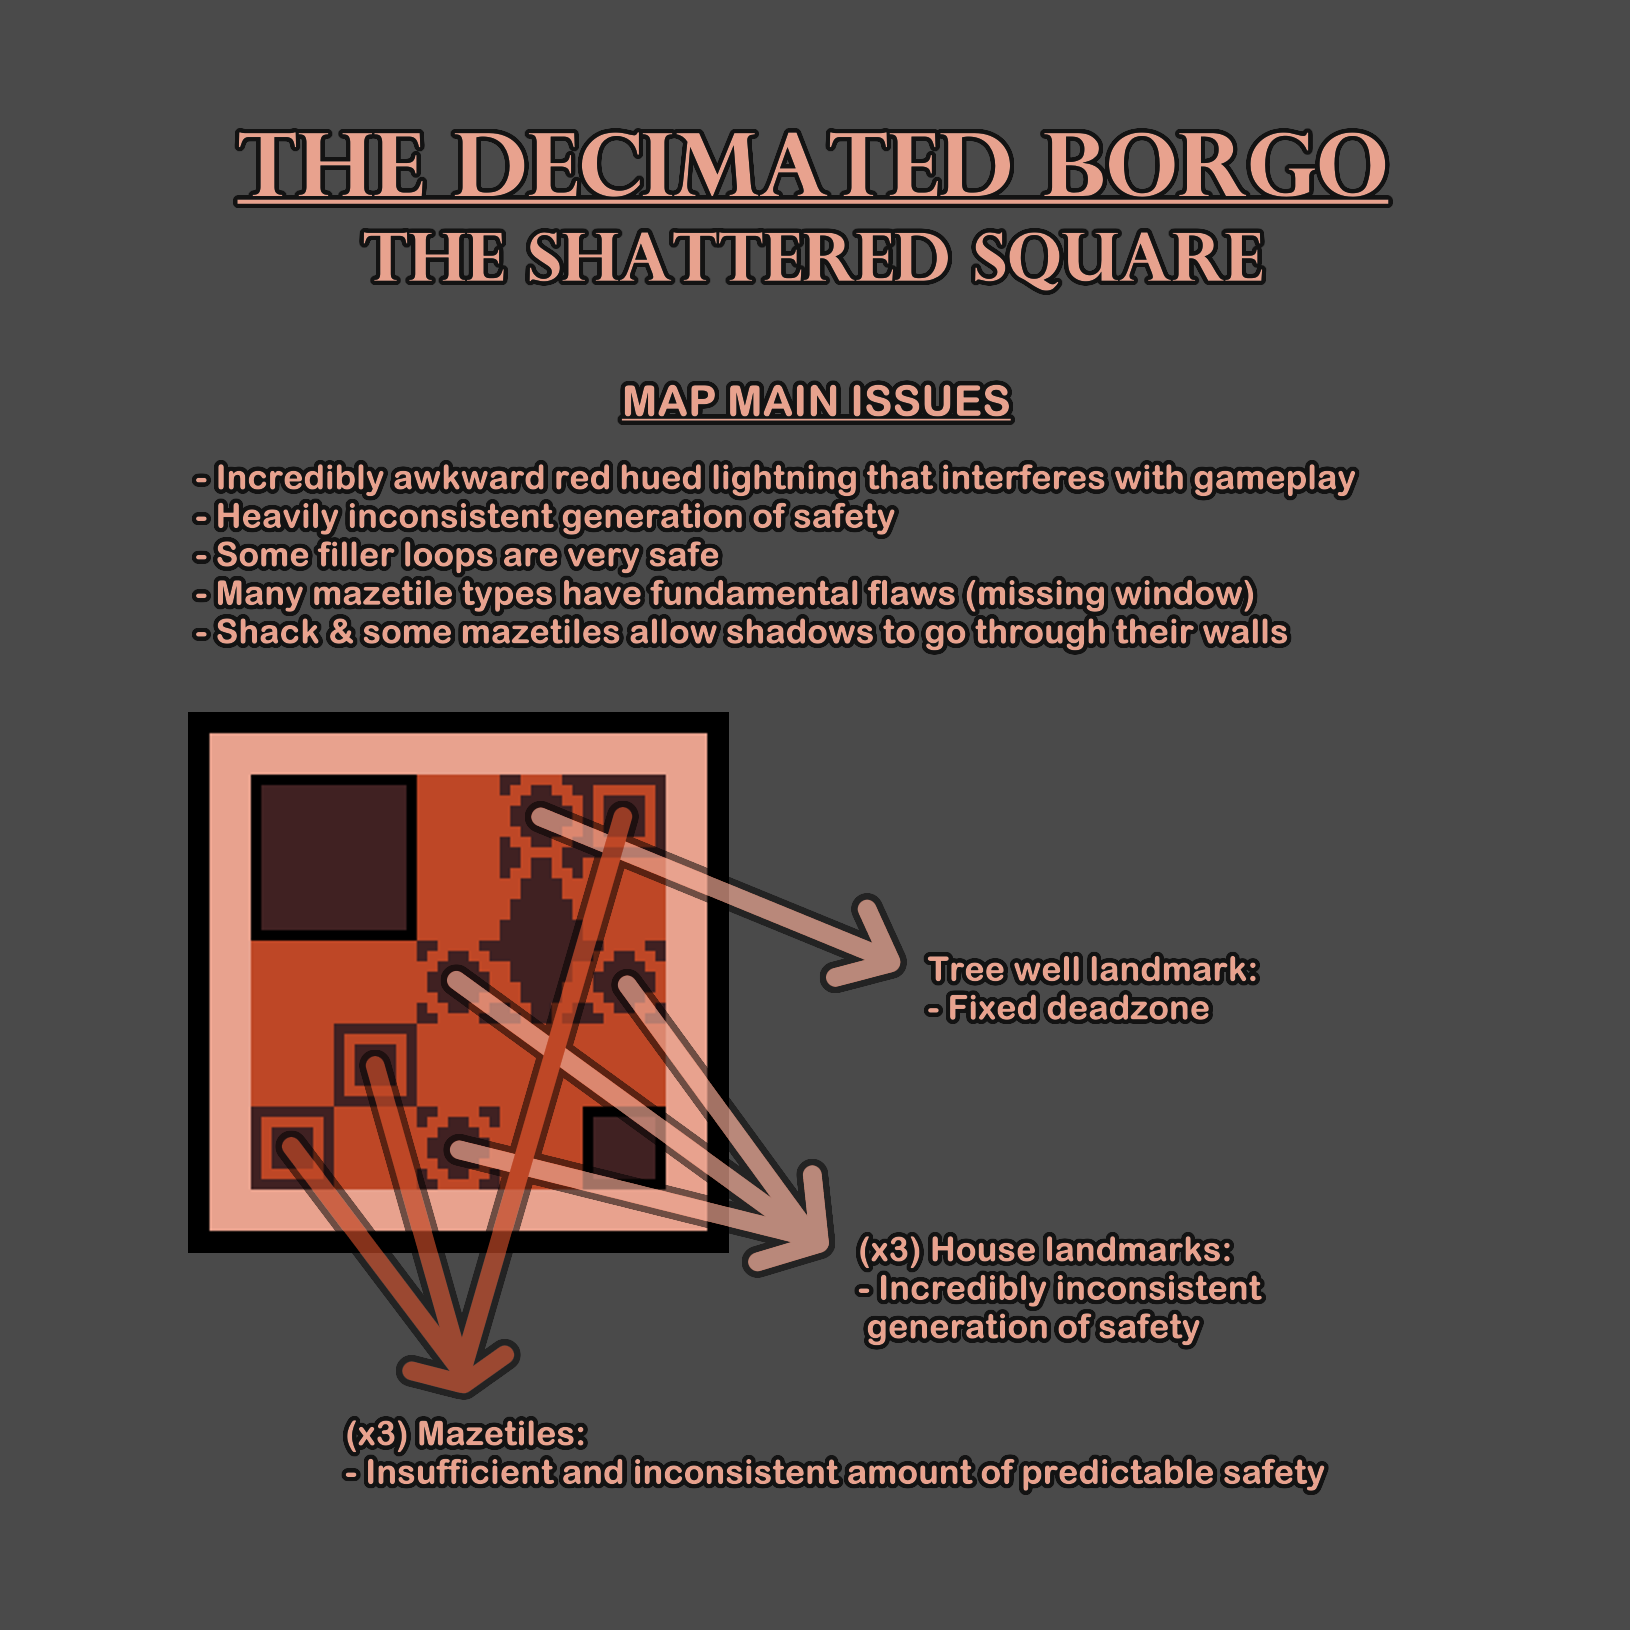
One of the mazetile types, commonly known as "variant gym" or "unique gym" is missing its window on both variations in The Shattered Square. This is not an isolated case, since it started as a bug in Yamaoka Estate and served as base for its design in Eyrie of Crows, Garden of Joy and The Shattered Square. The bug got fixed in all other realms except for one instance (of two) in Garden of Joy, yet it remains in The Shattered Square affecting both versions of the tile (it usually was only on one). This mazetile was originally designed to have a pallet and a window, not only it is not fun for it to be missing the windows but it also taints the essence of mazetiles being beacons of predictable safety for survivors and tiles that can be mindgamed for killer.
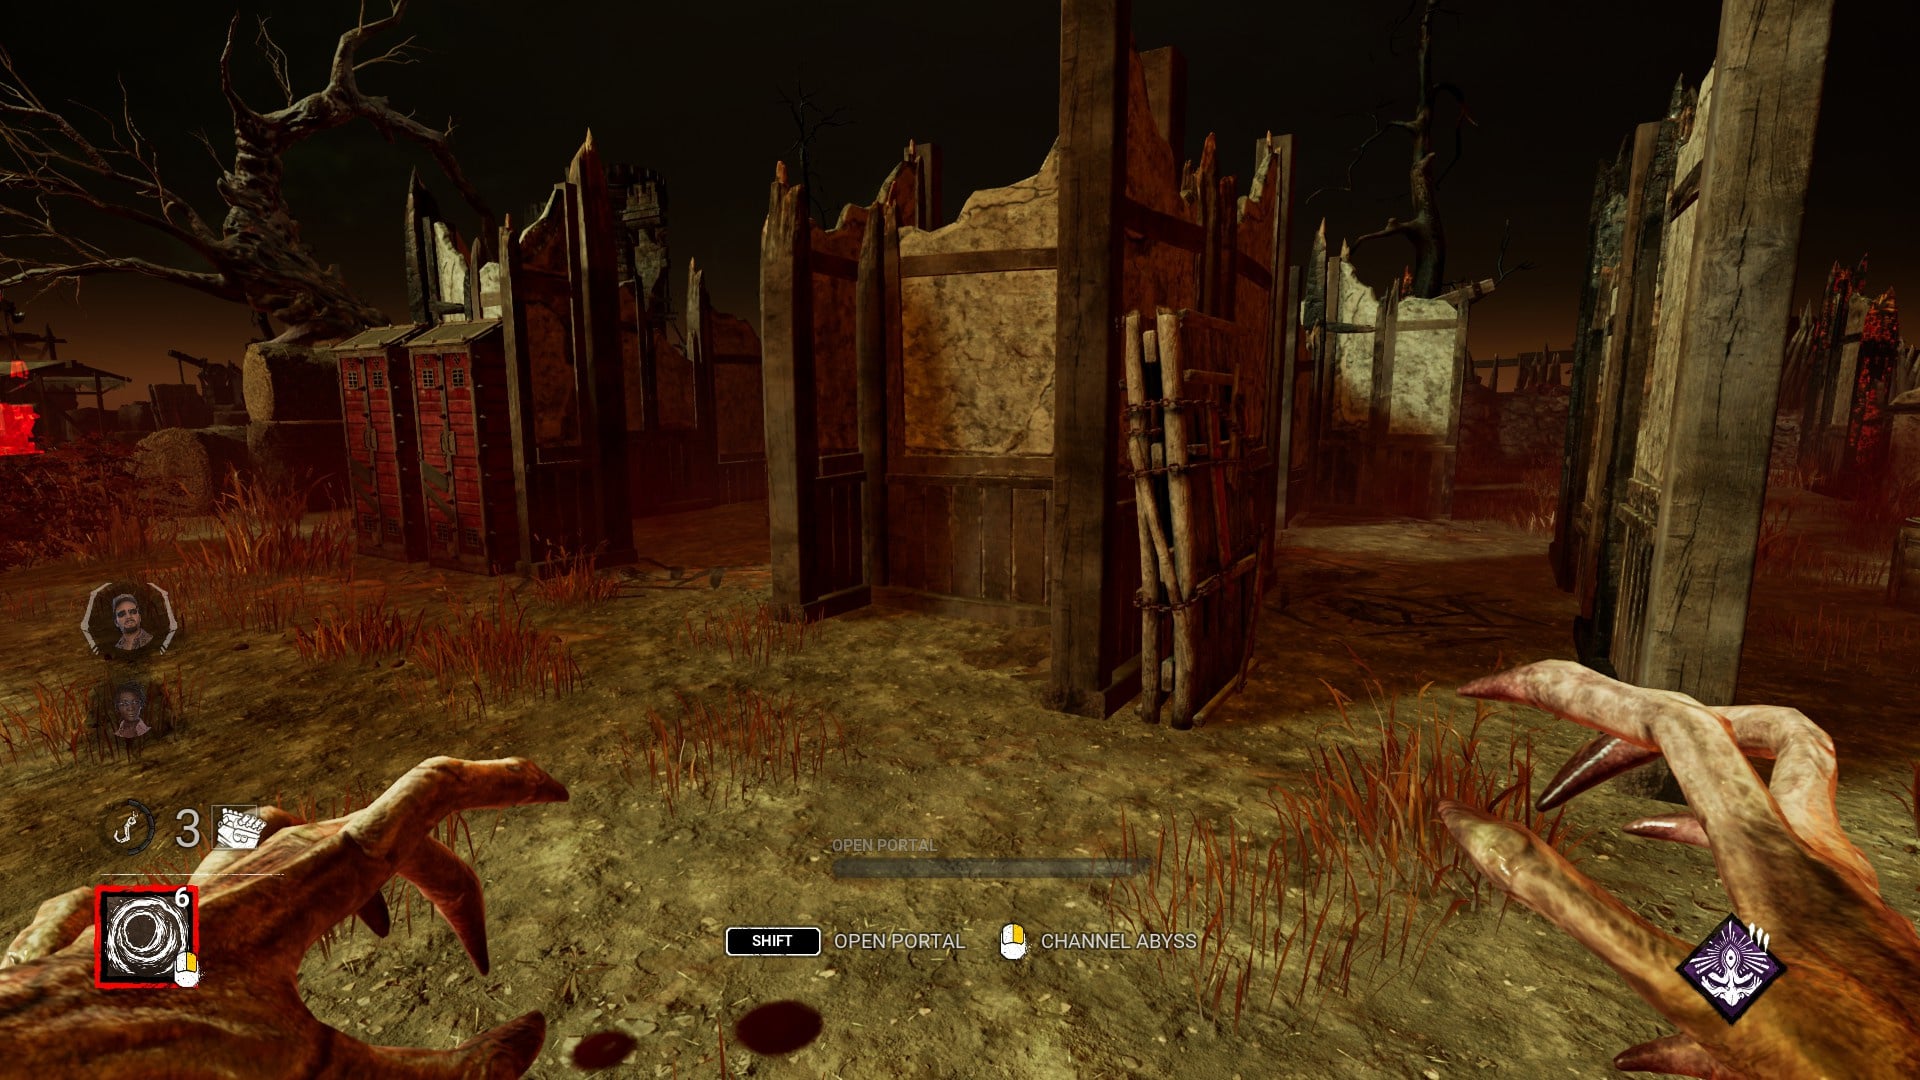
There is another mazetile that is missing the window on one of its variations, the "impostor gym" (mazetile that mimics other mazetiles, usually a jungle gym, while adding key changes that affect the gameplay), and it is a shame given that its counterpart in the shack side of Garden of Joy had a better design and it got removed recently. It could take upon the mantle of its pioneer and have a window on the outer gap at the left side.
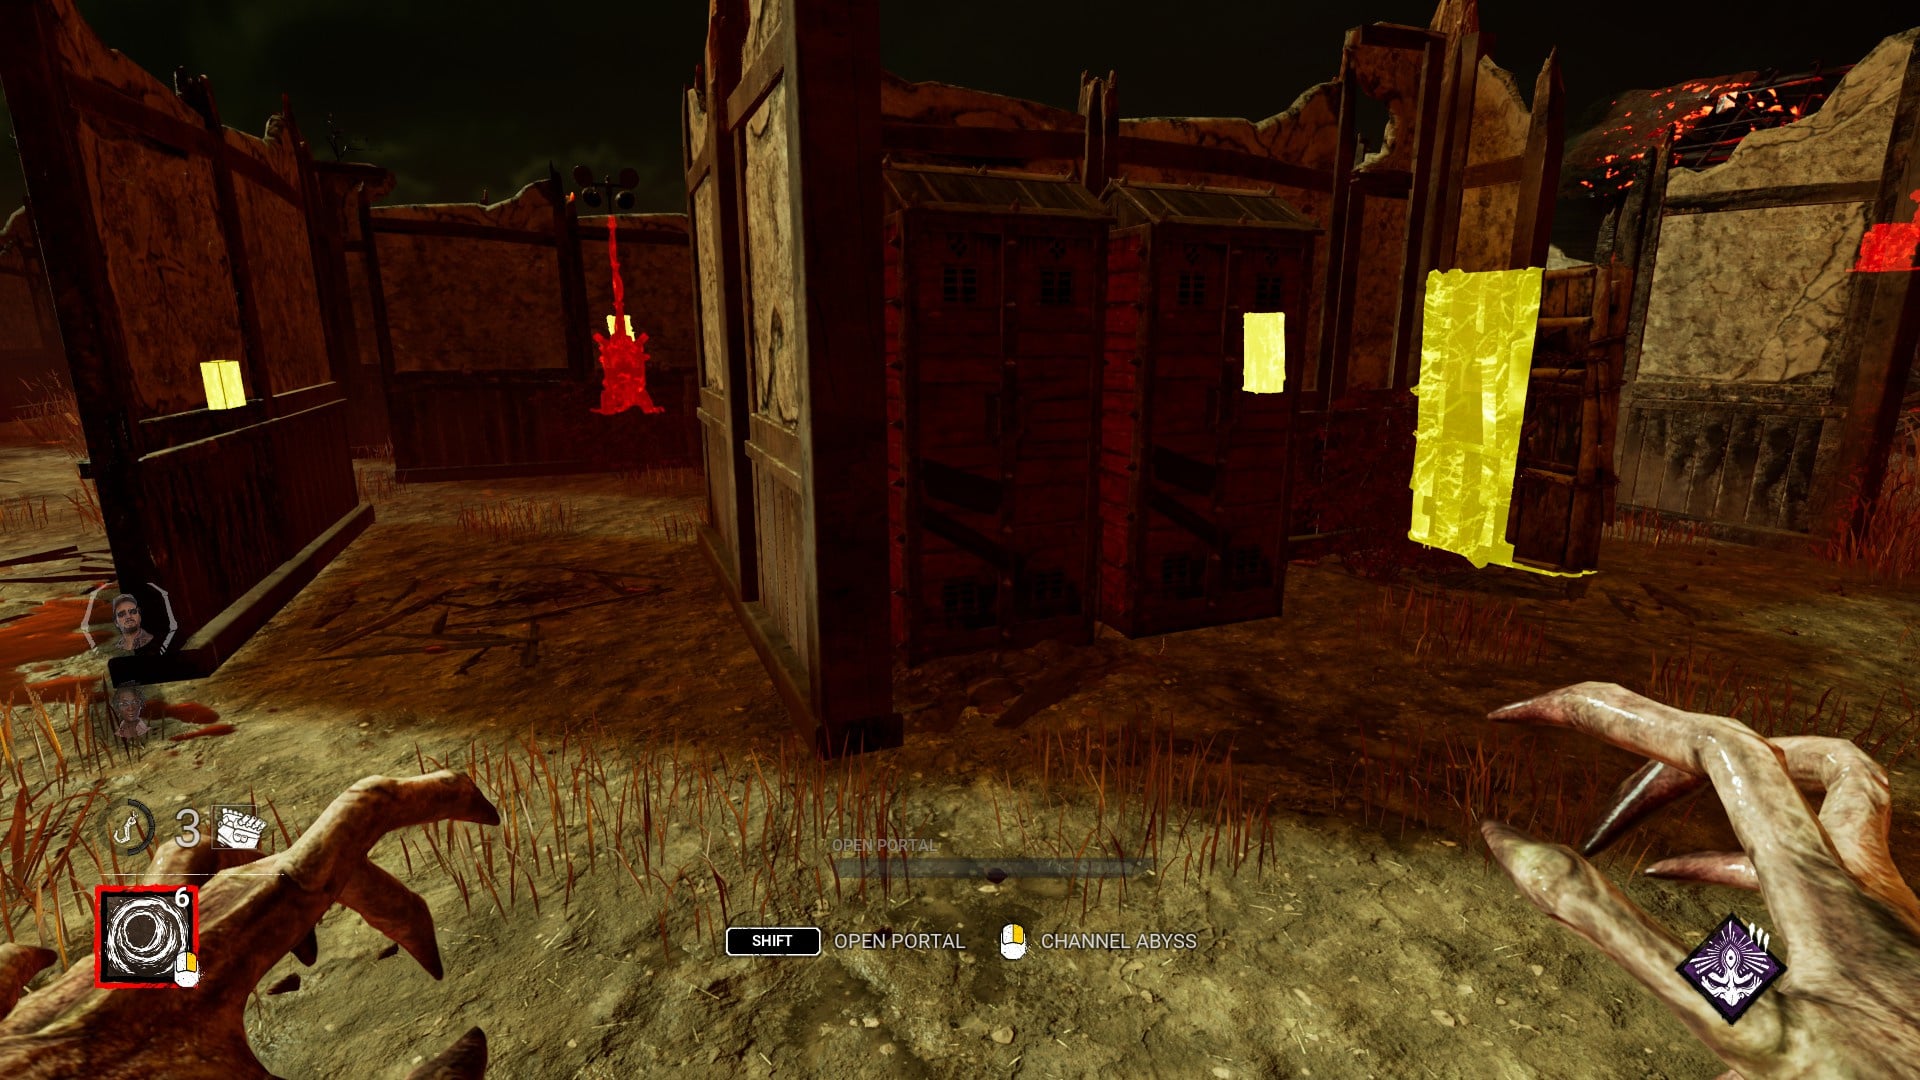
The Shattered Square needs to follow several changes to become more consistent and appealing: making the lightning of the map less intrusive for gameplay, adding the missing windows to the mazetiles that should have them, fixing the shadow issue with some walls like shack's, adding consistency to the house landmarks, weaking the stronger filler loops while increasing the pallet density to compensate.
The layout could be tweaked slightly to fit a 4th mazetile (solidifying the consistent predictable safety) and if necessary, main building could be relocated away from the corner, given that in the old version of the map it was never an issue for it to be adjacent to other structures (since the building is not particularly strong nor large so there wouldnt be any powerful set ups involving it).
-
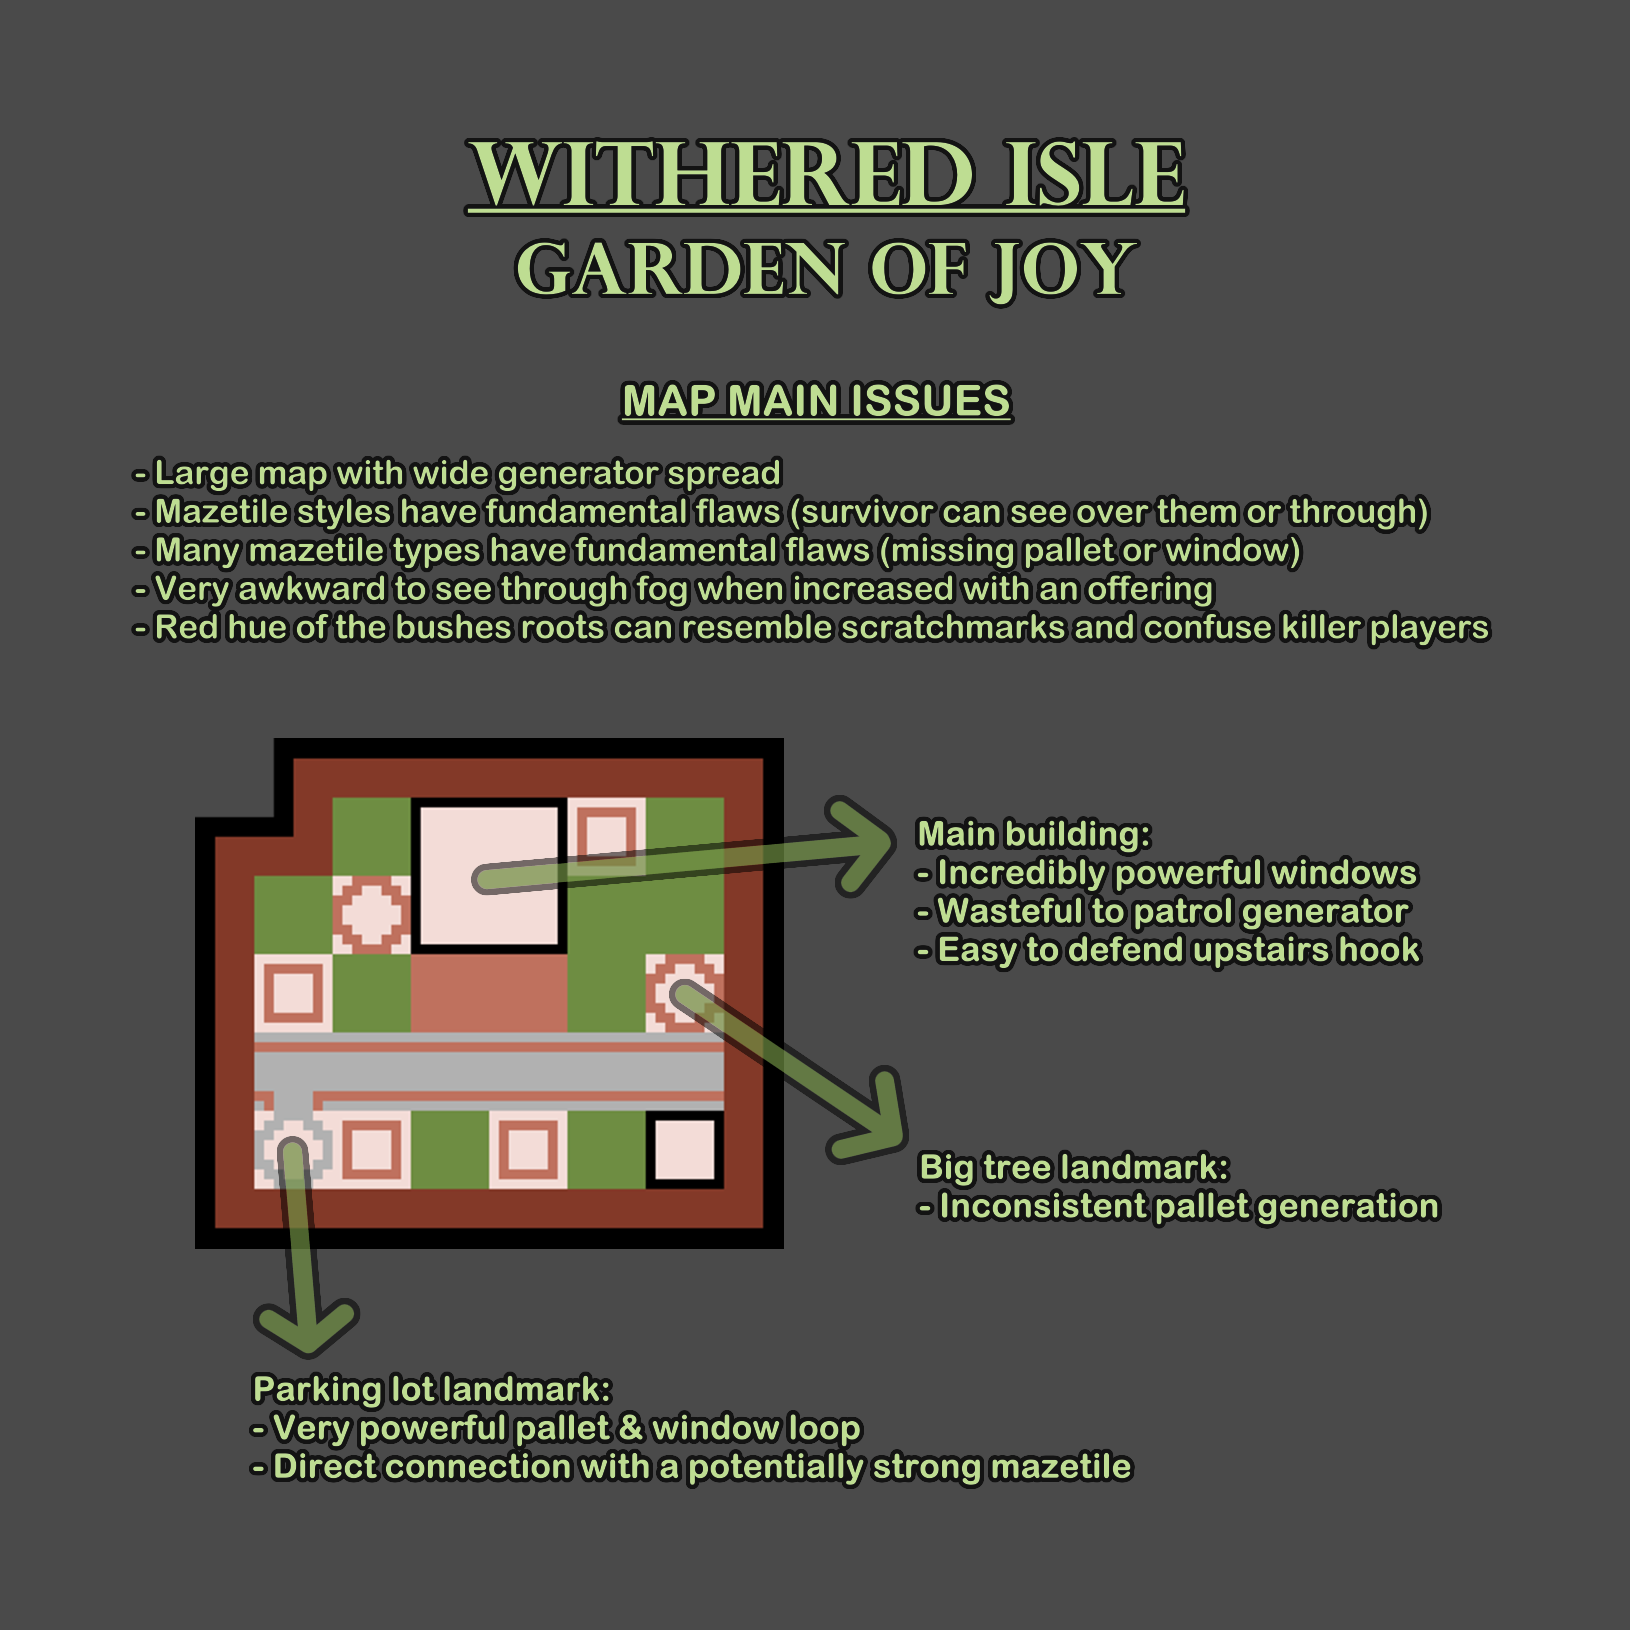
Garden of Joy is one of the most survivor favored maps and while the rework did some good changes, they were mostly subtle and didnt tackle the core issues of the map; unfourtunately there were also some very bad changes in the rework regarding the mazetiles. The good changes in the rework consisted of cleaning up clutter all around the map, including the shack which counted with some very intrusive objects that blocked killer powers; as well as nerfing most filler loops which stood out for being too safe and numerous.
The size of the map is too large and therefore the generator spread is awkward (specially with certain pairs of generators in the road that arose after the rework). The main building generator is hard to patrol which compliments with the size of the map. Main building counts with a very strong fixed window supported by a very strong fixed pallet; half the times there is a window at the front that is also incredibly problematic. The hook upstairs is very strong to defend since there is only one staircase to go up.
The parking lot landmark is fixed & specially powerful given its pallet & window with no mindgame potential and the fact it is connected to a mazetile that could perfectly create a set up with it. The big tree landmark, on the other hand, is rather inconsistent and doesn't always spawn its pallet.
Similar to Eyrie of Crows, the fog in this map can become troublesome when enhanced by offerings. The bushes all around the map count with roots that due to their hue can resemble scratchmarks and confuse killer players.
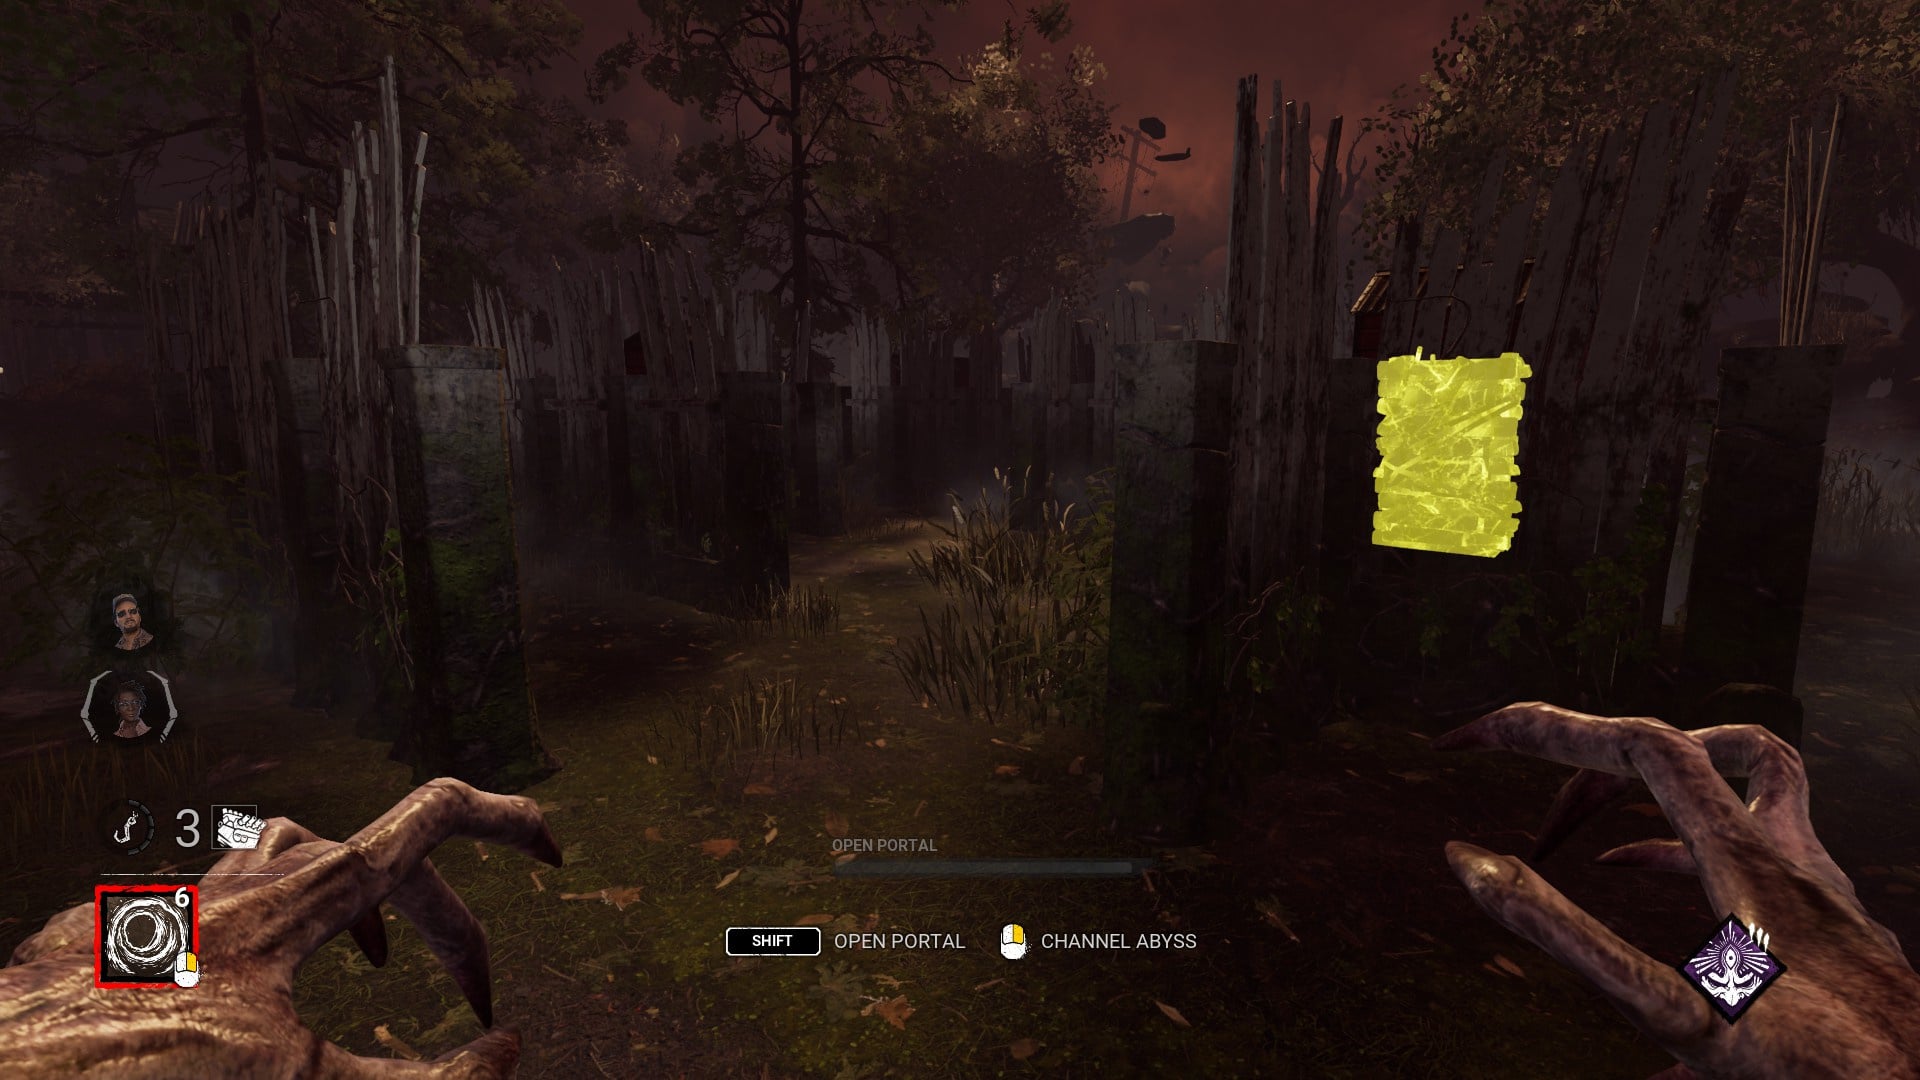
The mazetiles in Garden of Joy are special, they use not one but two styles of walls. The main building side gets thin, long and tall fences that are particularly easy to see through (the red stain is very noticeable through the wall), where as the shack side gets shorter, thicker walls of average length that the survivor can potentially see over to keep track of the killer. Both styles allow the survivors to potentially prevent mindgames.
In shack side there is a certain mazetile (commonly known as "variant gym" or "unique gym") that is missing its window on one of the two variations. This is not an isolated case since it all started with a bug in the Yamaoka Estate on the very same type of mazetile and variation missing the window. This bugged mazetile was used as base for its iteration in Eyrie of Crows, Garden of Joy and The Shattered Square. The bug got fixed in Yamaoka Estate, Eyrie of Crows and even in the main building side of Garden of Joy, yet it still persists on the shack side of the map (and in Shattered Square). The missing window creates a discrepancy in strength, it is not fun for the survivor and the tile itself was originally designed with a pallet and a window in mind.
From the 4 mazetile types in shack side and the 4 mazetile types in main building side, the rework changed 2 in shack side and 1 in main building side, not a single one being positive. The commonly known "labyrinth gym" or "maze gym" (also found in Ormond and Yamaoka Estate) got replaced in both sides and the pioneer and best iteration of the "impostor gym" (a mazetile that resembles a better known mazetile while introducing key differences) got replaced in shack side.
One of the 2 new types in shack side is a "pallet gym" that can have the pallet at either end of the loop (and it is specially troublesome because the survivor is immune to mindgames from any tall killer since they are seen over the walls). The other new type hardly resembles the most brand new mazetile from the Dvarka Deepwood realm and it is particularly unsafe, it is even missing its pallet on one of the two variations when the window is not even strong. Both new tiles are unfun for either one or both roles.
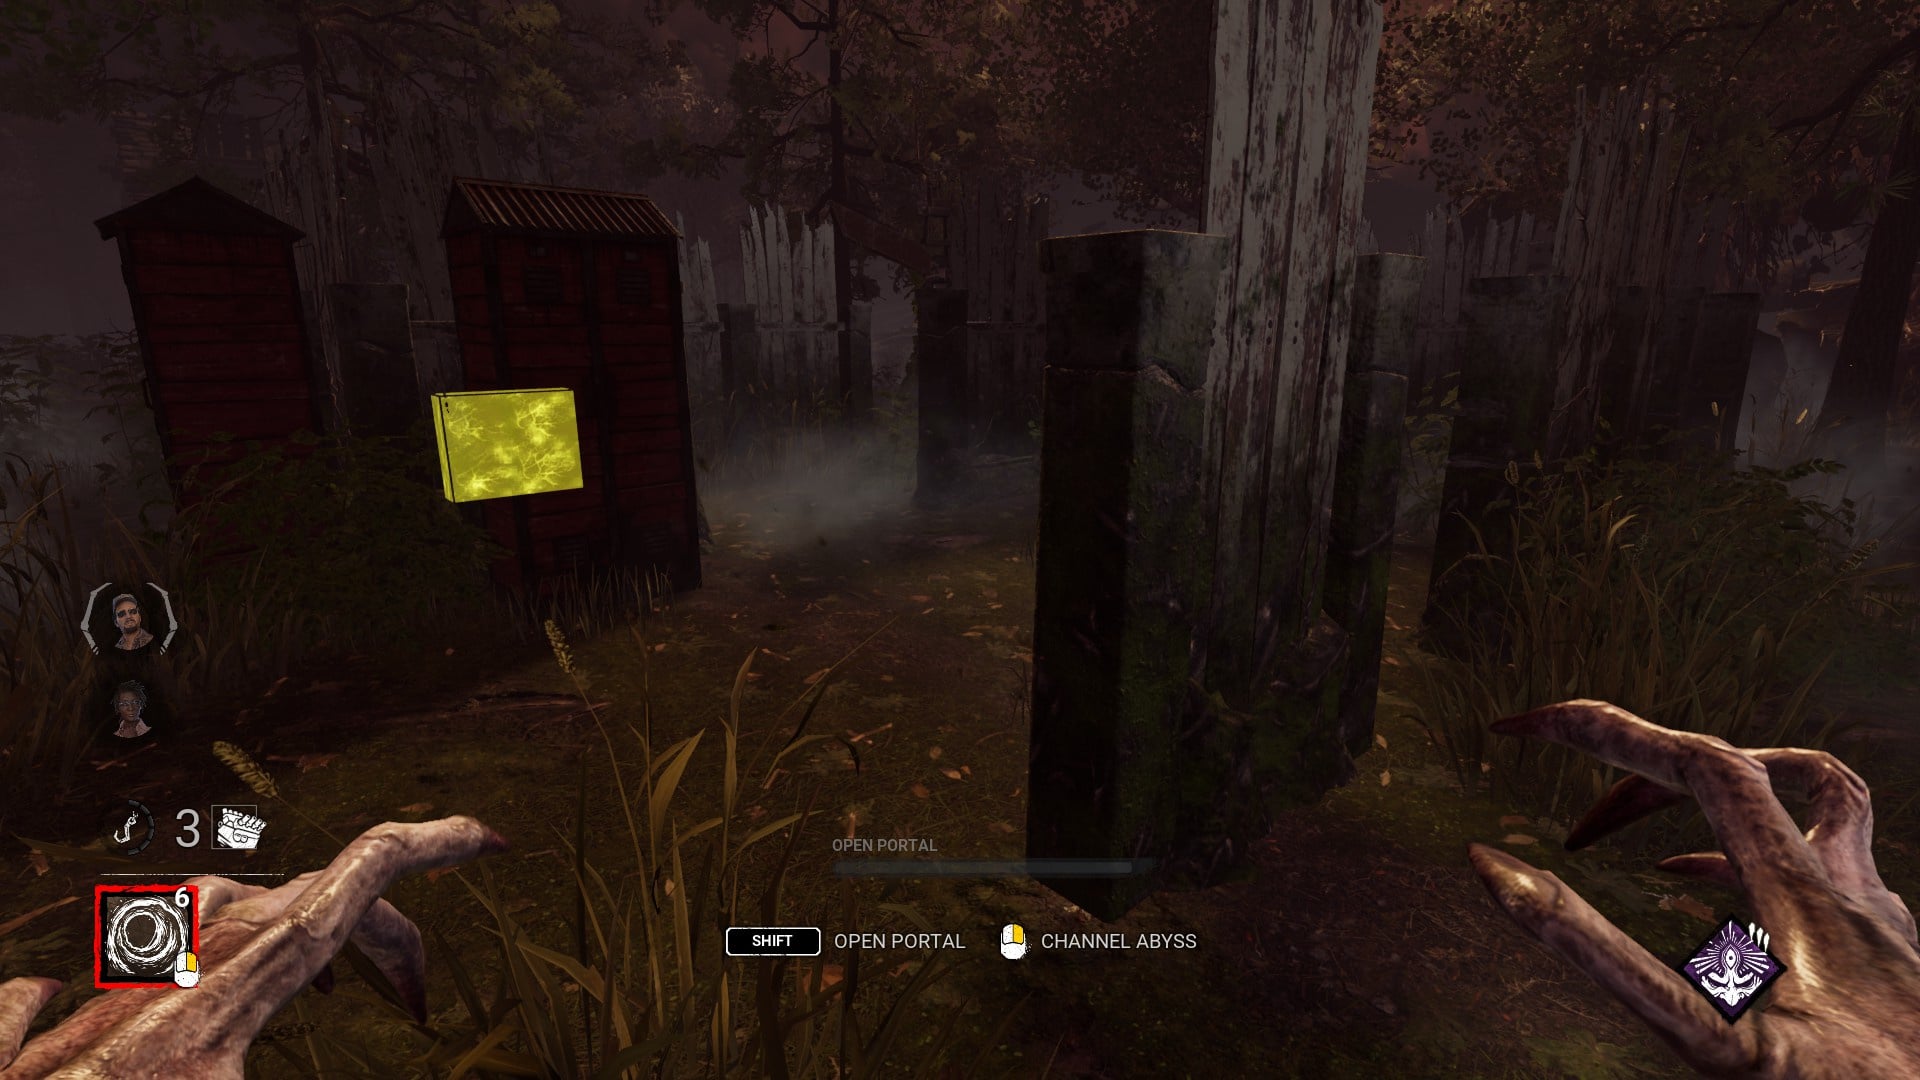
The new mazetile in main building side is the commonly known as "four lane" yet while the mazetile is usually not very strong by default (usually shines when the survivor has a solid headstart), it is specially awful in Garden of Joy, one variation is missing the window and therefore only having the pallet and then the other is straight up missing both the pallet and the window. Mazetiles are a beacon of predictable safety for the survivors and loops that the killer can mindgame, having these erratically weak mazetiles is not good design.
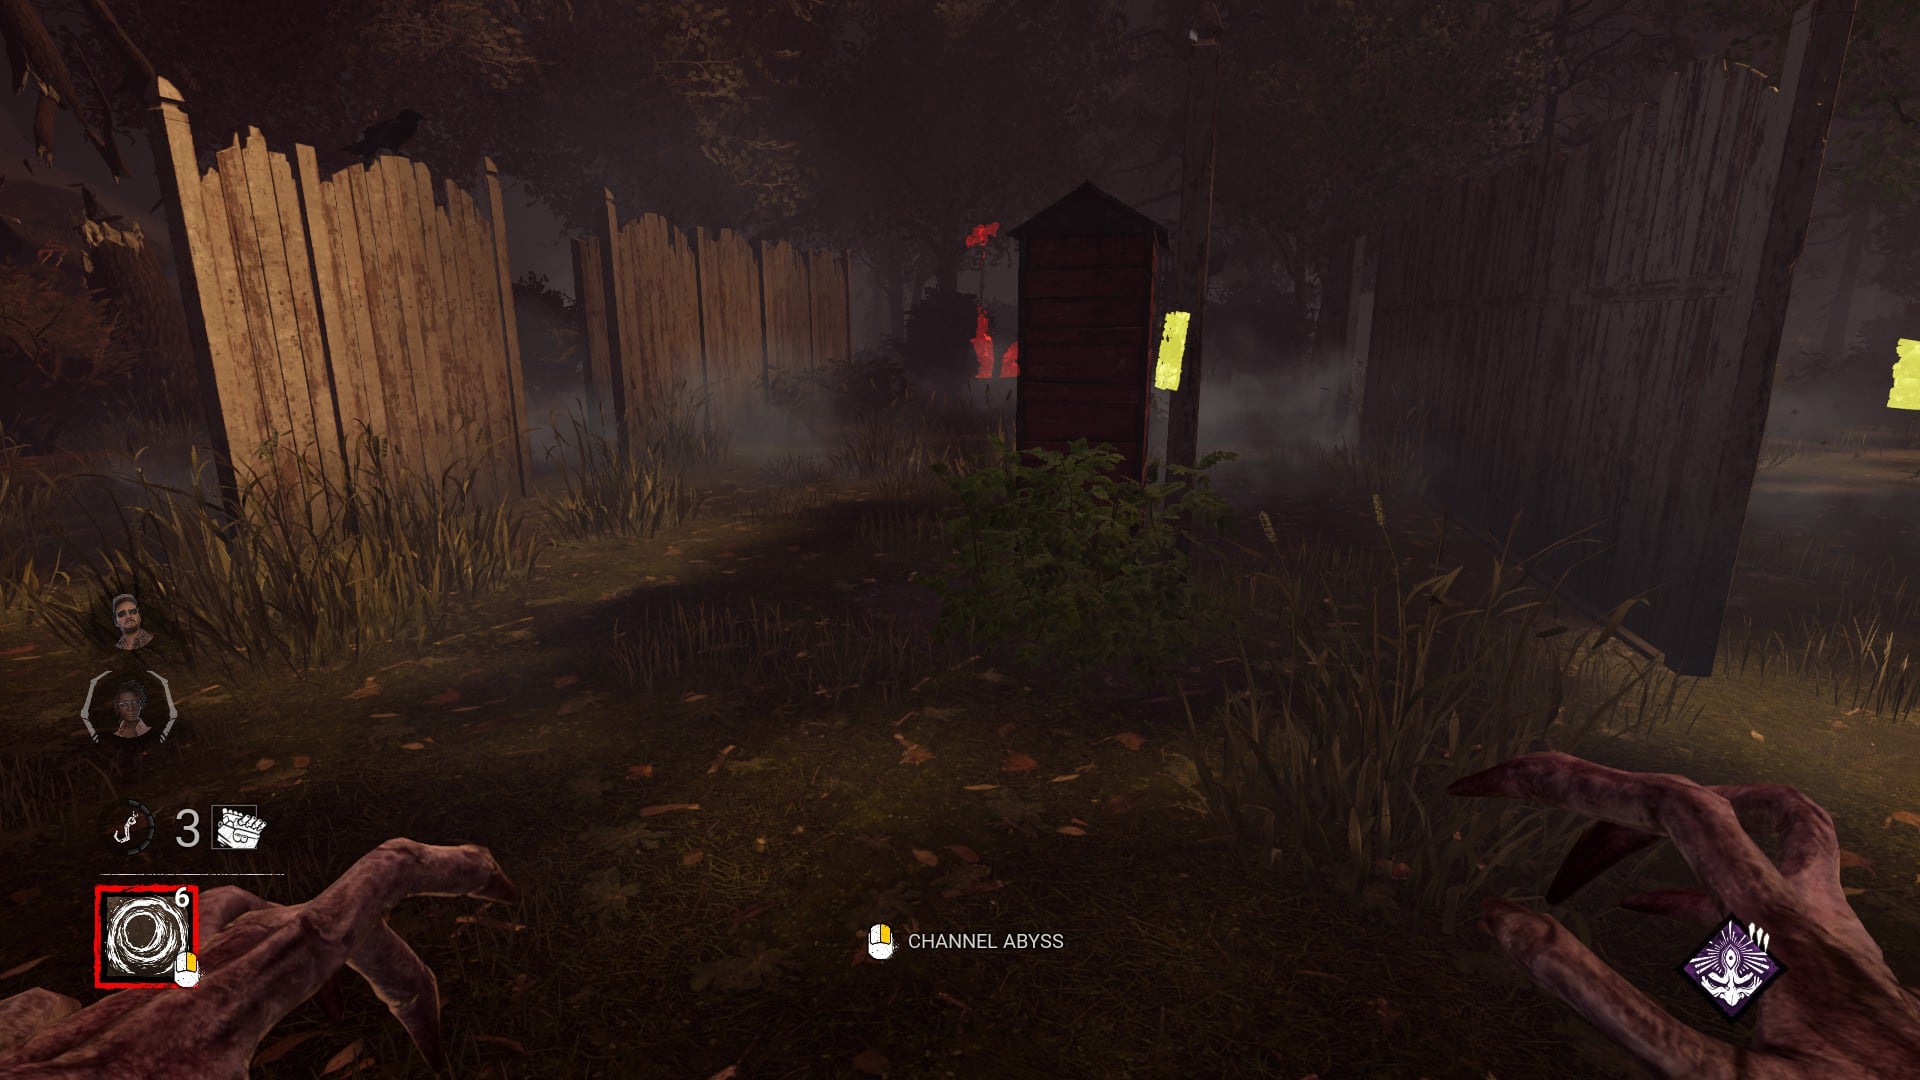
Garden of Joy should become smaller & main building needs adjustments on the two outstanding windows. The parking lot should at the very least not be next to a mazetile; the big tree landmark could become consistent with its pallet generation. The hue of the roots and the fog should be adjusted.
The mazetiles must remain as 4, ideally the 3 new types get reverted or redesigned; the missing window on the "variant gym" needs to get patched.
-
Raccoon City Police Station is a licensed indoors map that classifies as one of the worst designed realms in the game, and after its rework, the resulting maps combine the most unpleasant traits from each indoors map that preceded them. The intrusive over-saturated line of sight blockers that cripple so many killer powers from Treatment Theatre & The Underground Complex; the numerous, easy to use & very powerful pallets from The Game; and the awkward navigation from Midwich Elementary School that removes the ability to cut off survivors in chase & heavily enhances defending hooks by controlling the limited entrances.
All the amalgamated issues along with the incredibly fixed layout (where all the pallets have a few predictable spots & the one that may not spawn depends on the position of the pallet of the adjacent room) provide such powerful safety in which the killer can't cut off and gets their line of sight blocked most of the time; and the survivors can keep running and switching floors while making use of the resources in the way to extend the distance. With such uninteractive chases, most killers are heavily incentiviced to play into territorial tactics and / or follow alternative strategies of reduced interactions with the survivors.
The main hall counts with a very powerful pallet and possibly the strongest distance holder in the game, where survivors can make optimal use of their headstart while keeping track of the killer and leaving no room to get cut off. The open nature of the hall shuts down the potential for an ambush to a certain degree. Defending a survivor on the central hook while controlling the access to both wings of the map can offer a notable advantage to the killer.
The main gate outside section is a large scale distance holder where the survivors can force the killer into a time wasting long detour in chase if they count with a severe headstart. The generator that often spawns there is usually not worth patrolling and it is also hard to ambush. The hooks in this section can be very powerful to defend since it is very easy to control the entrances.
RPD West Wing can be considered survivor sided, since the chases are so one sided in the survivors' favor and the generator spread is quite wide due to both wings covering the whole length of the police department. The limited space of the East Wing still counts with the outside section of the main gate. The exclusive sections (at the West Wing) of this variant include very powerful pallets around the STARS office and also at the West Wing exit gate.
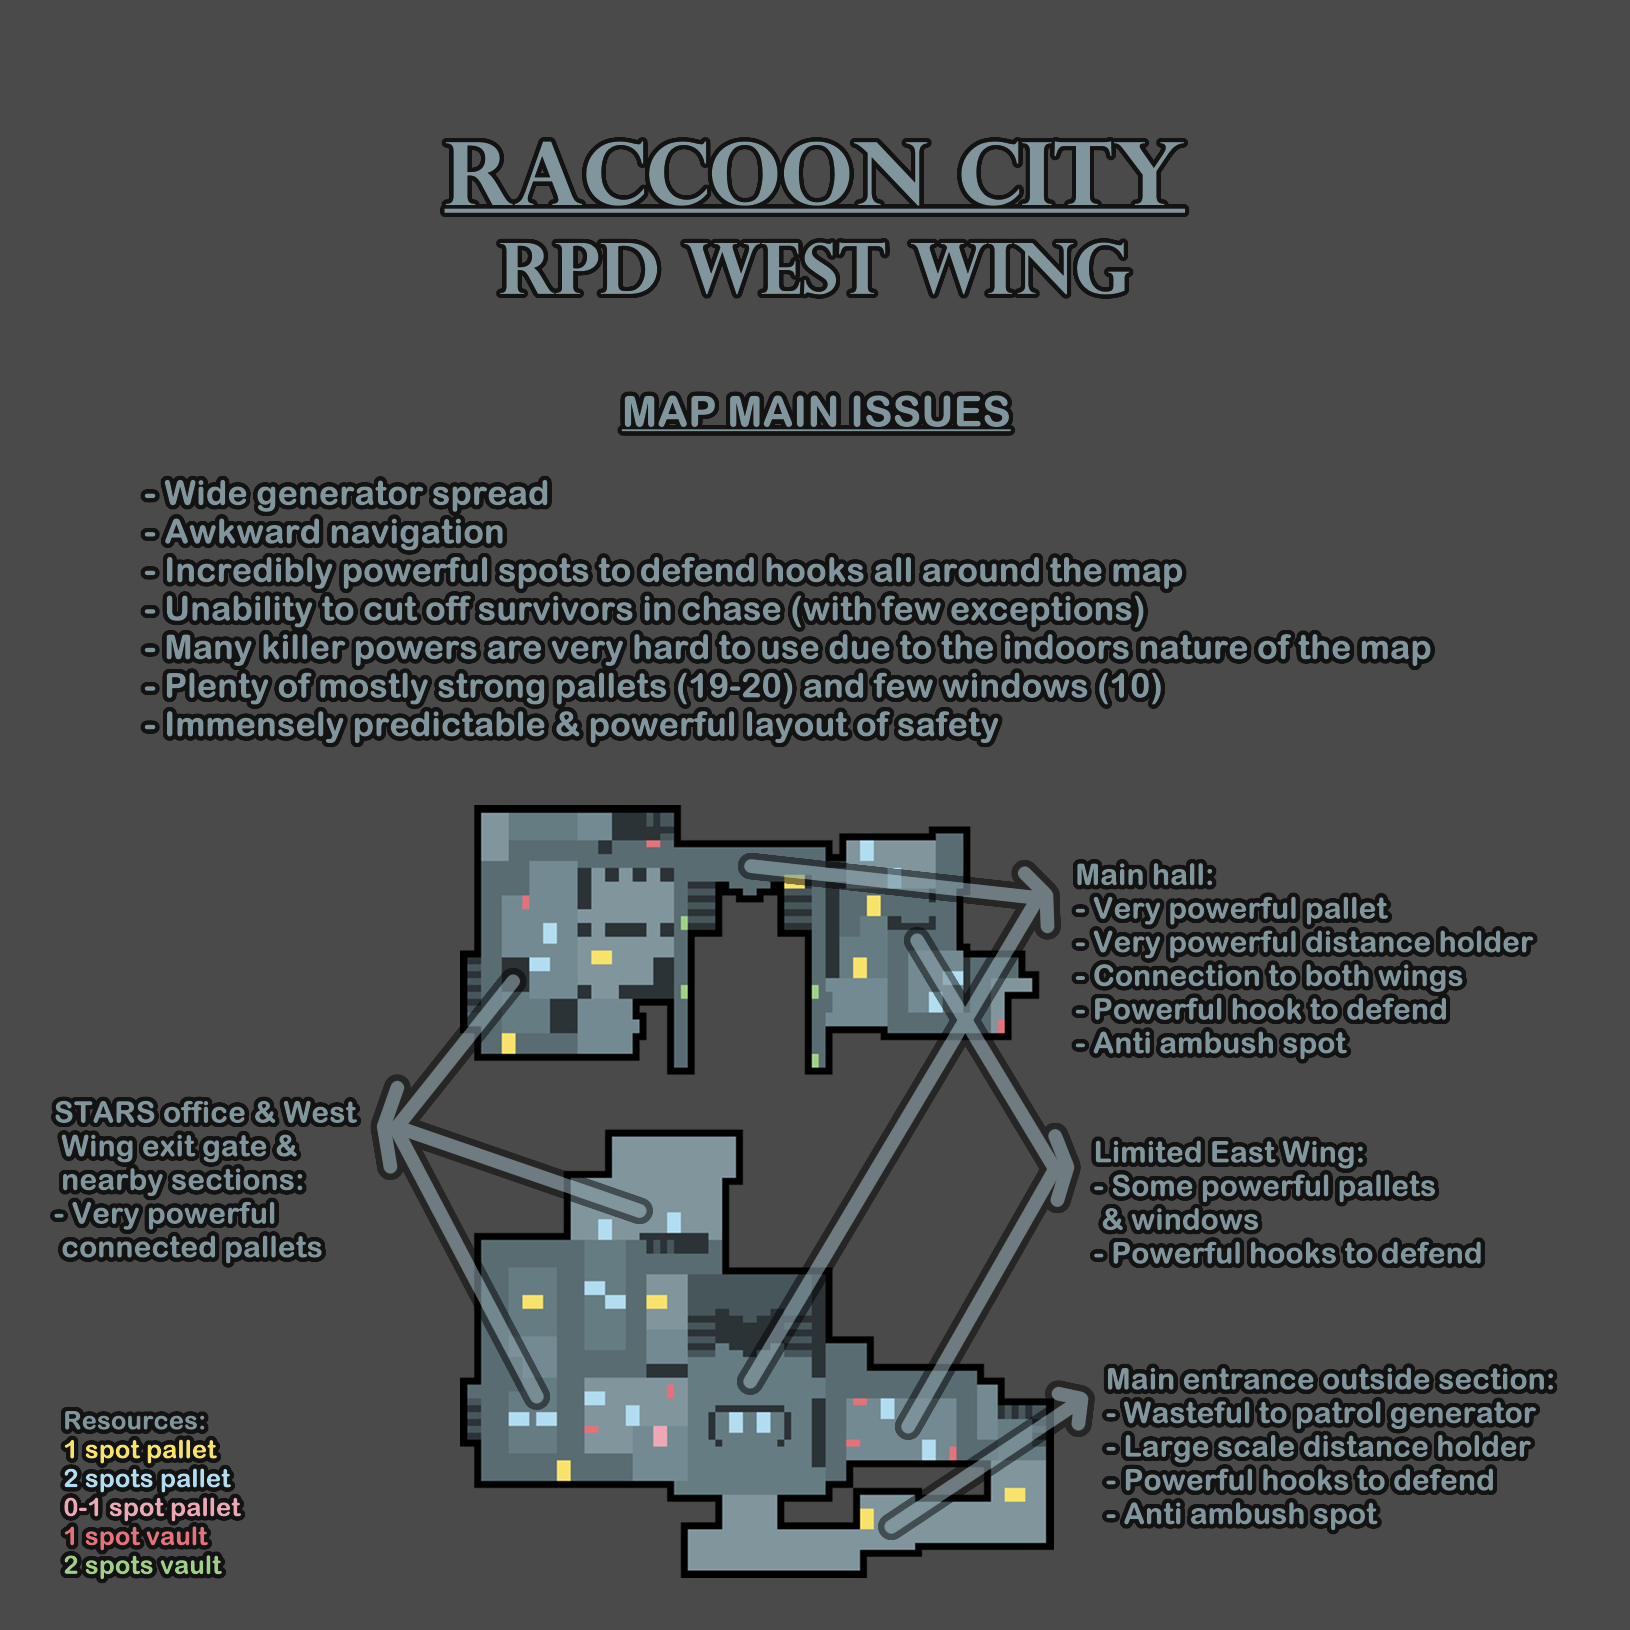
The issues of this realm are very hard to treat given the licensed nature of it, very creative solutions are required to mitigate the uninteractive gameplay that the map handles.
-
Raccoon City Police Station is a licensed indoors map that classifies as one of the worst designed realms in the game, and after its rework, the resulting maps combine the most unpleasant traits from each indoors map that preceded them. The intrusive over-saturated line of sight blockers that cripple so many killer powers from Treatment Theatre & The Underground Complex; the numerous, easy to use & very powerful pallets from The Game; and the awkward navigation from Midwich Elementary School that removes the ability to cut off survivors in chase & heavily enhances defending hooks by controlling the limited entrances.
All the amalgamated issues along with the incredibly fixed layout (where all the pallets have a few predictable spots & the one that may not spawn depends on the position of the pallet of the adjacent room) provide such powerful safety in which the killer can't cut off and gets their line of sight blocked most of the time; and the survivors can keep running and switching floors while making use of the resources in the way to extend the distance. With such uninteractive chases, most killers are heavily incentiviced to play into territorial tactics and / or follow alternative strategies of reduced interactions with the survivors.
The main hall counts with a very powerful pallet and possibly the strongest distance holder in the game, where survivors can make optimal use of their headstart while keeping track of the killer and leaving no room to get cut off. The open nature of the hall shuts down the potential for an ambush to a certain degree. Defending a survivor on the central hook while controlling the access to both wings of the map can offer a notable advantage to the killer.
The main gate outside section is a large scale distance holder where the survivors can force the killer into a time wasting long detour in chase if they count with a severe headstart. The generator that often spawns there is usually not worth patrolling and it is also hard to ambush. The hooks in this section can be very powerful to defend since it is very easy to control the entrances.
RPD East Wing can be considered balanced but for the wrong reasons, since the chases are so one sided in the survivors' favor and the generator spread can often be problematic with perimeters to defend. The limited space of the West Wing offers a very zonable terrain where hooked survivors and generators are easily controlled from the main hall, granting a tactical advantage to scheming killers. The exclusive sections (at the East Wing) of this variant include a very powerful window at the roof (where ambushes may be ineffective) along with several very powerful connected pallets. The interrogation room sometimes offers a very powerful to defend hook.
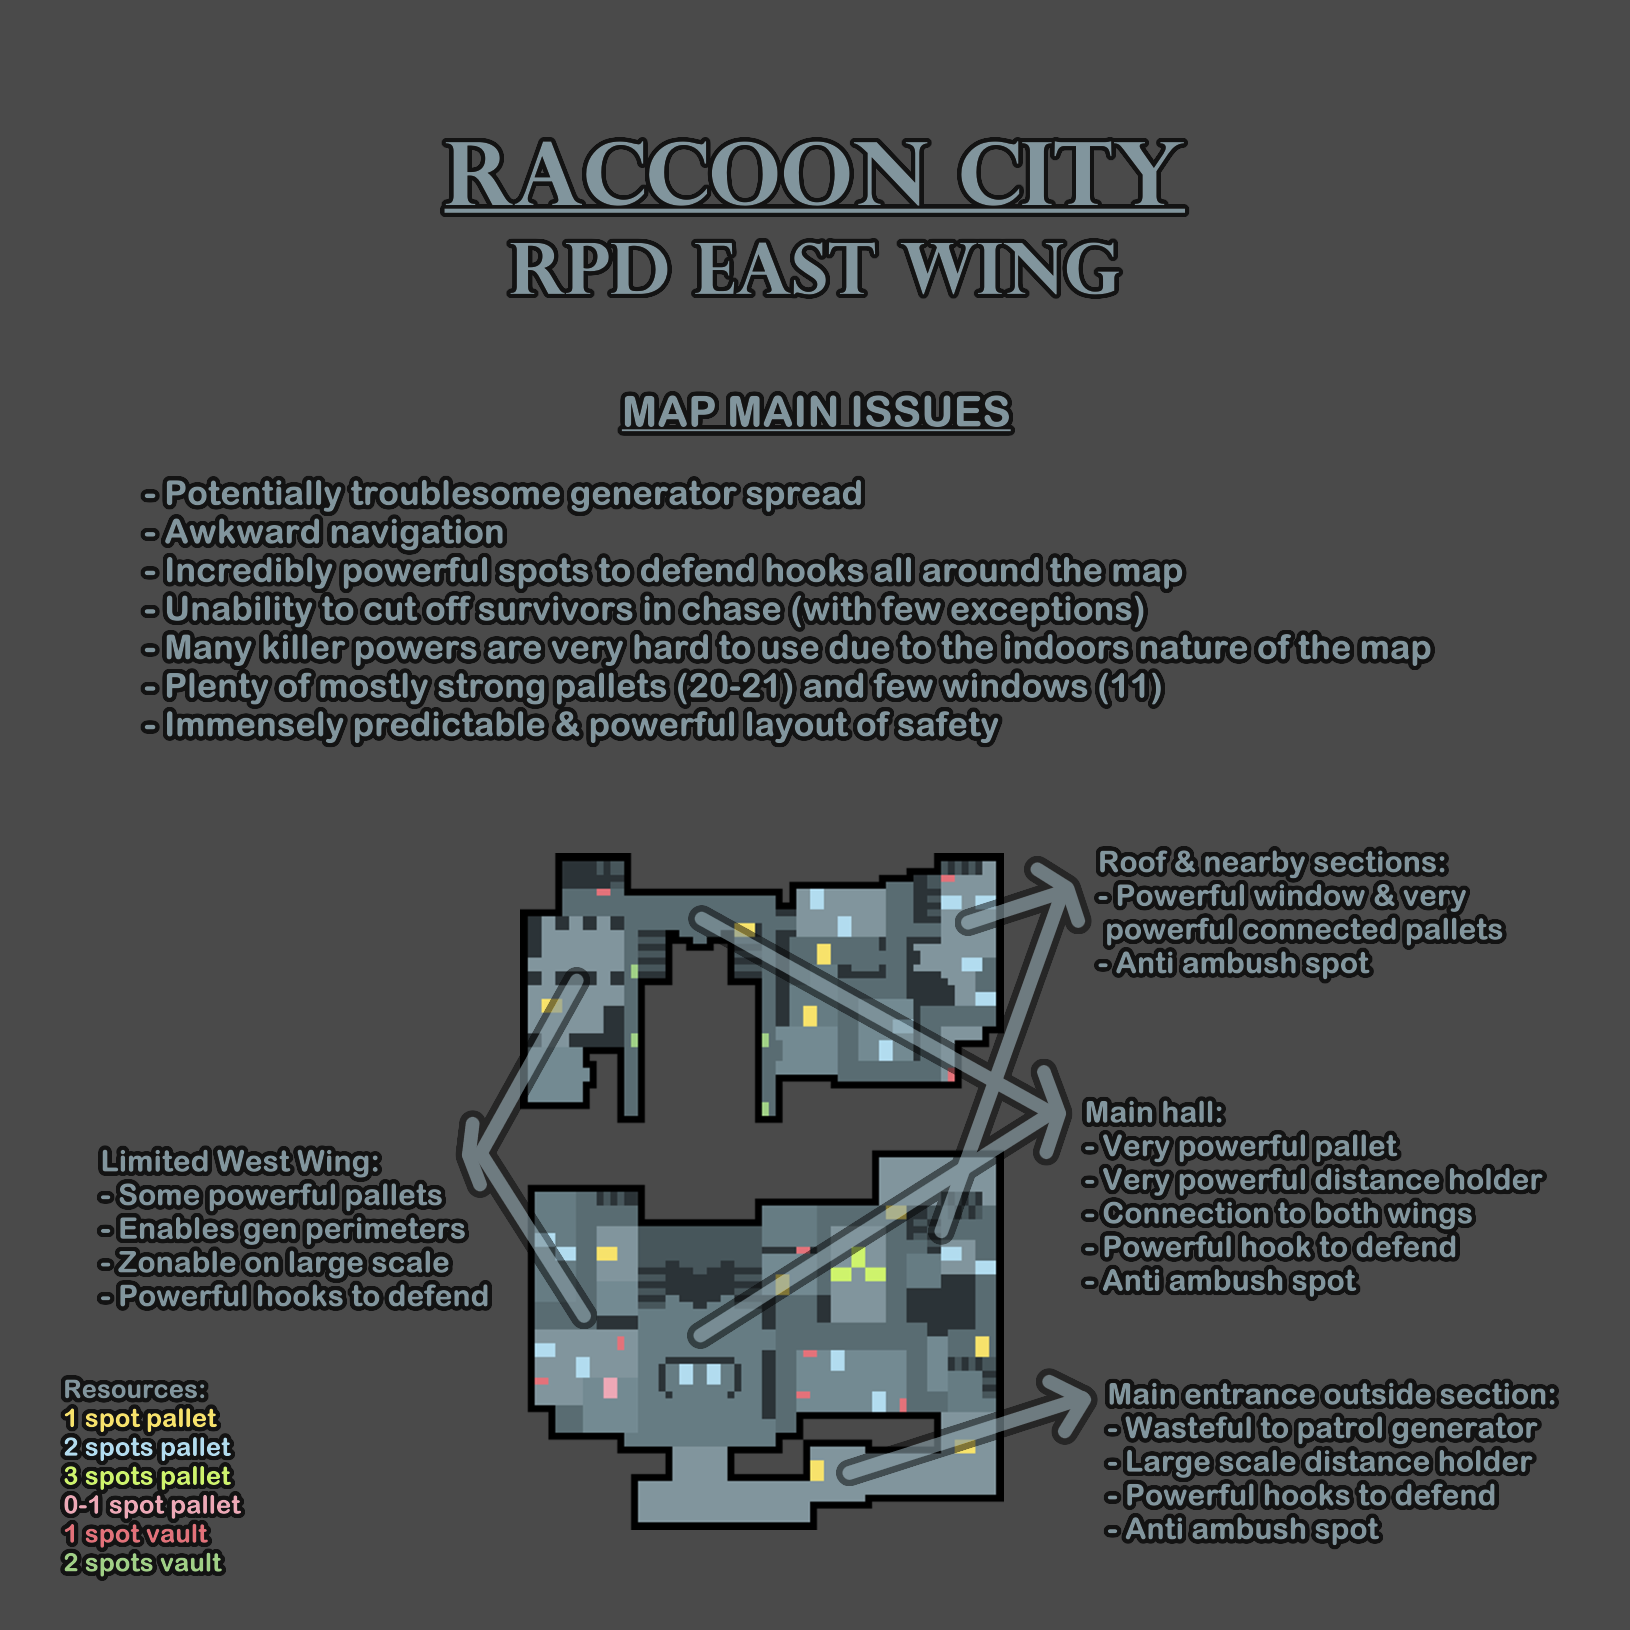
The issues of this realm are very hard to treat given the licensed nature of it, very creative solutions are required to mitigate the uninteractive gameplay that the map handles.
-
Midwich Elementary School is a licensed indoors map that is singlehandlely crippled by the ring shape of the map and the limited navigation it allows, favoring killer but usually not in a pleasant way. Like a few other indoors maps, it counts with numerous pallets (23-24) and some windows (8) but not that many of the pallets are safe (not a real issue). The safety is mostly fixed with very specific variables (staircase corners, classrooms columns and courtyard mazetiles) yet the shape of the map and the symmetrical display of the classroom sides can disorient even the finest survivors. The generators are hard to find and there are not many cues that ease the task.
The navigation to move around the map is highly limited, specially when going upstairs since only 3 corners count with a way up unless the killer breaks both walls at the toilets corner which is far from a common occurrence. This causes many issues such as favoring survivors that interfere with hooking, heavily favoring the killer when defending hooks (including basement) or completely determining the interactivity of chases. The survivors will run in straight lines without being cut off through the hallways (& switching floors if convenient) as long as they have headstart, sometimes gaining distance thanks to a few key resources or perks and then sticking to the available loops (mostly unsafe) when the killer catches up.
While other indoors maps often divide the killers somewhat evenly between those favored and unfavored, Midwich Elementary School favors many of the killers that are not compatible with the heavy line of sight blockers nature of the others. The hallways are used a lot during the chases and these killers get the opportunity to use their powers more freely and potentially disrupt the monothematic chase pattern of the survivors. Some other killers benefit from the hard navigation, chances for stealth tactics, multifloor mobility or tracking tools. Certain loadout specific tactics are also favored by the map.
While it may seem like the killers have an easy time all the time, against proficient survivors many can struggle and what really grants them the advantage in those cases is the tactic of defending hooks & holding the hallways that lead to them.
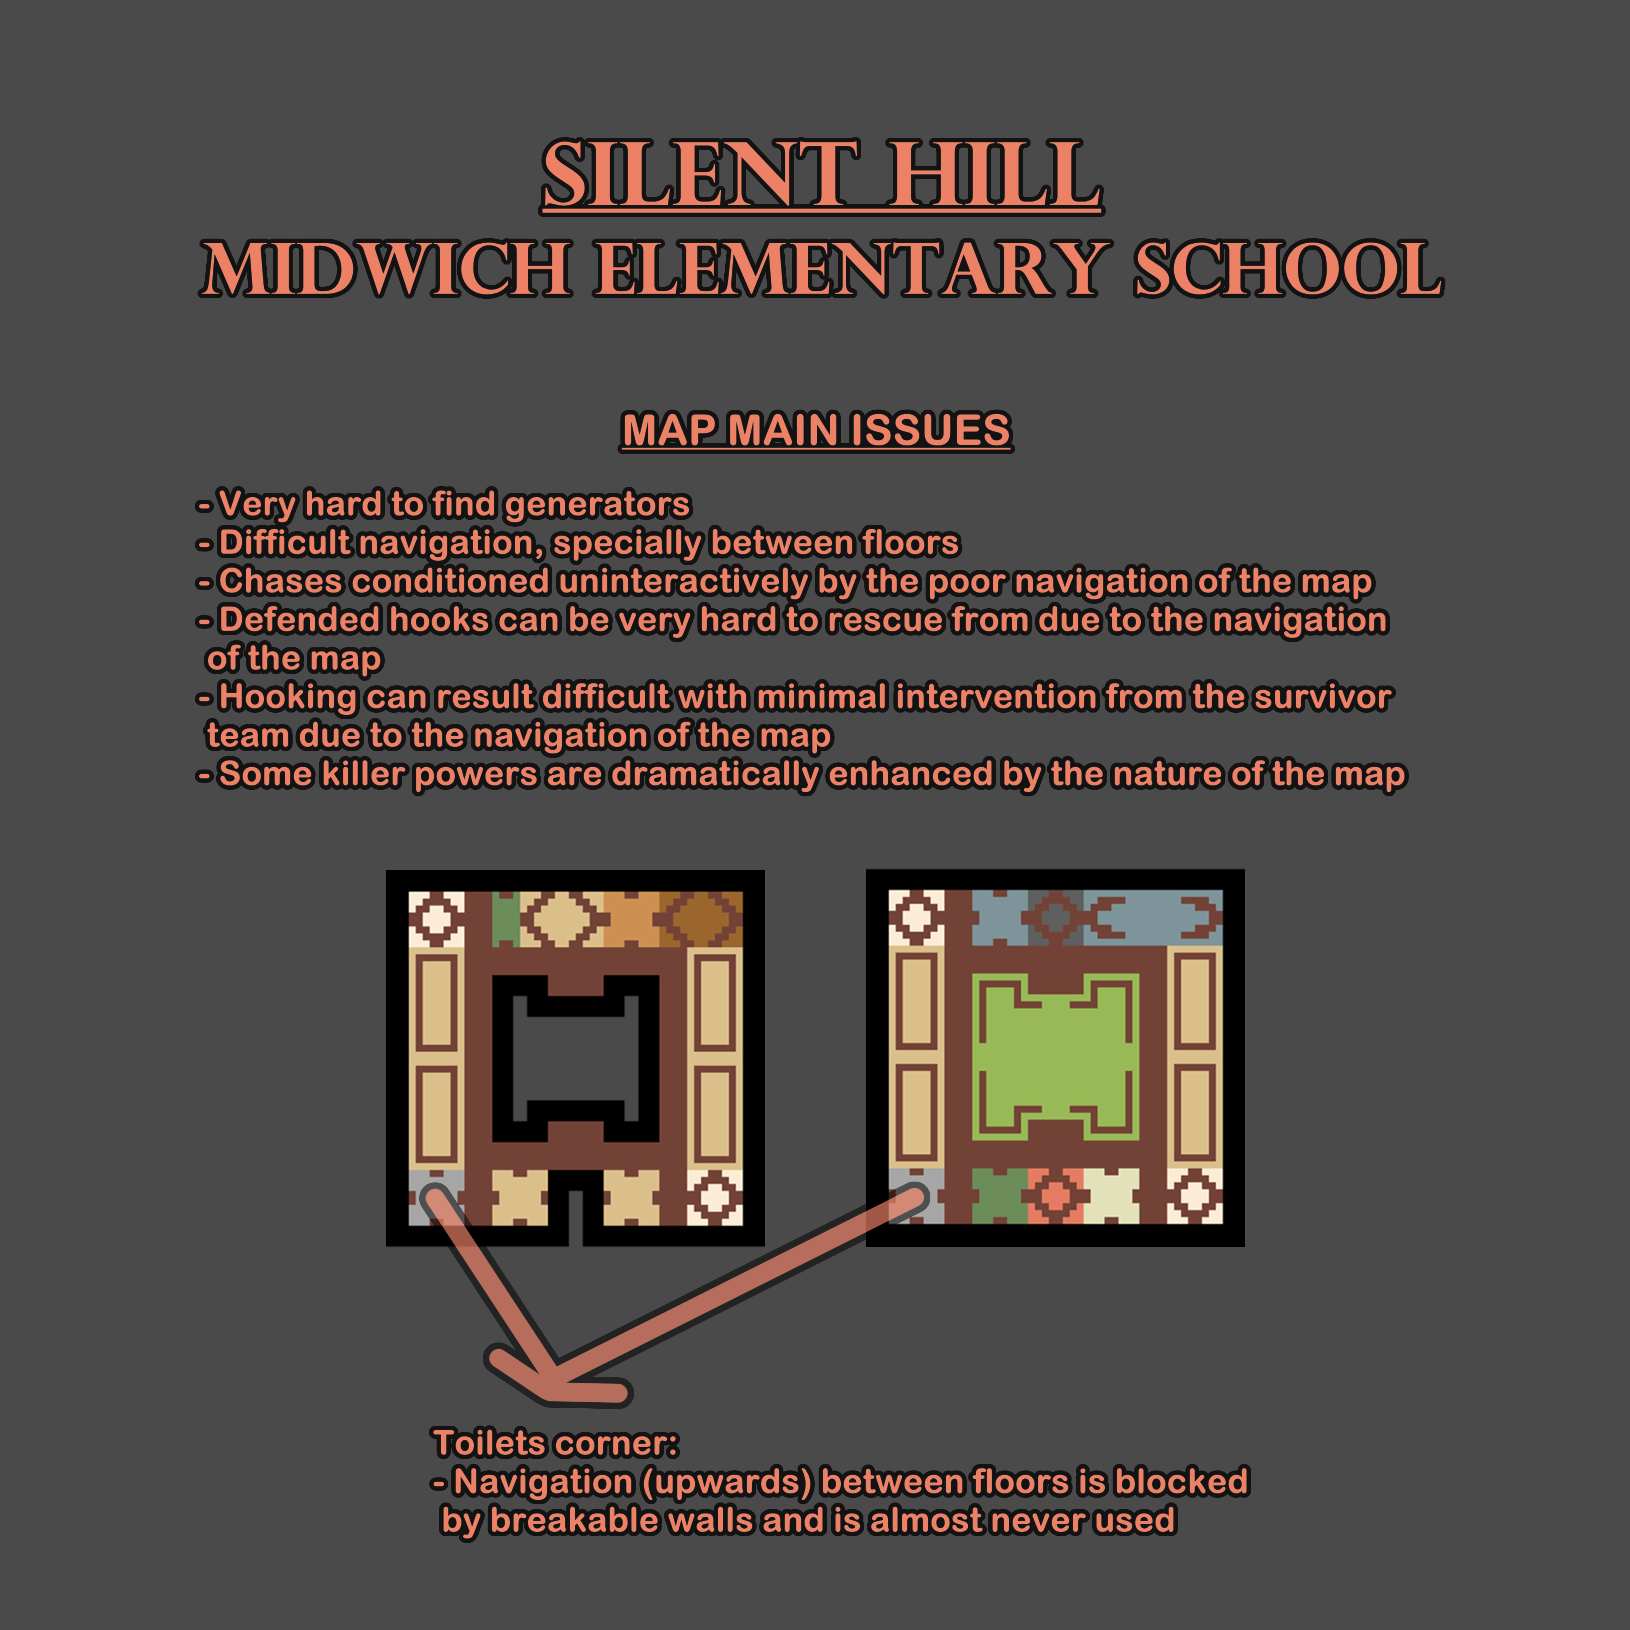
Most issues that affect Midwich Elementary School revolve around the poor navigation of the map, which is a simple yet very hard to fix problem, given the licensed nature of the realm, very creative solutions are required.
-
Eyrie of Crows is undoubtedly a survivor favored map that while being a lot better than the original iteration of the map when it comes to the shape and layout, the safety and miscellaneous issues of the map are the exact same or worse.
The filler loops are not just absurdly safe and easy to play (therefore uninteractive for the killer) but they are also linked together along with the rest of the safety. The mazetiles, while having very basic types, they stand out a lot strength wise due to the walls being long and thick (many spots for the survivors to wait at to prevent mindgames while not being seen themselves plus they gain extra distance upon vaulting windows due to the thickness). The middle counts with a very vast landmark (most of the graveyard) that always has 2 very safe pallets (two possible pairs, the pallets are matched diagonally), while not numerous, they consistently tie together the safety of the map.
The mazetiles, some filler loops and many other places including the open terrain count with twigs that have collision and become very intrusive for killer powers that have to account for environmental collisions. The rock loops and some rocks in other tiles are for the most part very awkwardly shaped and the navigation gets compromised by the collisions. Some of the smoother walls have an odd friction that slow down the players more than usual.
The main building counts with a very strong window that even after the breakable wall is removed it stays relevant with a very long loop around the outer wall of the building. The upstairs section is specially uninteractive, allowing the survivor to maintain their distance without letting the killer cut off, which not only is time wasting (if the survivor had a proper headstart) and highly recyclable but it also keeps the chase away from the rest of the map. The upstairs hooks are hard to rescue from and one of them doesn't always spawn, easily granting the survivors with unhookable spots (enhanced by certain loadouts).
The overall hook distribution of the map is very poor and easily exploited with offerings and specific loadouts. The fog is also particularly bad when enhanced by offerings, dramatically affecting the lines of sight. The lightning of the map is a bit too bright for the players' comfort.
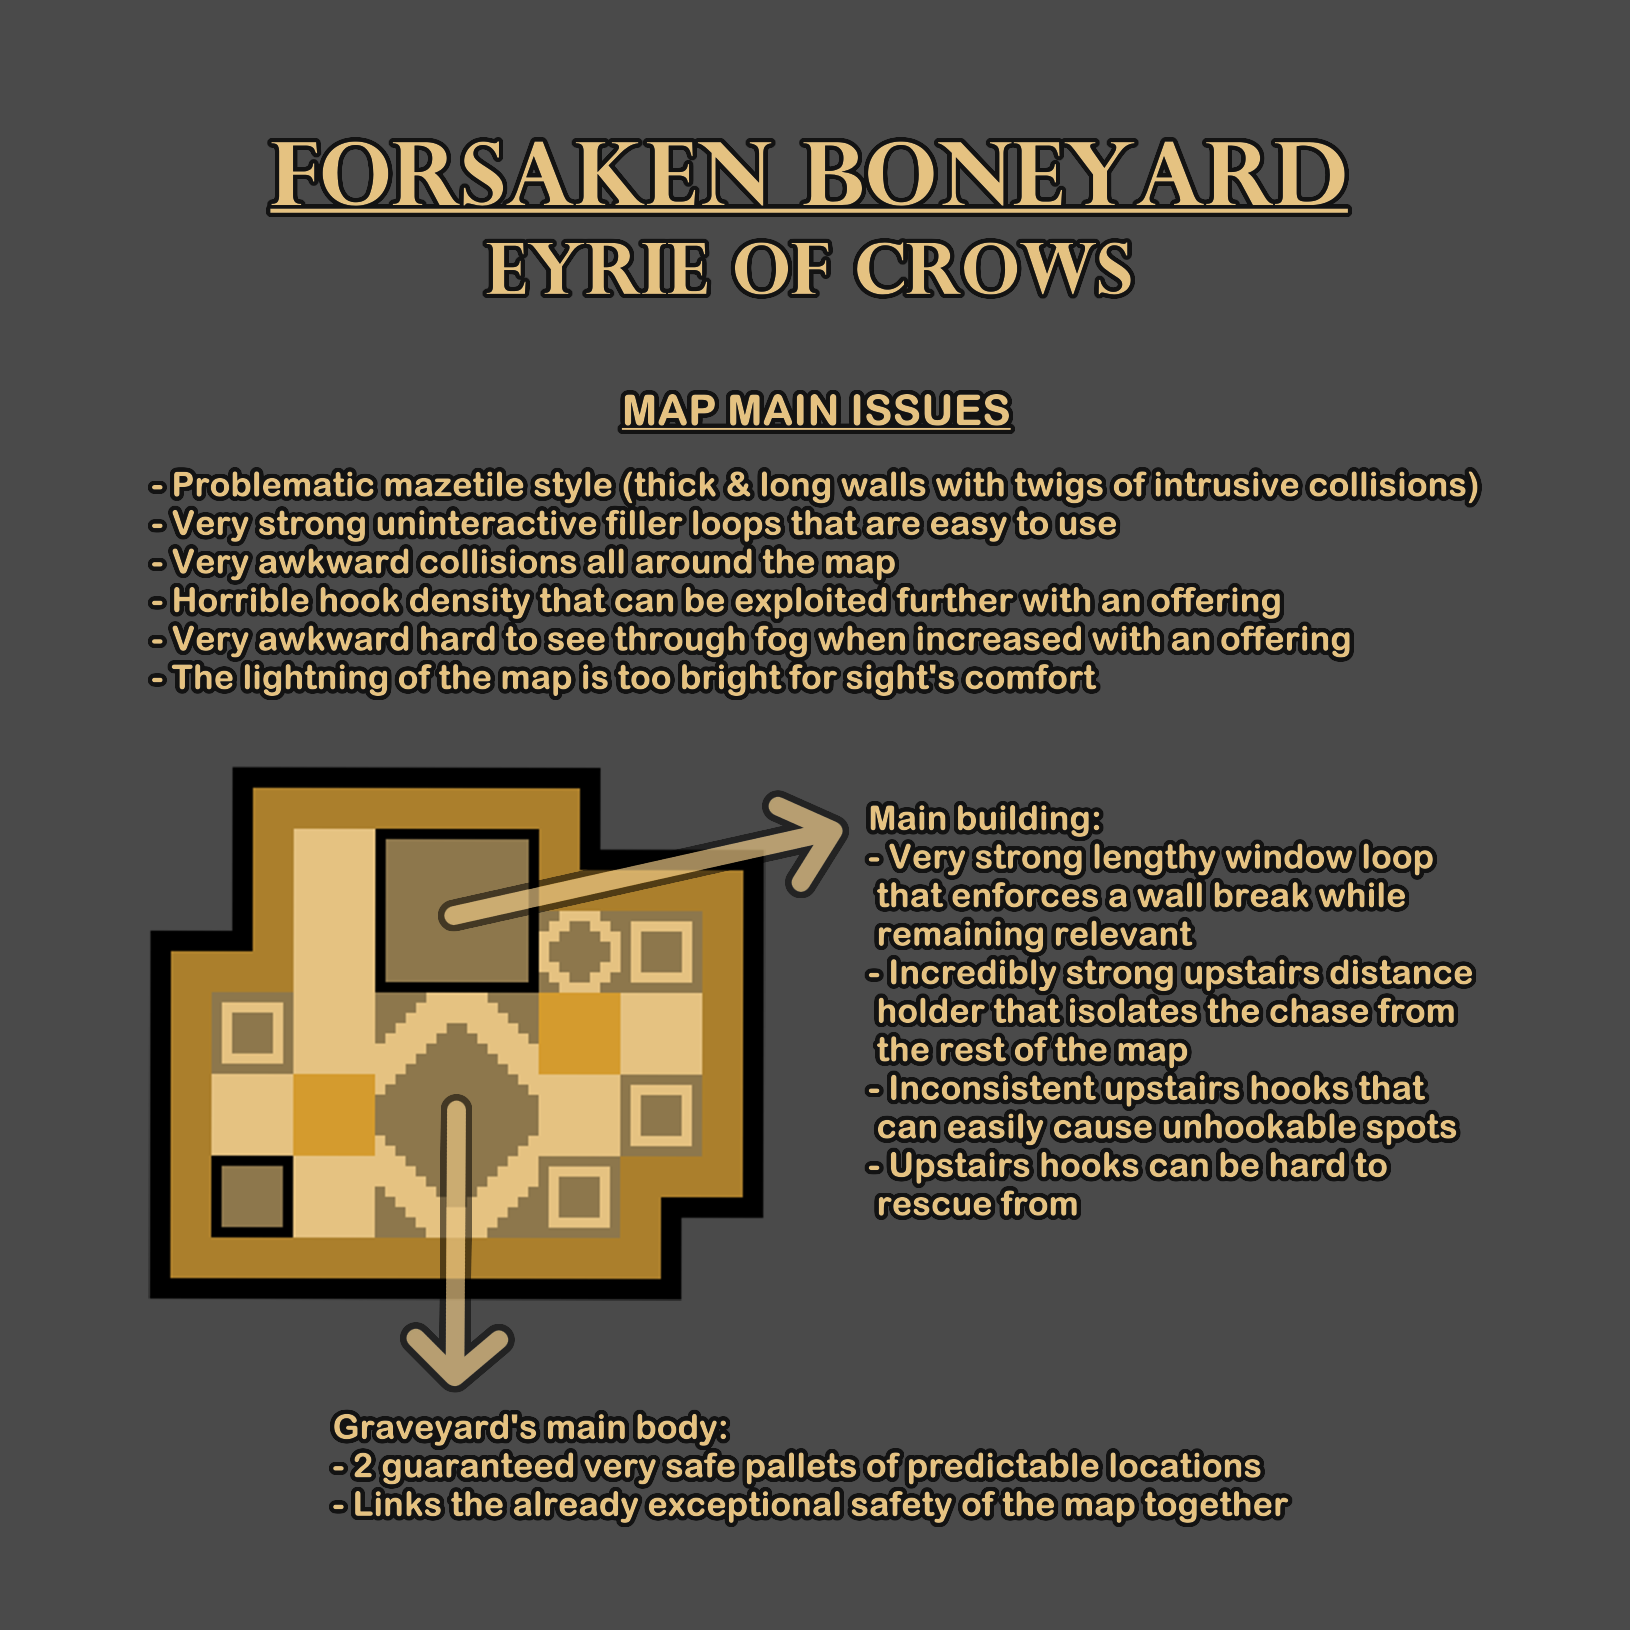
The map requires many changes regarding the safety of the loops, specially the rock filler loops; the pallet density could be increased slightly to compensate once the loops are more interactive. The main building needs several changes to be more fun and fair.
The collisions around the map should be revised and the twigs should receive the treatment that foliage usually has in other maps (not having collision). The hook density, brightness and fog should be adjusted.
-
Dead Dawg Saloon is considered one of the most balanced maps by many, it is quite the peculiar outdoors map so analyzing its issues is indeed harder. The two outliers of the map are the generators spread and the main building.
The main building has several very strong windows that require removing breakable walls and even then they are still troublesome. On the other hand it has 2 guaranteed pallets (in the front and in the back) and 2 that are inconsistent and don't spawn all the time. The generator is not worth defending as most killers, unless it is done remotely through certain perks.
The generators don't always spawn in a predictable pattern, sometimes there are quite many on platforms, sometimes you only see the ones in main building and gallows elevated; sometimes there is even a generator in the middle of the road between shack and main building. The biggest problem is found in the filler loop area near gallows, where a perimeter of generators can be defended sometimes, but with the recent update to combat such strategy maybe the greater evil is oriented towards how easy it is to defend a hook from afar in that area that is so open and cornered. The road is also a relevant hook defending spot where many territorial playstyles flourish around.
The shack has several gaps that allow the survivor to keep track of the killer and prevent mindgames. On the same note, there is a non sloped step around the outer corner of shack that is near the road and gallows, which gets players of both roles stuck at times. While most pallets aren't completely safe, the fact that the killer has to break so many walls adds up like if they were breaking safe pallets.
The many bushes that can be found around the map allow very passive and uninteractive stealth playstyles from the survivors, which can be a problem depending on the killer's tools.
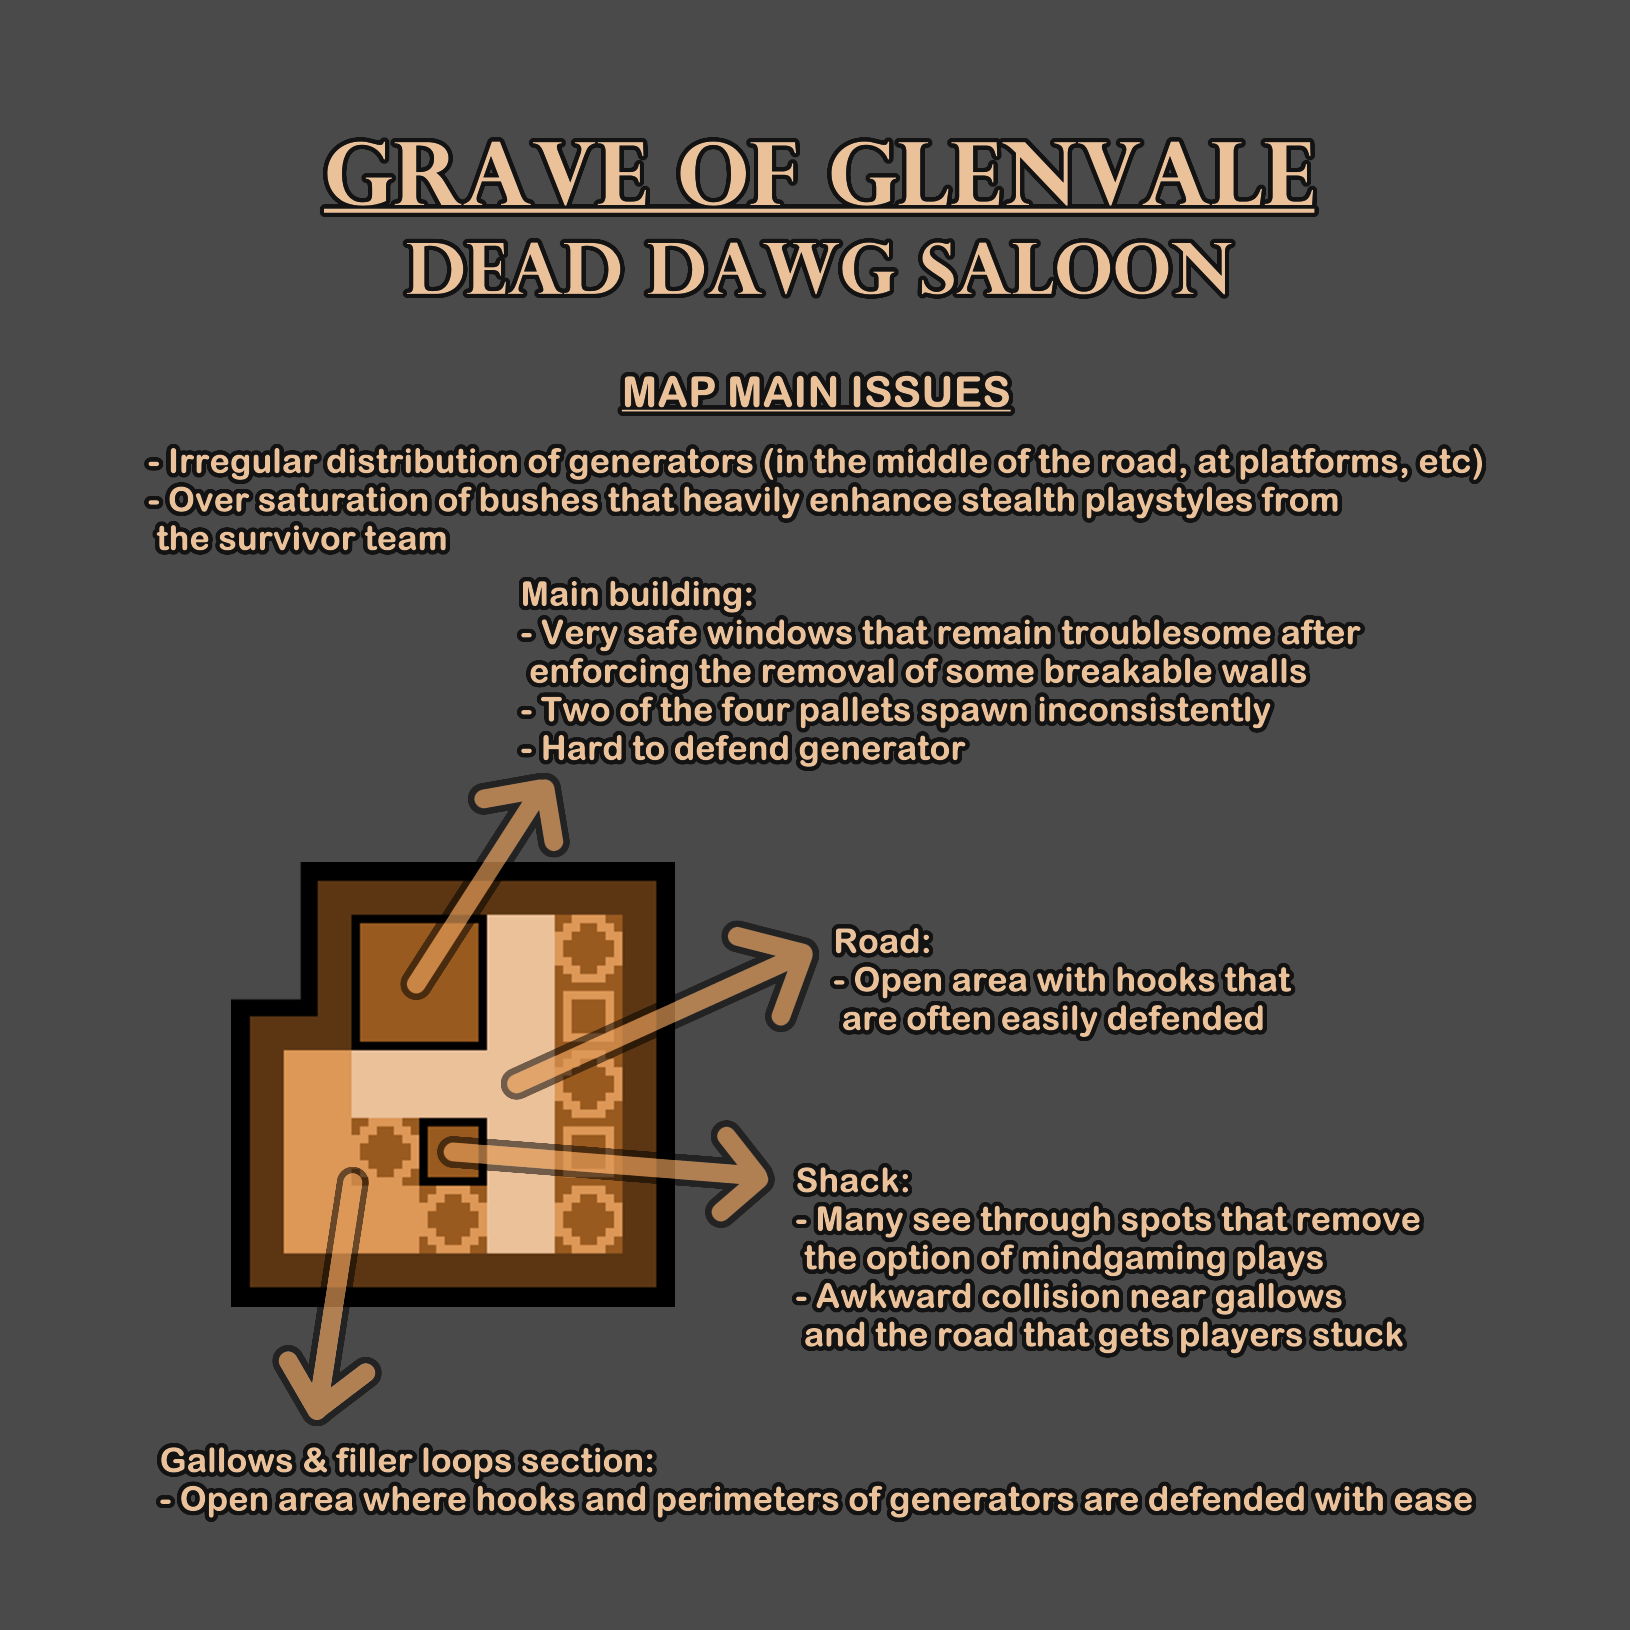
Main building could receive some adjustments that make the windows more interactive and it could also get all 4 of its pallets guaranteed instead of leaving two of them to luck. The shack should get its minor issues addressed.
The area around gallows could maybe get some structure like a mazetile to reduce the hook-gen defending strategies around it. The over saturation of bushes should be reduced.
-
The Game is a licensed indoors map that stands out for its overwhelming amount of connected safe pallets, it counts with 25 pallets and over 20 of them are either safe or they can be under the right circumstances. Unlike Treatment Theatre and The Underground Complex, the killer powers are not so crippled or conditioned by the excess in line of sight blockers (which are still relevant to an extend) but instead the absurd amount of safe pallets which defines a line between the killers that can contest hits at them and those who can't, as well as those who have tools to break the pallets faster. Some killer powers oriented for out of chase interactions can use powerful strategies in this map to play around the high density of safe pallets.
The area around the bathroom and the control room above it is specially powerful, since the tile generation is quite specific and the bottom floor of the columns (what is on the upper floor is connected to what is on the lower floor) adjacent to bathroom / control room are composed by purely safe pallets of which 2 are guaranteed (the one at the jungle gym and the one below the tile connected to the exit gate) and are very likely to connect with the 2 guaranteed safe pallets next to the bathroom (which could potentially be linked from the control room which counts with 2 more safe pallets that can be looped safely for some time before dropping them). The fixed basement in that area can turn the tables against the survivors given how potentially easy it is to defend.
The generators spawns are very irregular and can have very uneven distribution between the upper and lower floor, which can cause many dead ends downstairs (since there is always a sliding door blocking the path next to gens) where survivors can't identify them from afar. The excess of generators in the same floor can also create favorable perimeters of generators as well as powerful to defend hooks.
While it may seem less apparent, there is still some skill expression for the survivors to show, since the map counts with a very limited amount of window vaults (only 7, and 2 of them don't get used most trials) and wiser killer players will bounce between survivors to drain the resources until there are several deadzones where survivors have no pallets left. The more proficient survivors are able to avoid spending the pallets as quickly and also use the lower floor's line of sight blockers more aggressively against those killers that excel at dealing with the safe pallets; as well as switching floors at the more convenient times to counter other killer powers. This is not a justification for the map's flaws but rather a reminder that even some of those killers that would normally perform well in the map can also struggle.
The upper floor counts with a very poor distribution of lockers. The hook density can sometimes be very awkward and cause a wiggle out with minimal interventions from other survivors.
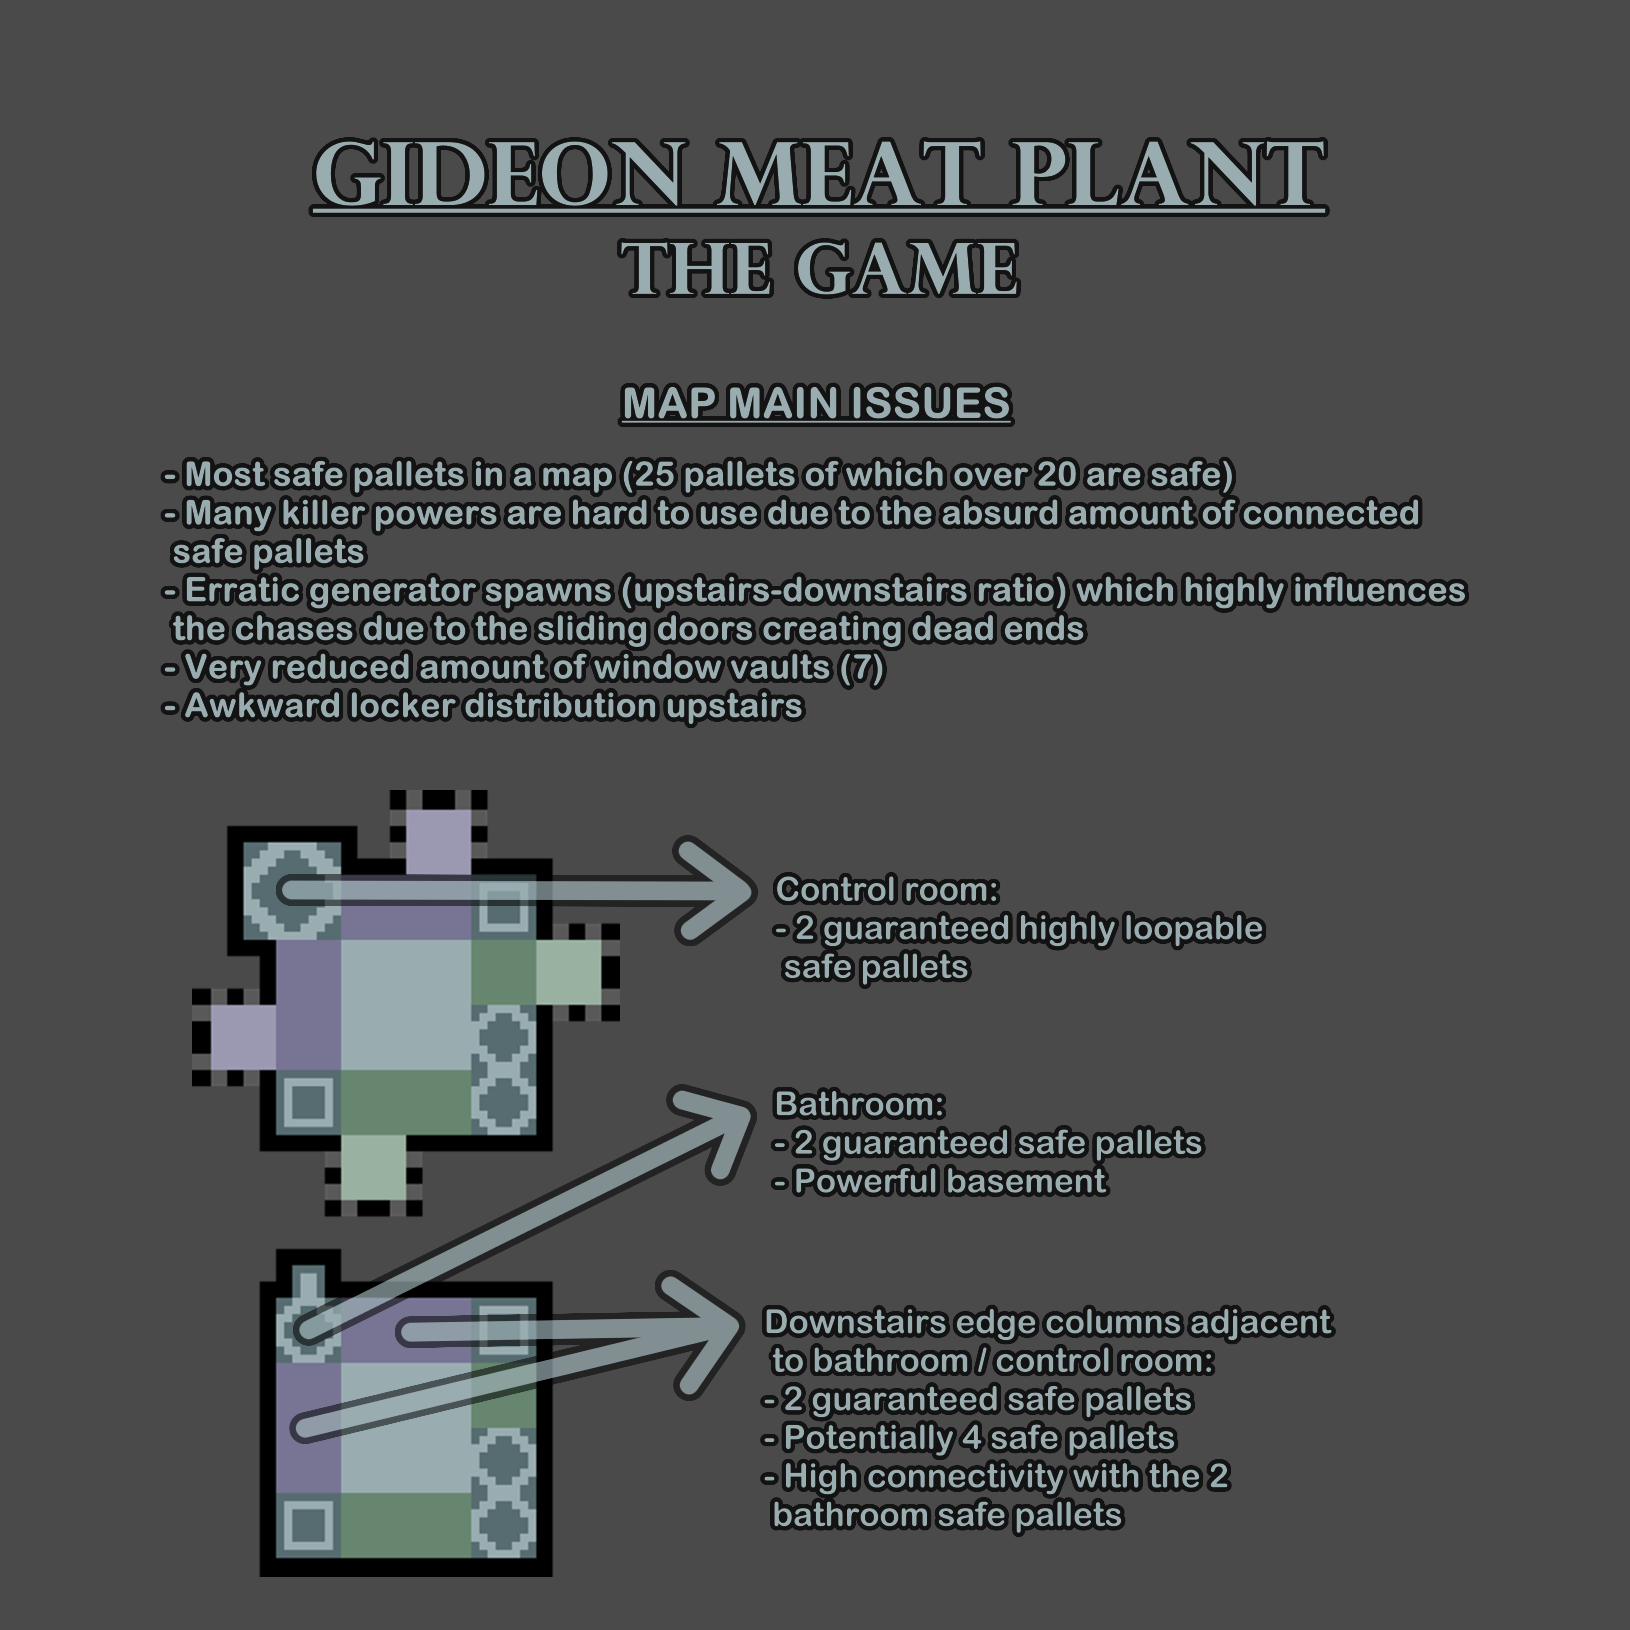
Other than the lockers upstairs, the weird hook density and the inconsistent distribution of generators between floors, the issues of the map all revolve around the high amount of connectable safe pallets and the lack of interactive chases they produce, weakening some of the pallets and replacing some with windows would be the ideal approach, but that is easier to say than to implement, given that the map is licensed and may not count with the freedom that other maps have.
-
The Underground Complex is one of the licensed indoors maps and it is the one that shares the most with Treatment Theatre. By its own nature, it has plenty of differences from a typical outdoors map, like it being smaller, having lots of line of sight blockers, hard to find generators & totems, lots of pallets (22) at loops that are unconventional as well as many drop-down windows. Similar to Treatment Theatre, the survivors' proficiency in the map and the killer power's compatibility with it play a major role to the outcome and enjoyment of the trial.
The small and long rooms can only repeat the specific type if it is a laboratory room but no if it is a storage room, it would be more intuitive if neither could repeat. The doorways are very erratic, sometimes generating dead ends where the survivor is unable to do anything in chase and that can also block killers from navigating towards a hook in time. The generators spawn logic can rarely spawn two generators inside the same long room.
The rift room counts with a window that is arguably very strong for many killers to handle; it also has hooks that are very easy to defend due to the reduced entrances and the generator is so awkward to patrol that it is usually not worth defending. On a similar note, the generator in the isolation room on the upstairs section is also not worth patrolling most of the time and that area on itself is not the most interactive (since the loops are so unsafe and the best option is to navigate it up and down with enough headstart).
The two adjacent corners to the upstairs section have hooks that are also very easy to defend, specifically the one where the staircase is far from the edge map wall (since approaching from upstairs is not an option and the fixed loop nearby is very unsafe).
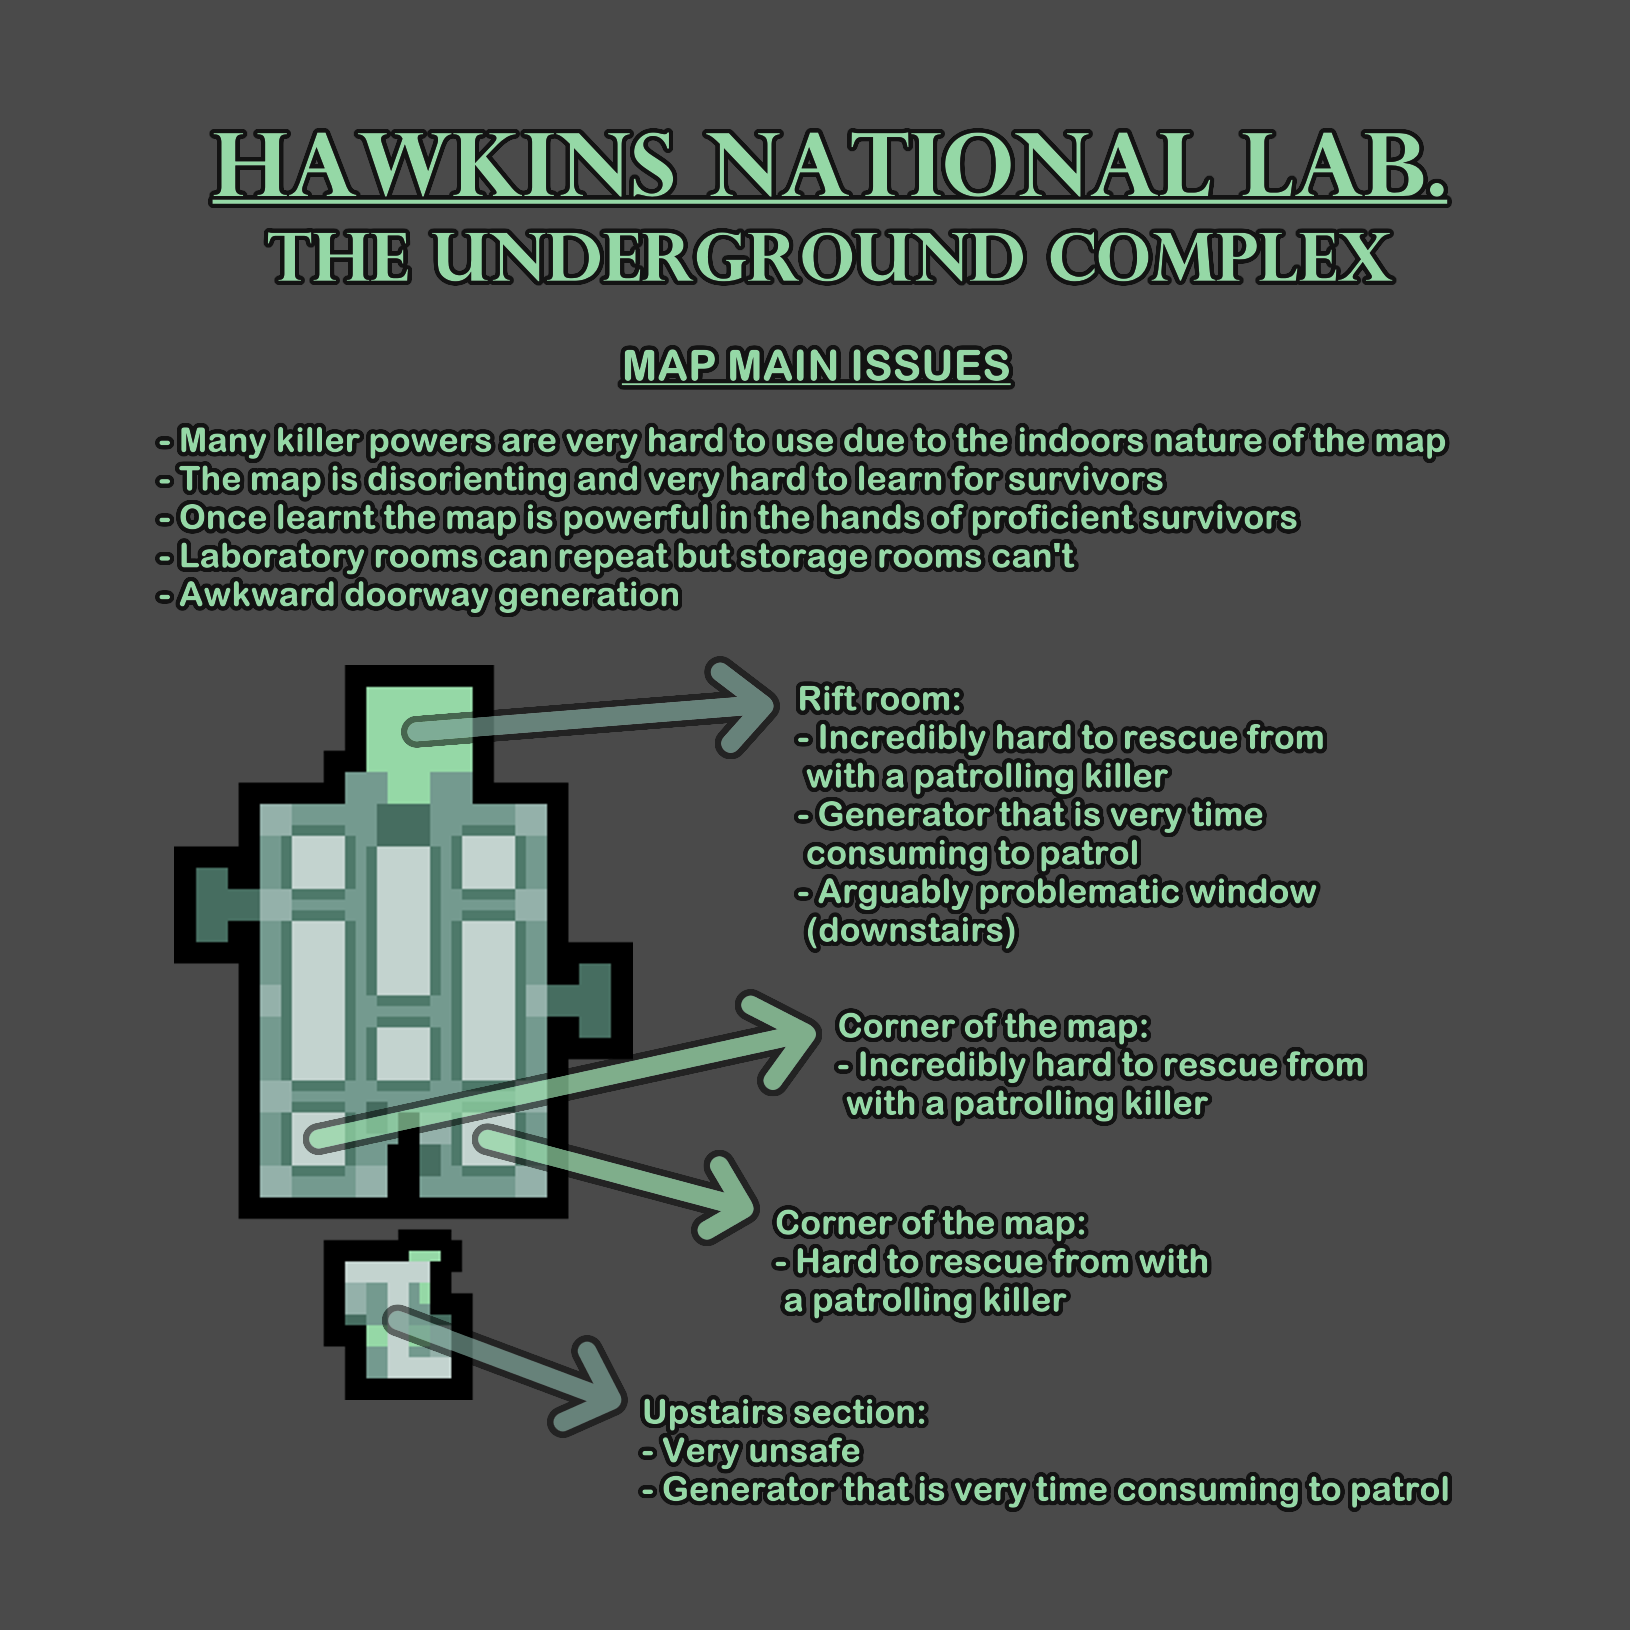
Several issues could realistically be addressed, like the doorways & generators spawn logic or the room types that repeat.
Modifying the outliers in the layout may result complicated due to the licensed nature of the map & reducing the frustration from powers that aren't compatible with the map is also not an easy task.
-
Greenville Square introduces a few innovative design approaches for maps, as for if they are good or bad is yet to be seen. The first one is the filler loops being mostly unsafe but the map having 25 to 27 pallets (more that in any other map), making for chases where the survivor is likely to always have something to loop but dropping the pallets aimlessly won't prevent hits. There are a couple of double pallets loops where each pallet is so unsafe on its own that it is not absurd for both pallets to be there. This safety design approach is not necessarily bad and can perfectly work out.
The other design approach is more devious and hard to assess. The map is the longest in the game, tied with Azarov's Resting Place, yet the generator spread is very peculiar, uncharacteristic of maps with similar shapes. There is a fixed generator at main building on one end of the map and another fixed generator at the statue landmark, but the rest of the generators do not spawn near them and instead gather around the middle of the map (sometimes spawning adjacent to each other in the open). The parking lot landmark never spawns a generator and it is highly unproductive to defend a perimeter with main building, on the other hand, only rarely one will find a favorable perimeter of generators near the statue; meaning that ideally the killer will play most of the trial around the middle of the map, where territorial playstyles are not as effective given that survivors can run towards either end of the map.
The positives of this design approach are that if the killer stays around the middle, they won't need to traverse vast distances to patrol the map and that the survivors count with natural "anti-tunnel" locations at both ends of the map since the safety is more outstanding there and the generators in those spots are so isolated from the rest that it isn't in the killer's interest to spend much time in said places (therefore good locations to go for a survivor that is targeted too aggressively).
The negatives are how the fixed generators at main building and statue landmark are so undesirable to defend that the killer has to play around 5 generators from the start, instead of 7; how the most charming locations (main building & the landmarks) are ideally ignored; how the exit gates are consistently so far apart; how the survivors can run in a straight line for so long without being cut off; and how any killer that is unaware of the tactical endeavor they have to follow will indeed become victim of the absurd length of the map by trying to chase everywhere and / or defend all generators indiscriminately.
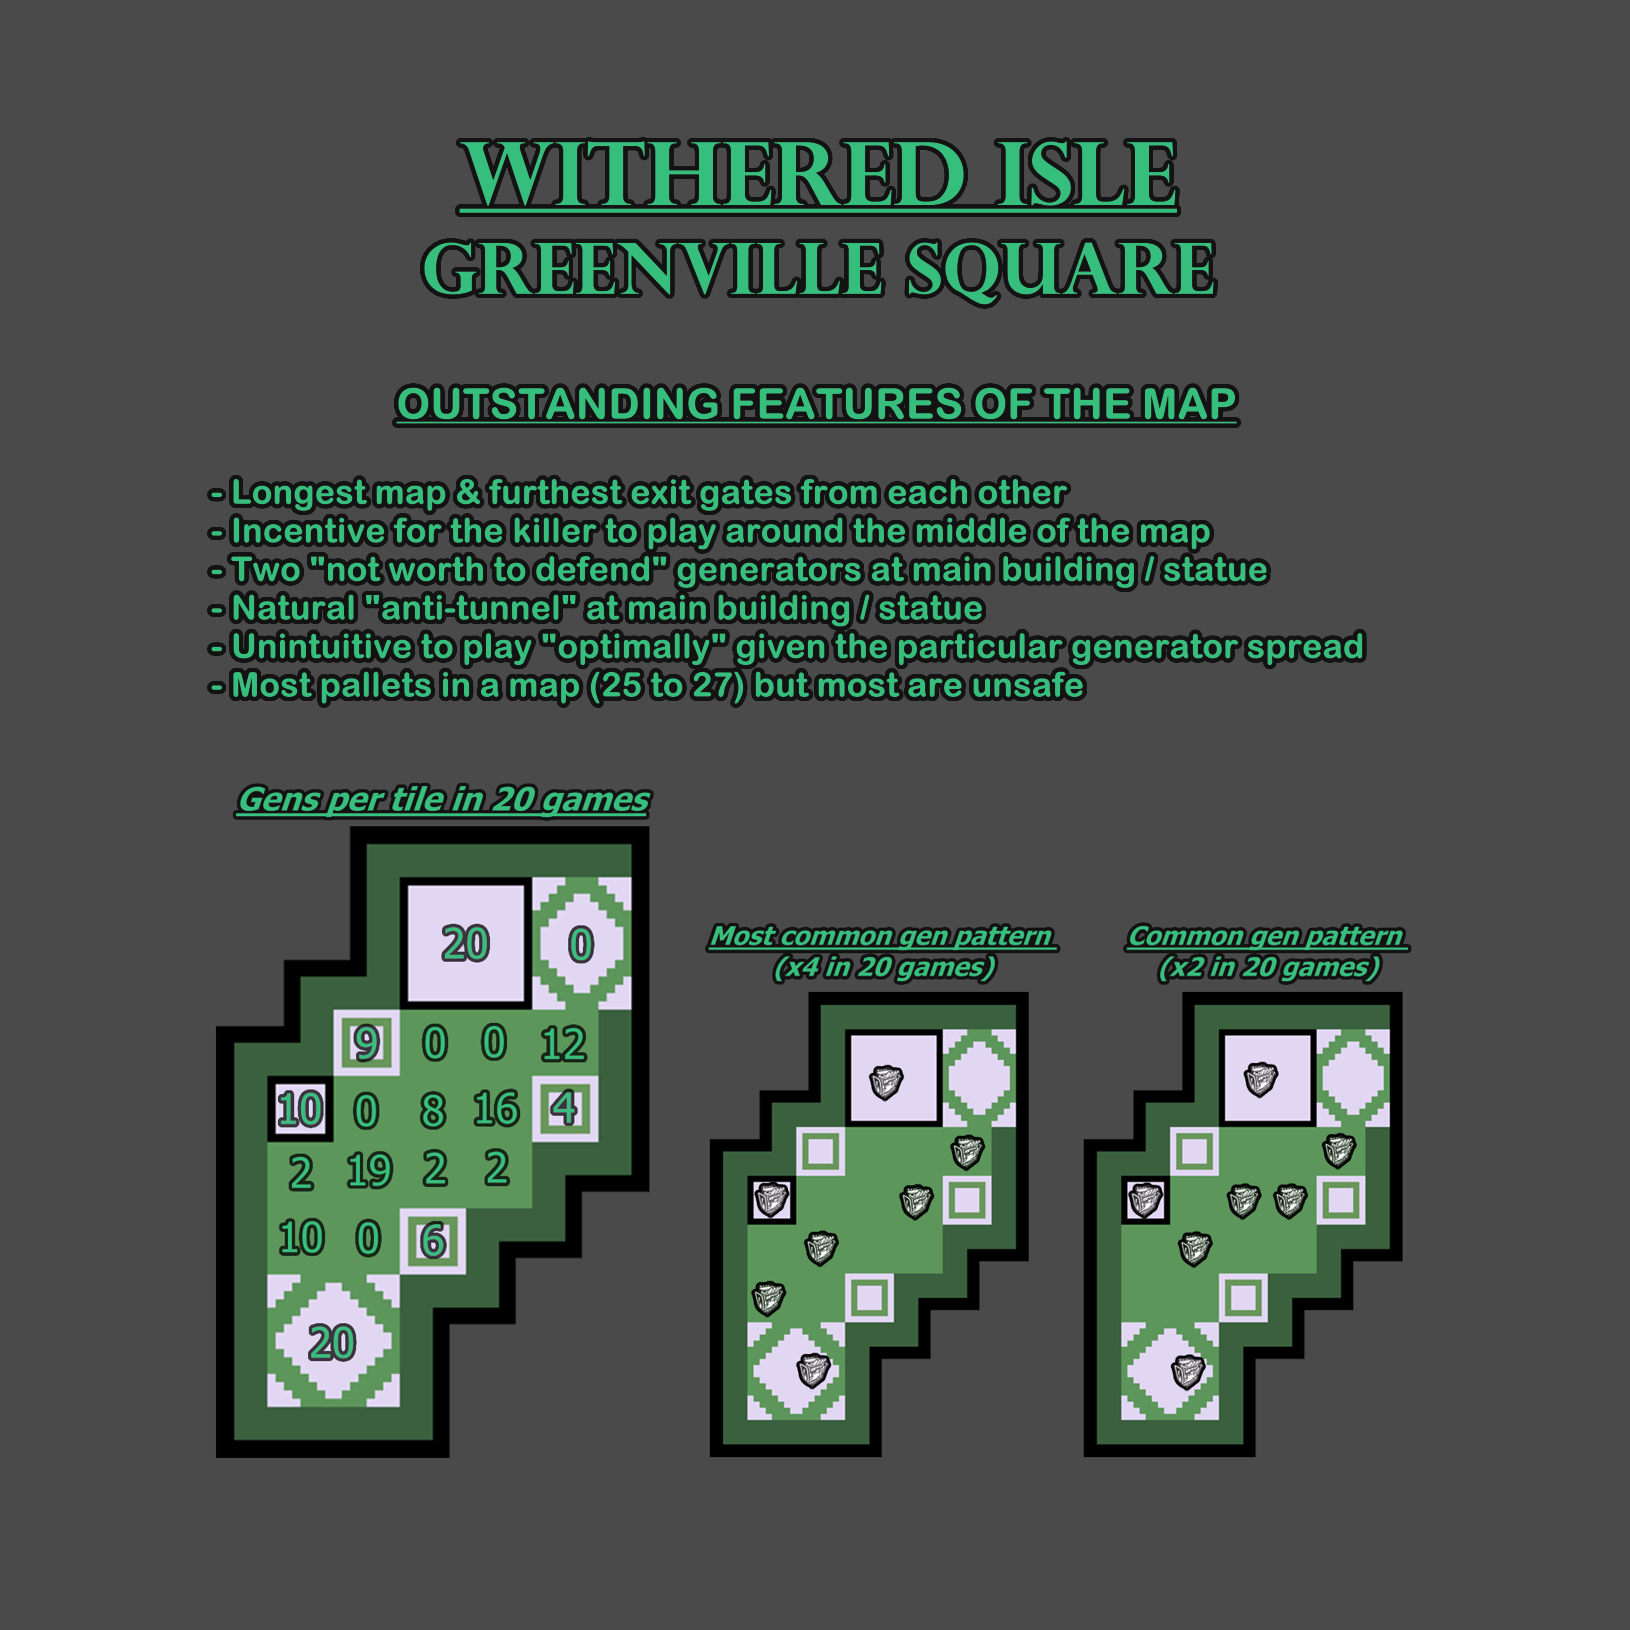
If the design approach of "longest map with most generators near the middle & ends of the map that the killer needs to avoid" is found defective, a size reduction and layout rework would be required. Independently of that happening, there are two things that could be improved regardless: the location of the exit gates & the amount of mazetiles getting increased from 3 to 4 (which would solidify the strong & predictable safety of the map that supports the unsafe yet numerous filler loops).
-
Treatment Theatre is the first of the indoors maps and the only one that isn't licensed. By its own nature, it has plenty of differences from a typical outdoors map, like it being smaller, having lots of line of sight blockers, hard to find generators & totems, lots of windows and pallets at loops that are unconventional. The issues of the map are mostly vague and hard to address except for a few. The main issues are directly connected to how impossible it is to estimate which side it favors in general.
Many killer powers are favored by the map and many others are incredibly hard to use, causing a very unnatural hierarchy within the killer roster for this map. The unfavored killers can result incredibly frustrating to play in Treatment Theatre. Many loadouts and playstyles (specially those around stealth) from both roles can be very advantageous.
The map is very disorienting and hard to learn for a survivor that is not familiar with it, putting them in a major disadvantage both in chase and at repairing generators. On the other hand, survivors that are proficient at the map will be able to have very long chases with the advanced resources that the map counts with.
In summary, the map's strength shifts a lot depending on which killer is at play and also on how proficient the survivors are with the layout and loops of Treatment Theatre. Two incredibly relevant factors that are not from the map itself change how the trial is gonna play out.
More unalloyed issues of the map are how absurdly loud the treatment room is, specially when the generator is repaired; and how the doorways are so erratic and unpredictable, which can cause circumstantial problems like struggling to hook a survivor, hardships in navigation or getting cornered randomly.
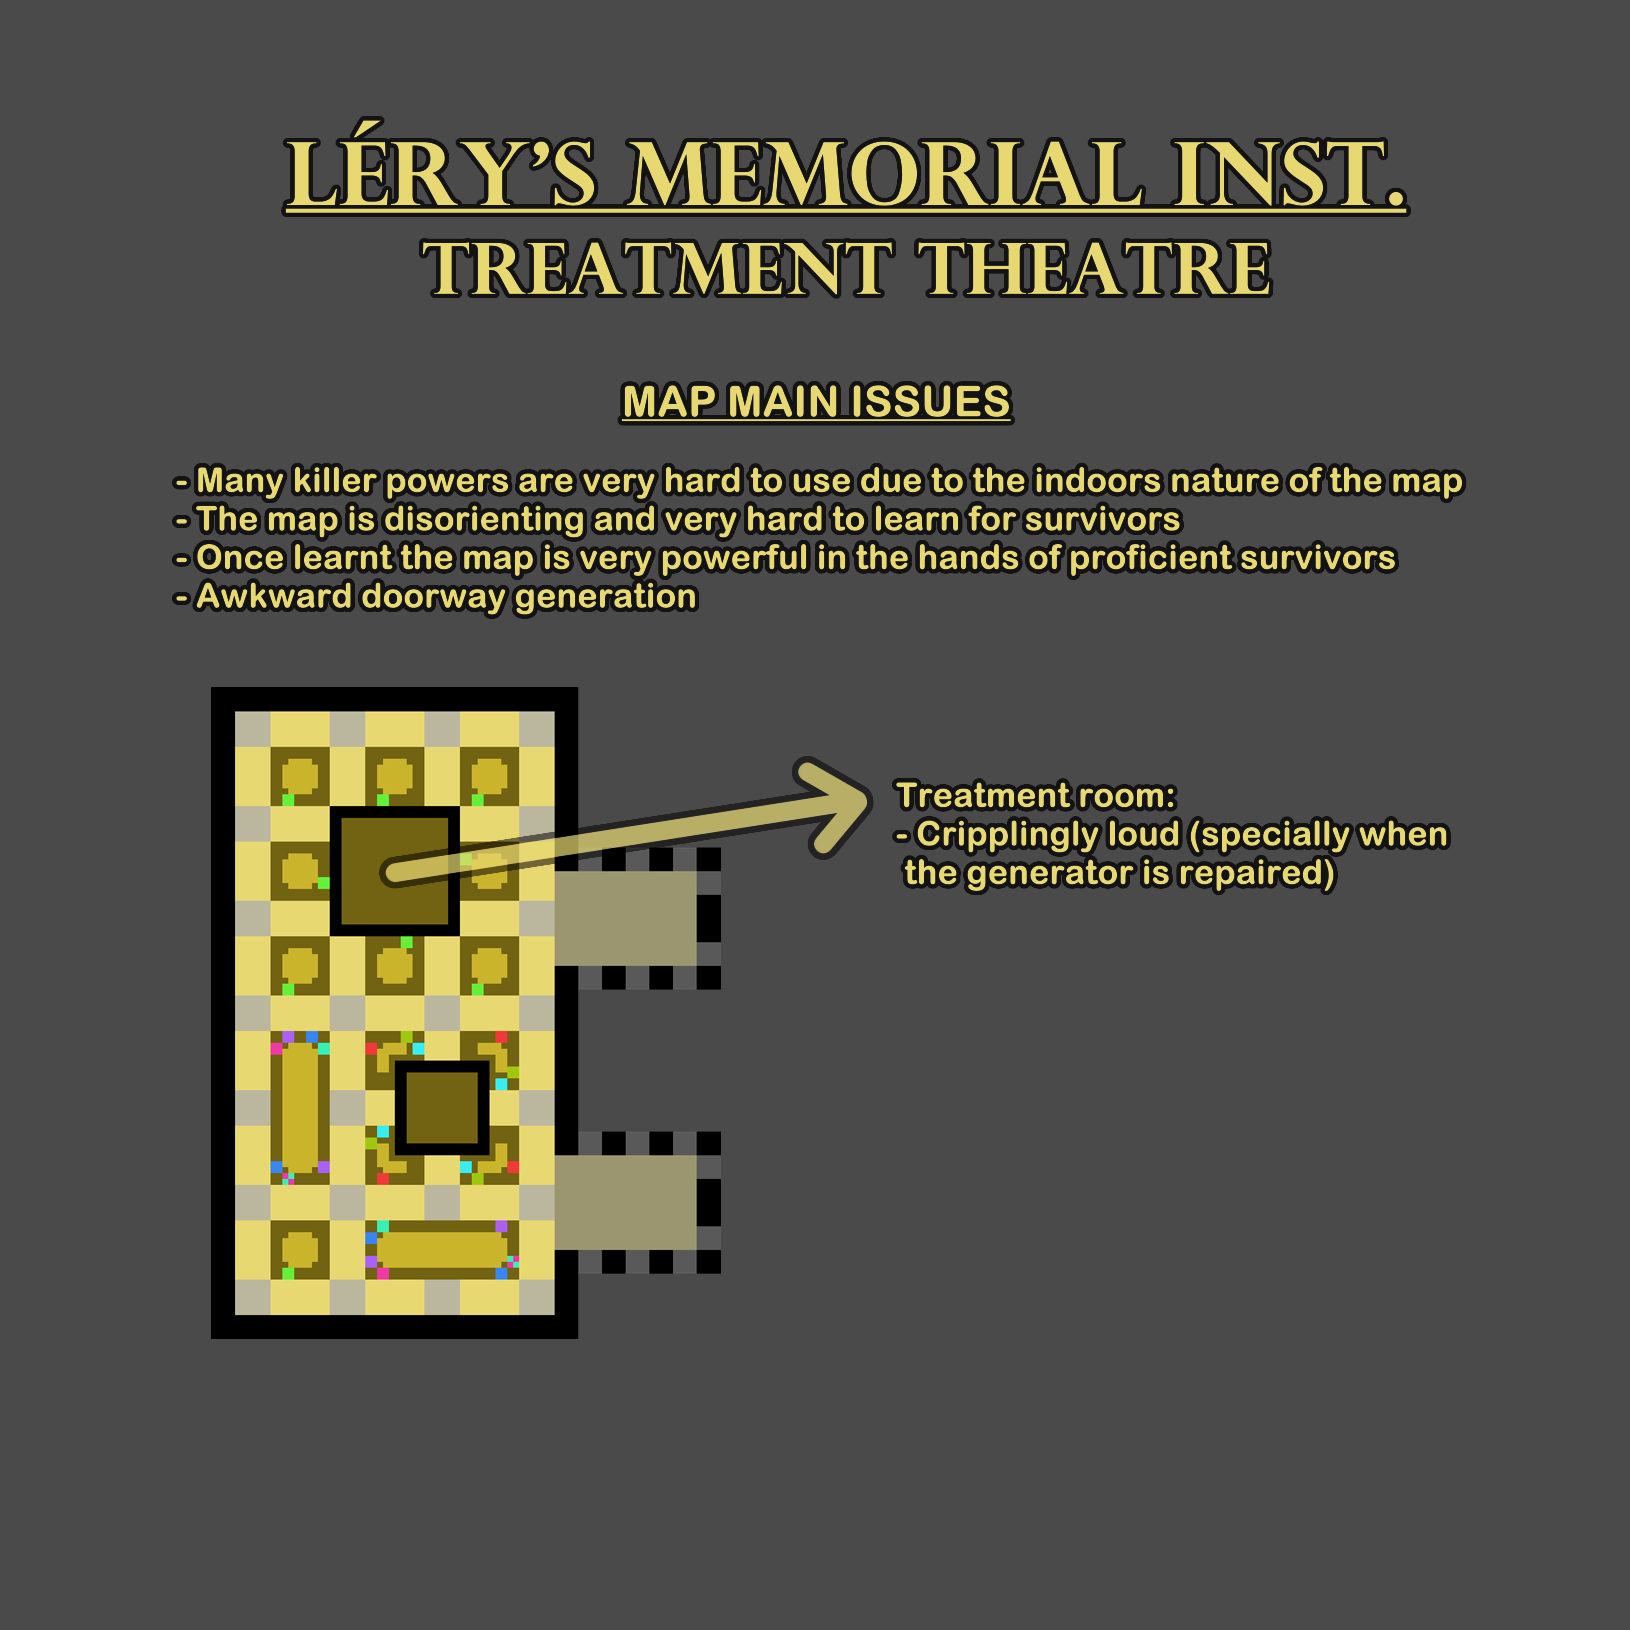
The most immediate improvement that the map could receive is reducing the loudness of the treatment room.
The fact that survivors that are unfamiliar with the map struggle so much and those who are familiar excel so well is an ambiguous yet very troublesome issue since weakening the safety would make the first group struggle even more and strengthening the safety would elevate the second group further. This problem requires a very careful solution.
The killer powers being so favored or unfavored by the map is tied to the line of sight blockers and the overwhelming amount of obstacles, yet tweaking those elements is not an easy task and should be addressed with prudence.
-
The Temple of Purgation could be tagged as balanced but it is an incredibly inconsistent map. It overrelies on the filler loops that it generates, which on itself is a very unpredictable display of safety for the survivors.
The landmarks are pure pallet loops but the pallets don't spawn consistently, providing no safety for the survivors at random times (like if they were filler loops). There are only 2 mazetiles so the strength of the safety they provide is highly inconsistent, since the realm Red Forest has 7 types and you need 4 mazetiles to guarantee 1 strong one.
The main building has fixed resources at the underground but variable resources above it. There are 4 configurations, one with 3 windows, one with 2 windows and two with 1 variable pallet (one very strong and the other not so much) and 4 windows of which 2 are the exact same as the configuration with 2 windows. The discrepancy between configurations is absurd and therefore adds a large strength variability to the main building. The underground hooks are very powerful to defend, that being the one in the back or basement; with a sabotage or sacrifice, the underground could get an unhookable spot if basement isn't there.
The realm Red Forest has very awkward collisions, specifically on its filler loops and random obstacles, where the players get drastically slowed down when moving too close to the geometry. This may be an issue of friction, since the players dont get fully stopped by the geometry but instead lose speed.
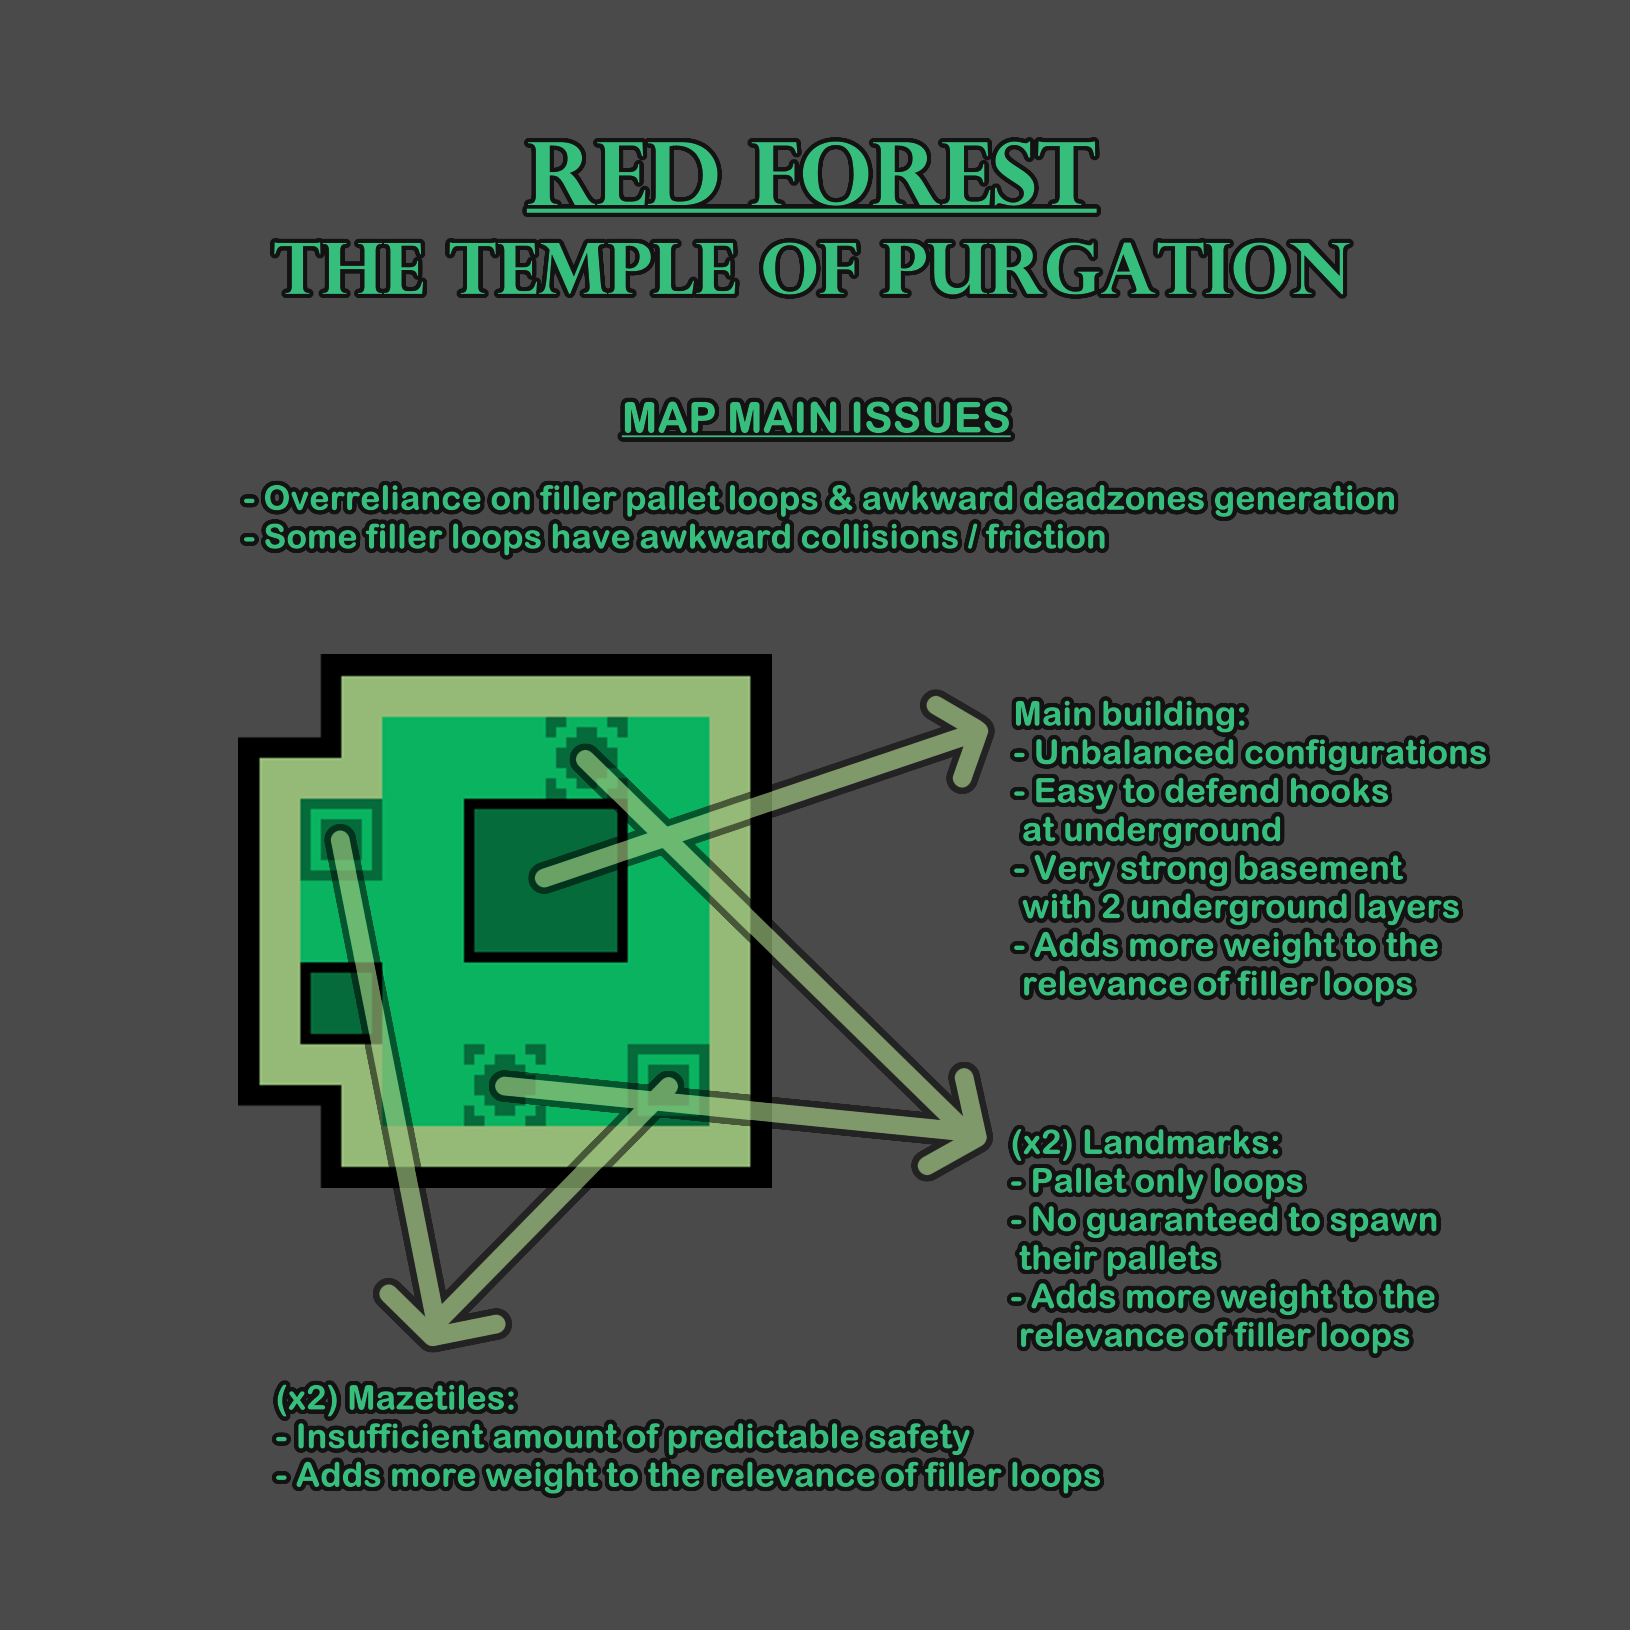
The realm Red Forest needs to solve the collision issues on its loops.
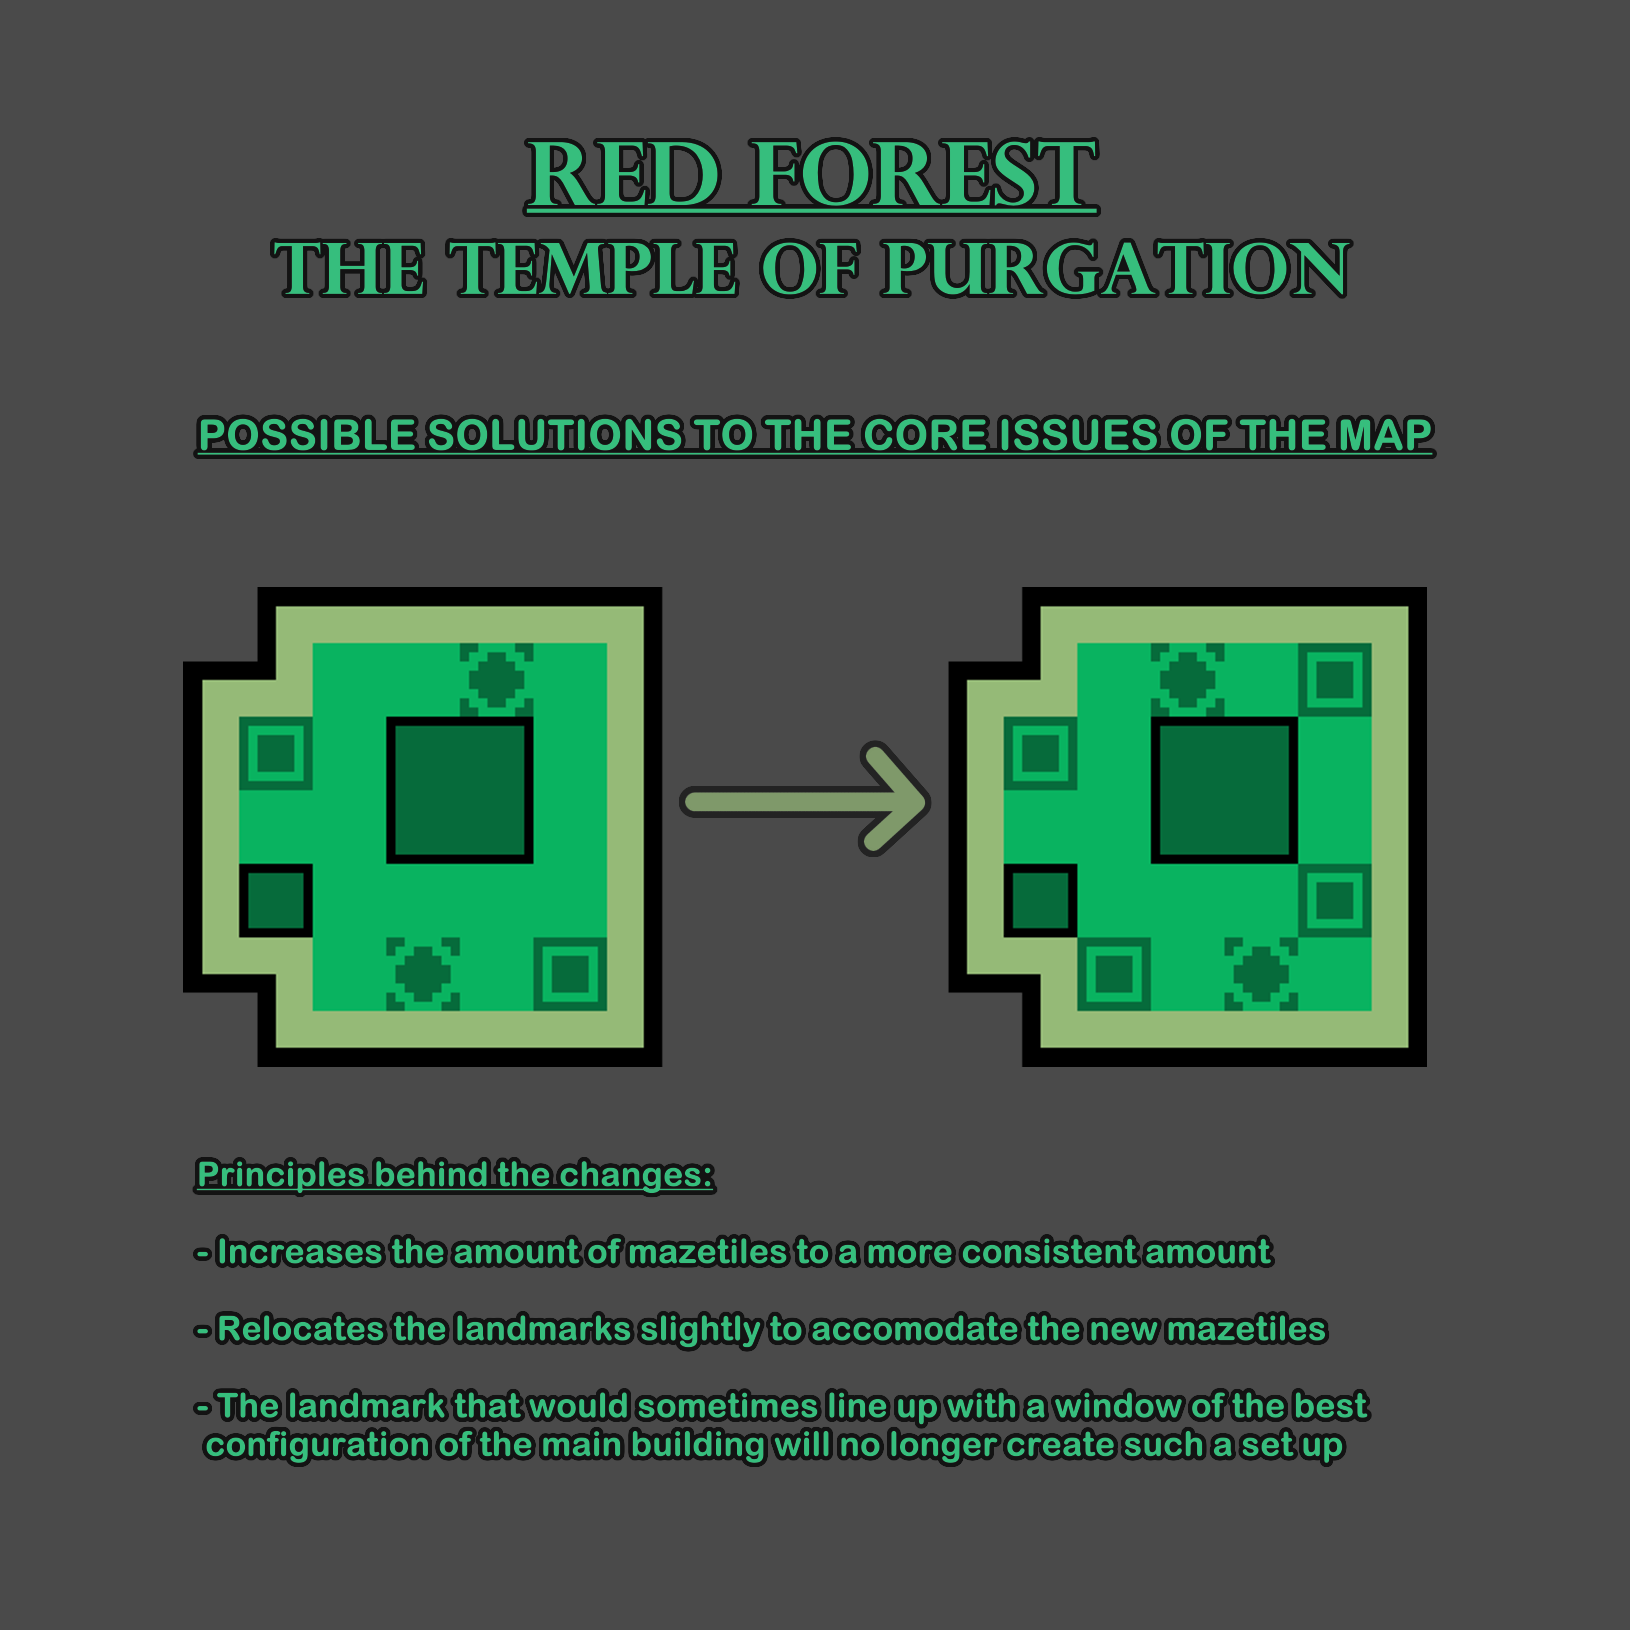
The map The Temple of Purgation should increase its mazetile count to 4 to achieve consistency (like in the example below), the landmarks could spawn a pallet all the time and the main building requires some changes. The configuration with 4 windows could get 0 pallets, the one with 3 windows could get the weak pallet and the one with 2 windows could get the strong pallet. The underground might require some adjustments.
-
Mother's Dwelling is a slightly survivor sided map that eventhough improved massively with its recent update, it still has some issues. The size is still a bit large so the generator spread is slightly too wide. The pallet density is quite low for its size and there is an area of the map that is full of filler tiles so if survivors are unlucky, they could get a very vast deadzone there.
The main building has fixed resources on the upper floor but variable resources on the lower floor, which counts with some very absurdly safe windows. Before the graphical rework, the configurations with the incredibly strong windows would get 1 pallet and the ones without would get 3 pallets; after the graphical rework all configurations have 2 pallets, making the already superior strong window variations stronger and increasing the discrepancy between configurations. Some time after, the weaker configurations would also randomize the location of their pallets, making it harder for survivors to find them (when they have predictable resources with the stronger configurations).
The realm Red Forest has very awkward collisions, specifically on its filler loops and random obstacles, where the players get drastically slowed down when moving too close to the geometry. This may be an issue of friction, since the players dont get fully stopped by the geometry but instead lose speed.
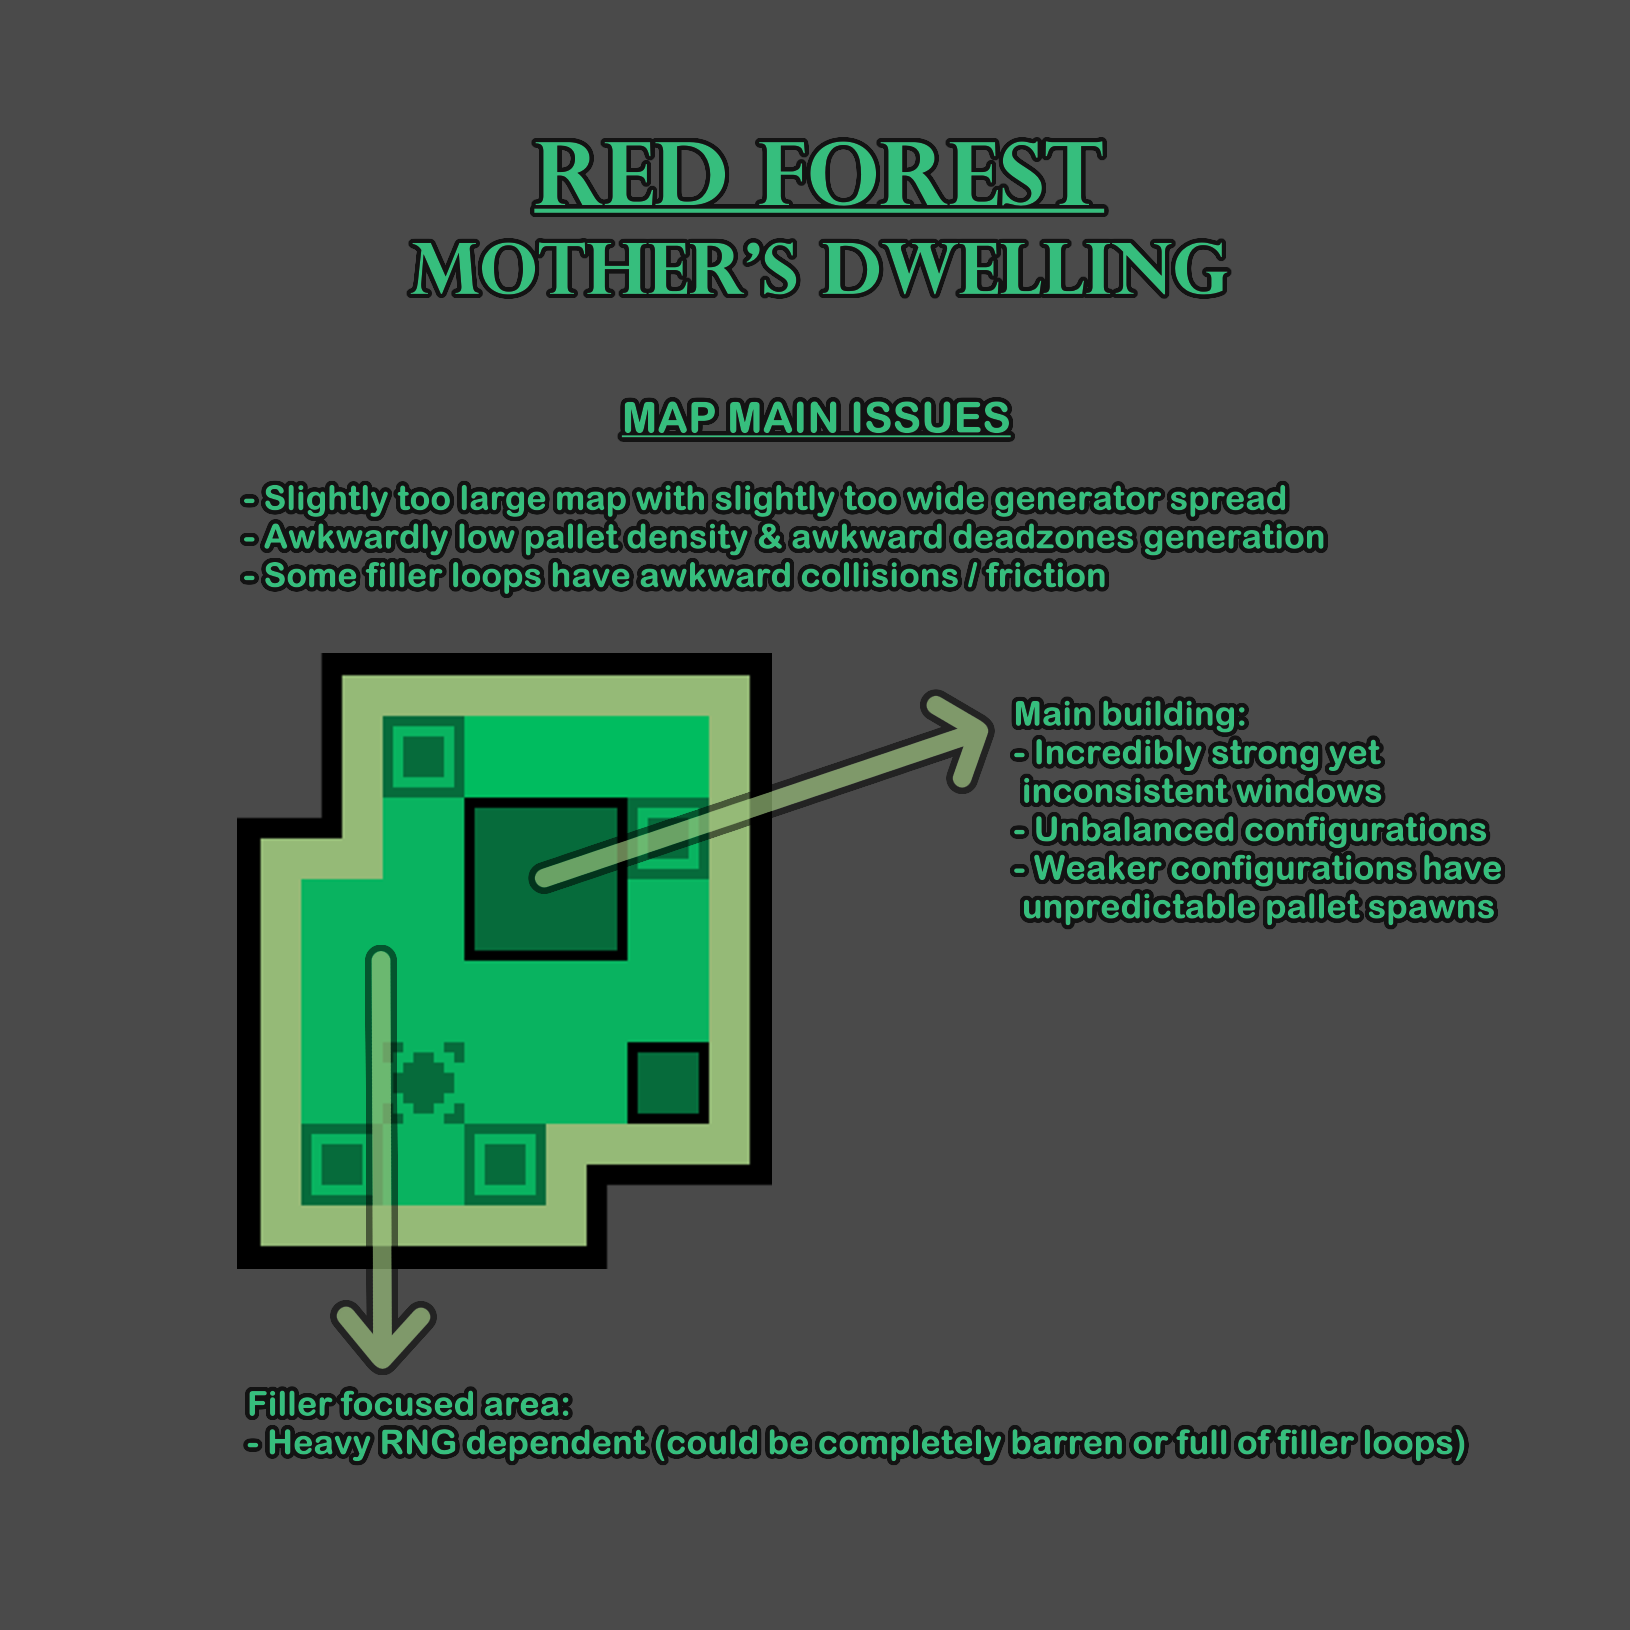
The realm Red Forest needs to solve the collision issues on its loops.
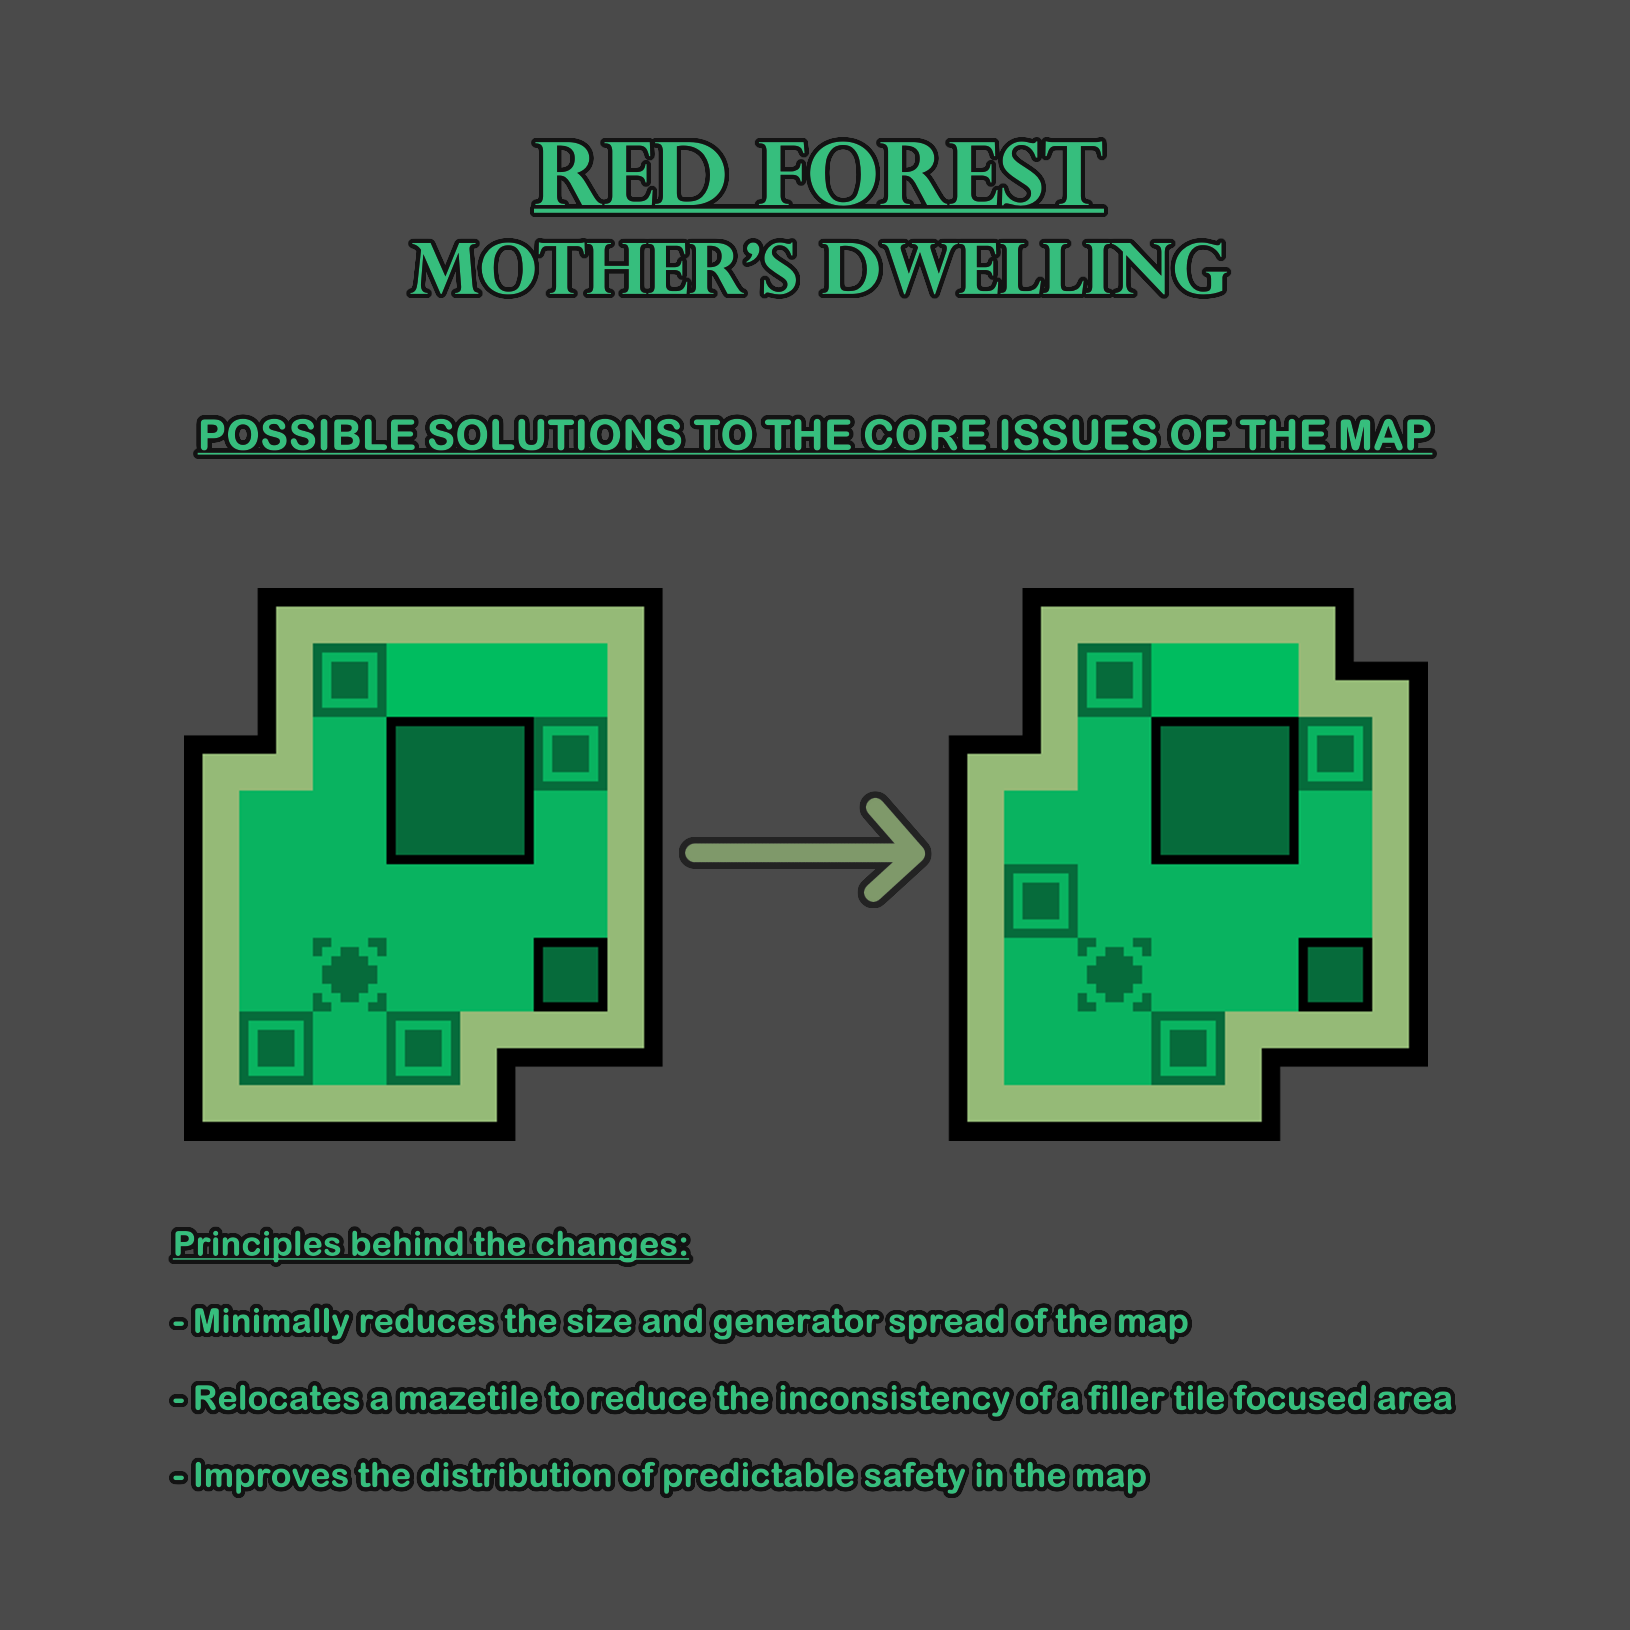
The map Mother's Dwelling should minimally reduce its size, slightly increase its pallet density and relocate a mazetile to the area that is full of filler tiles (like in the example below). Main building needs to nerf the outstanding windows and balance its different configurations. The amount of mazetiles must stay at 4, since it is the functional amount for its realm.
-
Azarov's Resting Place is the most troublesome map in the realm Autohaven Wreckers. Its size is tied at largest with both versions of Shelter Woods and its length is also tied at longest with Grenville Square, but the determining factor is its peculiar shape with a very thin middle of the map and wide ends, giving it a two-sides dynamic that poisons the flow of the trials.
Killers can't afford to cross the map back and forth to chase everywhere and instead they are encouraged to stay on one side while tactically holding the middle to play as territorial as possible (that being defending a perimeter of generators, a hook, killing someone efficiently fast or a combination of these), which is not necessarily always favorable or easy. Sometimes the spread of generators will be uneven between sides.
The middle of the map counts with a chain of 3 mazetiles that are diagonally linked to both landmarks and to 2 more mazetiles, making it an incredibly strong area where the killer is discouraged from chasing (which further punishes playstyles where the killer is chasing anywhere, since the survivors can go through the middle constantly) that also happens to randomize the likelihood of the safety on either side of the map since many filler loops are found there and they may not spawn many pallets and the pallet density of the map is already inconsistent enough by itself.
The realm Autohaven Wreckers has poor lightning and some filler loops are remarkably safe without room for mindgames.
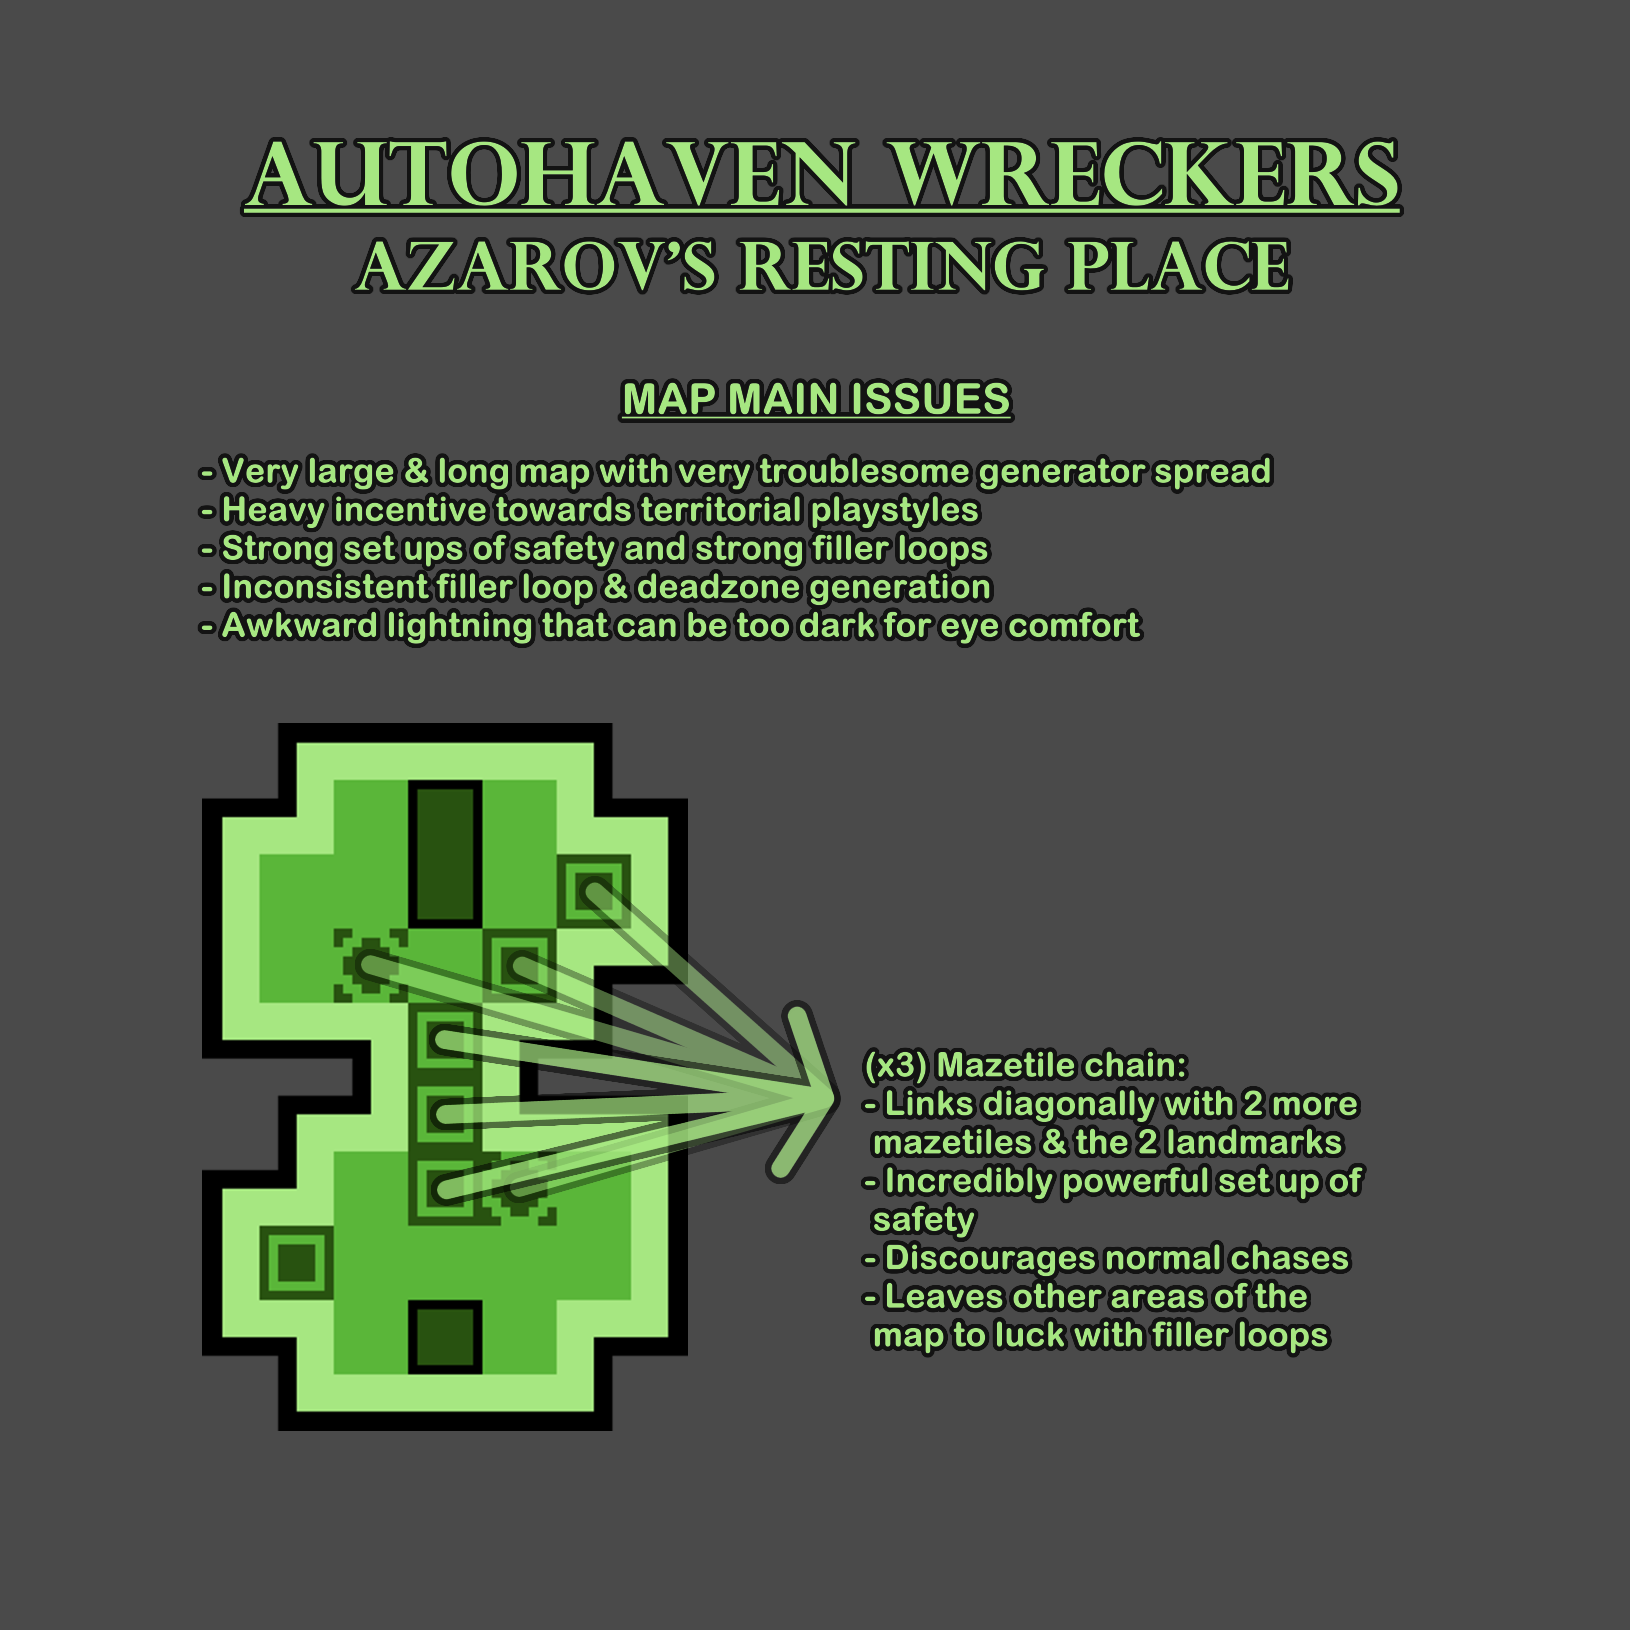
The realm Autohaven Wreckers could improve its lightning and the stronger filler loops could be nerfed slightly to then increase the pallet density a little.
The map Azarov's Resting Place needs an overhaul to its layout and size to either mitigate or remove its dynamic that limits the gameplans of the players. The pallet density should be stabilized and maybe (or maybe not) the mazetile count could be reduced from 6 to 5.
-
Gas Heaven is by far the most survivor sided map in Autohaven Wreckers, its size is large enough to have a very awkward gen spread (even after the rework) but the most outstanding issue is the main building, which counts with a very powerful window that is always complimented by 4 pallets. The amount of mazetiles is too low, it needs more than 3 or else the focus of the safety relies a lot more on the filler loops which are less interactive, more killer power reliant and far more unpredictable and inconsistent.
The realm Autohaven Wreckers has poor lightning and some filler loops are remarkably safe without room for mindgames. The car piles are treated as filler loops, meaning they do not have guaranteed pallets and that is with half the possible types already being unable to spawn a pallet (so only half the types spawn pallets and those pallets are not always generated). In Gas Heaven the car piles interfere a lot with the generation of the filler loops to the point they amplify the unpredictability of the filler pallets even further.
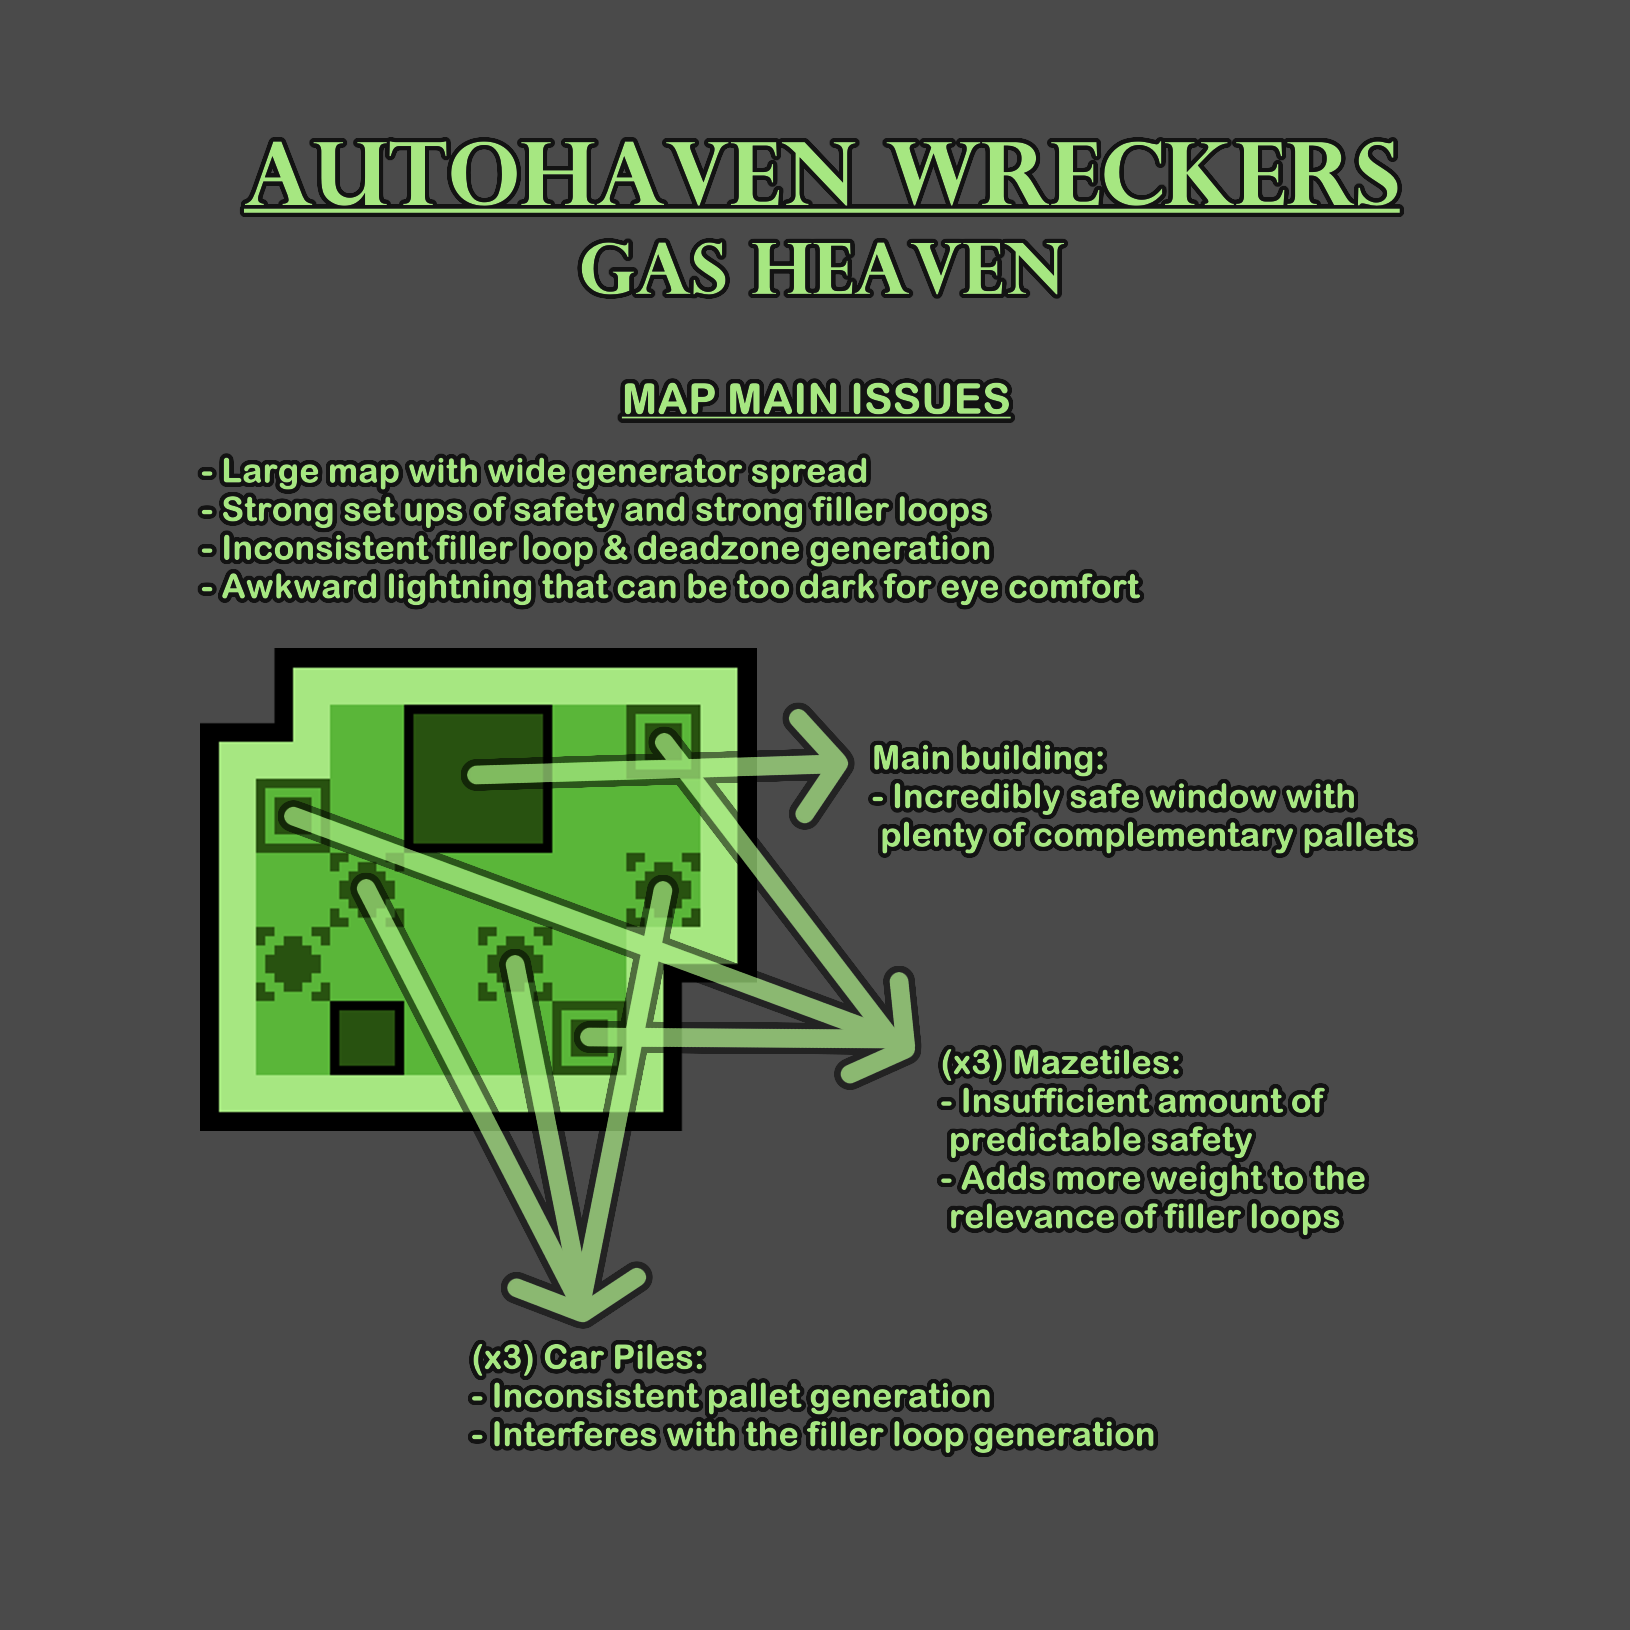
The realm Autohaven Wreckers could improve its lightning and the stronger filler loops could be nerfed slightly to then increase the pallet density a little.
The map Gas Heaven should reduce its size slightly, add 1 more mazetile so the safety is more consistent and address the strength issue of the main building.
-
Blood Lodge is a survivor sided map that is (even after the rework) too large for the generator spread to be balanced. The amount of mazetiles is too low, it needs more than 3 or else the focus of the safety relies a lot more on the filler loops which are less interactive, more killer power reliant and far more unpredictable and inconsistent. The main building's basement can be problematic due to the breakable wall blocking one of the already limited entrances, which certain killers can abuse greatly to their benefit.
The realm Autohaven Wreckers has poor lightning and some filler loops are remarkably safe without room for mindgames.
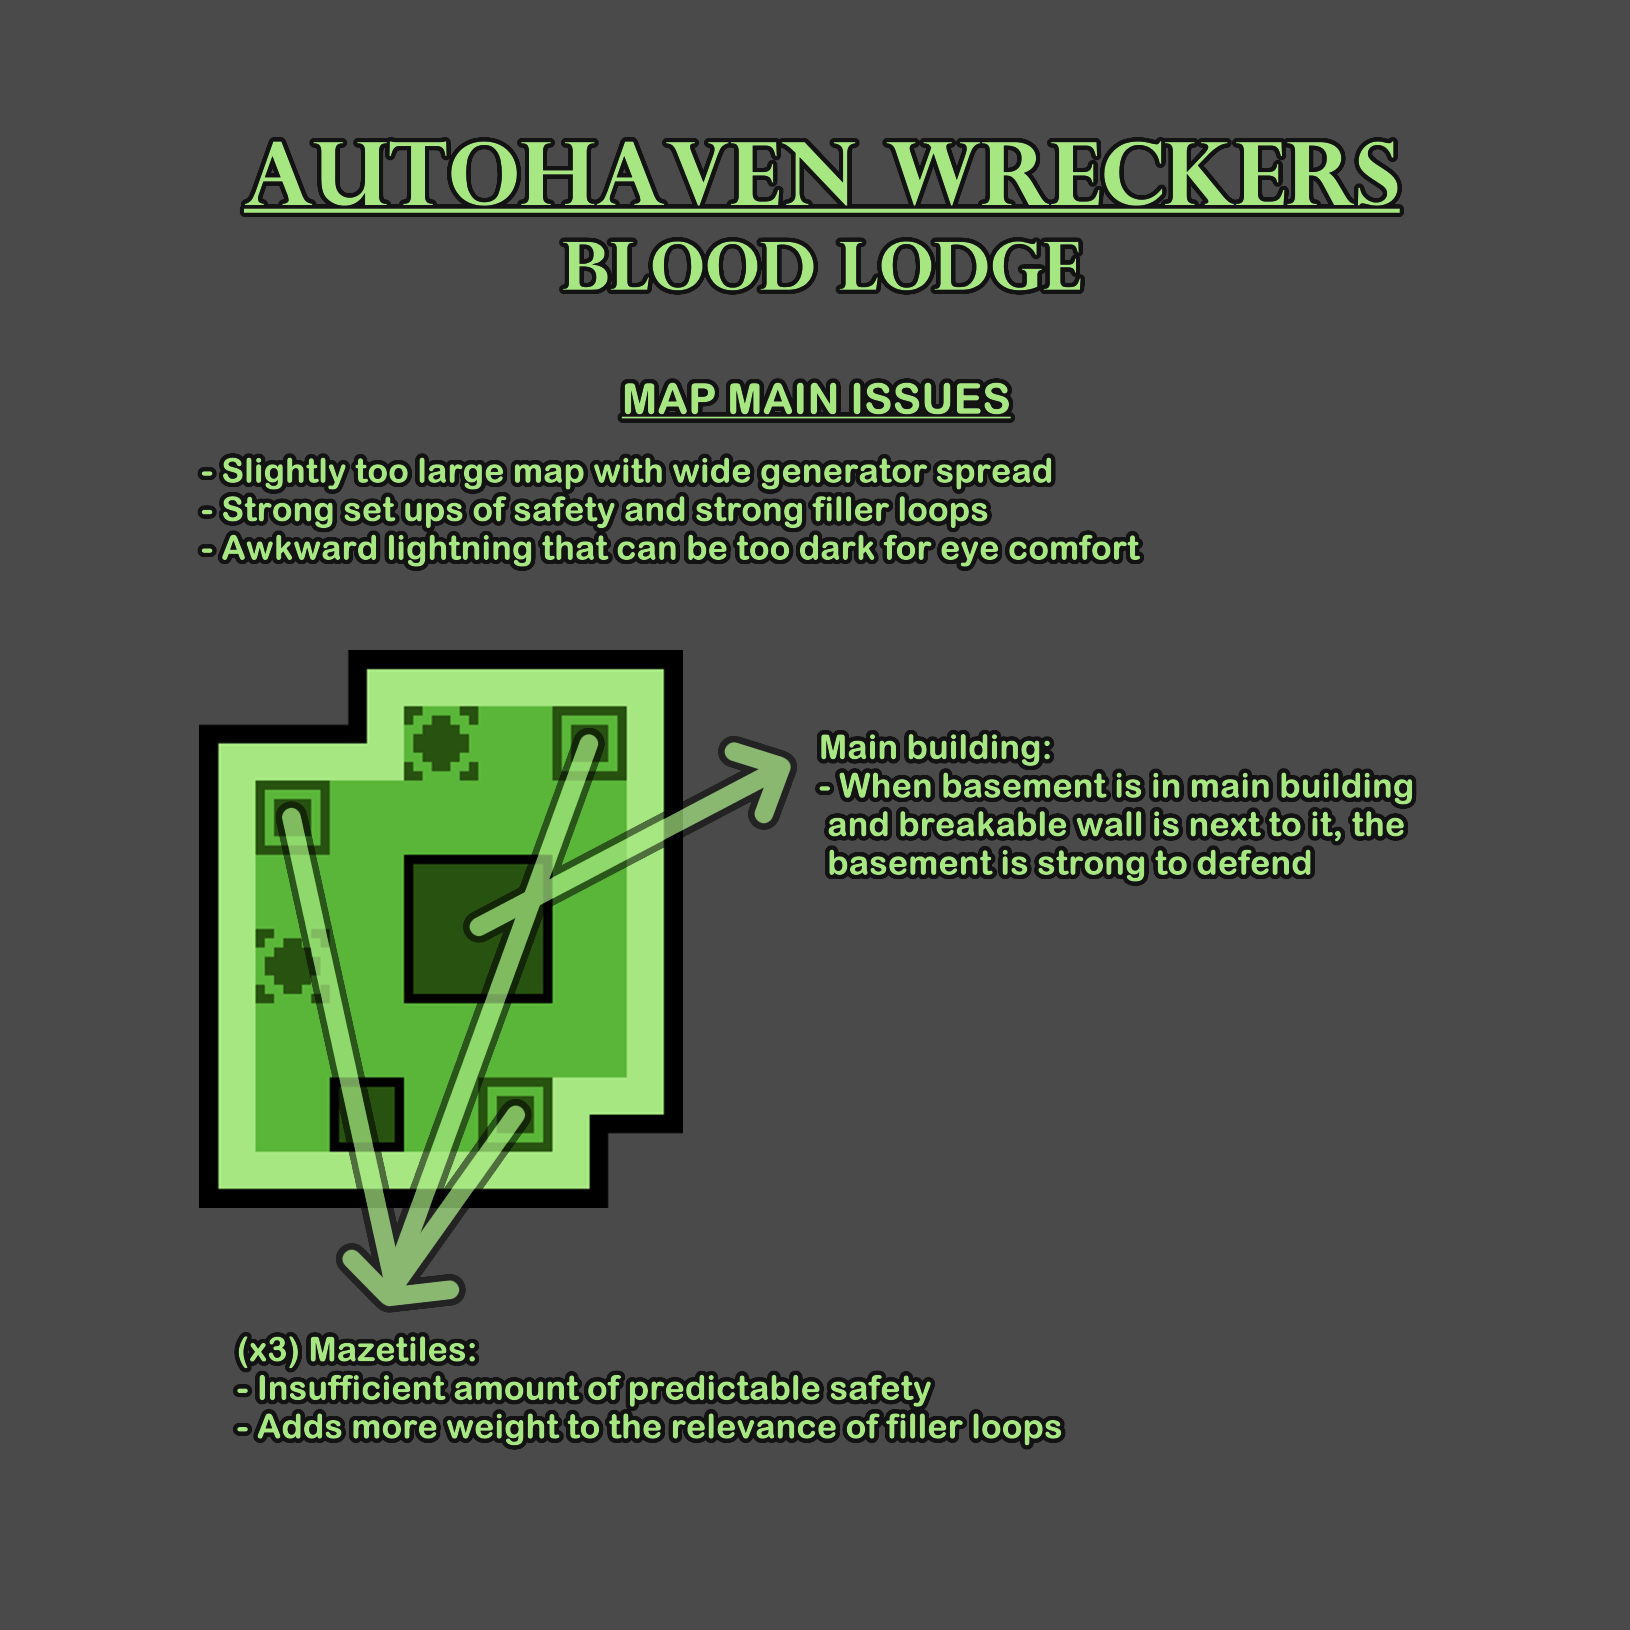
The realm Autohaven Wreckers could improve its lightning and the stronger filler loops could be nerfed slightly to then increase the pallet density a little.
The map Blood Lodge should reduce its size slightly, add 1 more mazetile so the safety is more consistent and remove the breakable walls at main building so killers waste less time in chase while giving survivors a better chance to rescue from its basement.
-
Wreckers' Yard is one of the most balanced maps in the game, with just a few flaws of which most are related to its realm and not the map itself. The safety in the map is a bit inconsistent, having strength variability between trials. One of the filler tile pockets (marked in the graphic) stands out in the sense of spreading the gens a bit too far from the rest of the map while leaving the survivors there zoned; this spot is also very powerful for defending hooks.
The realm Autohaven Wreckers has poor lightning and some filler loops are remarkably safe without room for mindgames. The car piles are treated as filler loops, meaning they do not have guaranteed pallets and that is with half the possible types already being unable to spawn a pallet (so only half the types spawn pallets and those pallets are not always generated).
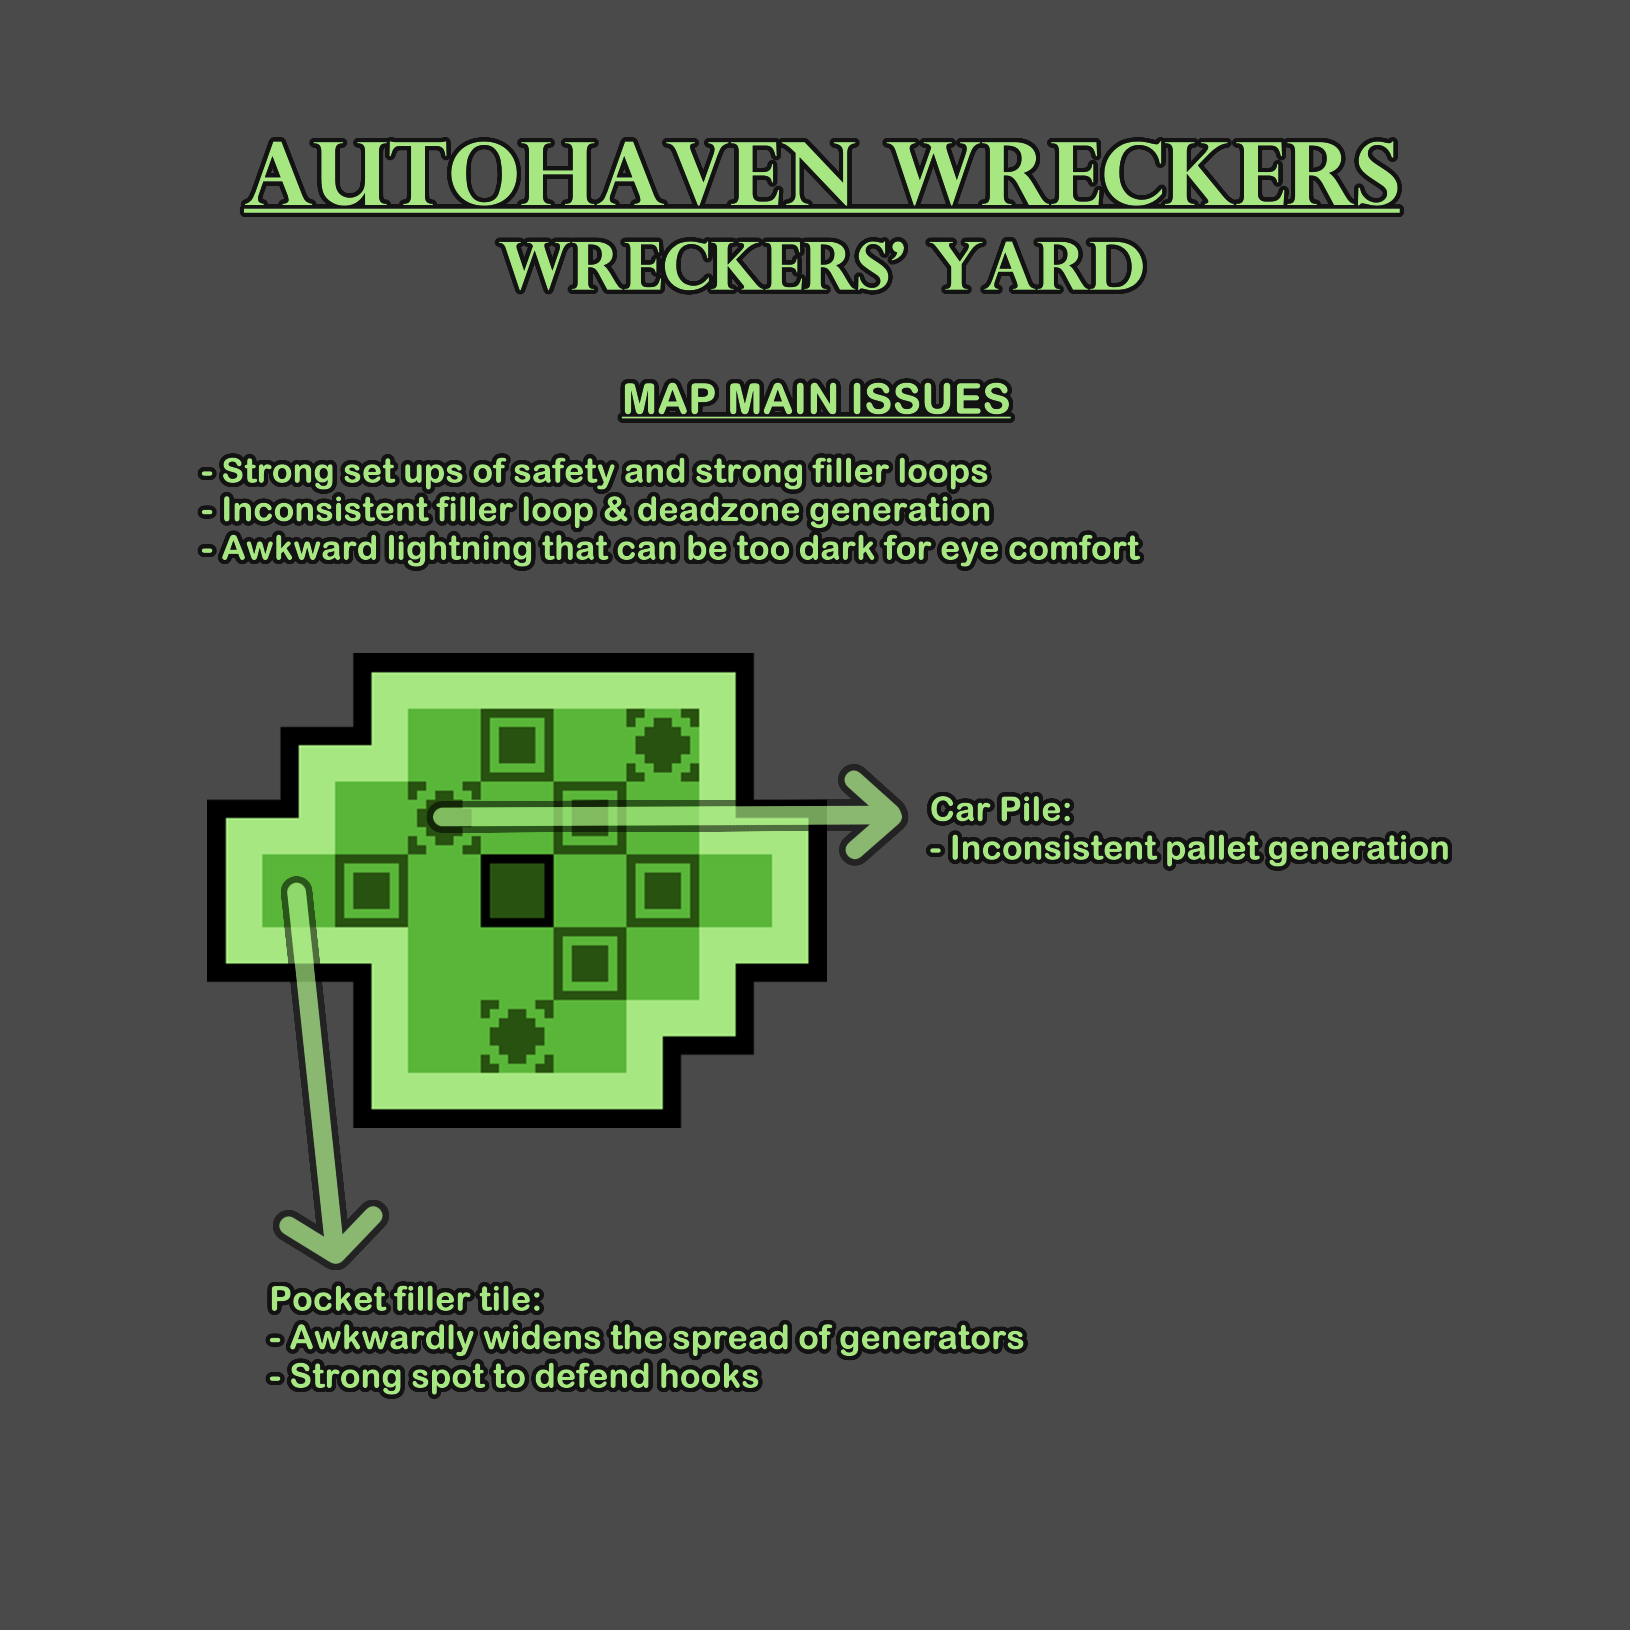
The realm Autohaven Wreckers could improve its lightning and the stronger filler loops could be nerfed slightly to then increase the pallet density a little.
The map Wreckers' Yard should stabilize its pallet count and the filler tile pocket might need to be placed elsewhere.
-
Wretched Shop is a very inconsistent map that stands out for being very barren at times but also very powerful other times. The map is severely large and the generator spread is therefore troublesome for killers without mobility. The main building has a basement that can be incredibly strong to defend when the window doesn't spawn next to it. The outskirts filler tiles around main building can be problematic deadzones where gens and hooks are easy to defend.
The realm Autohaven Wreckers has poor lightning and some filler loops are remarkably safe without room for mindgames.
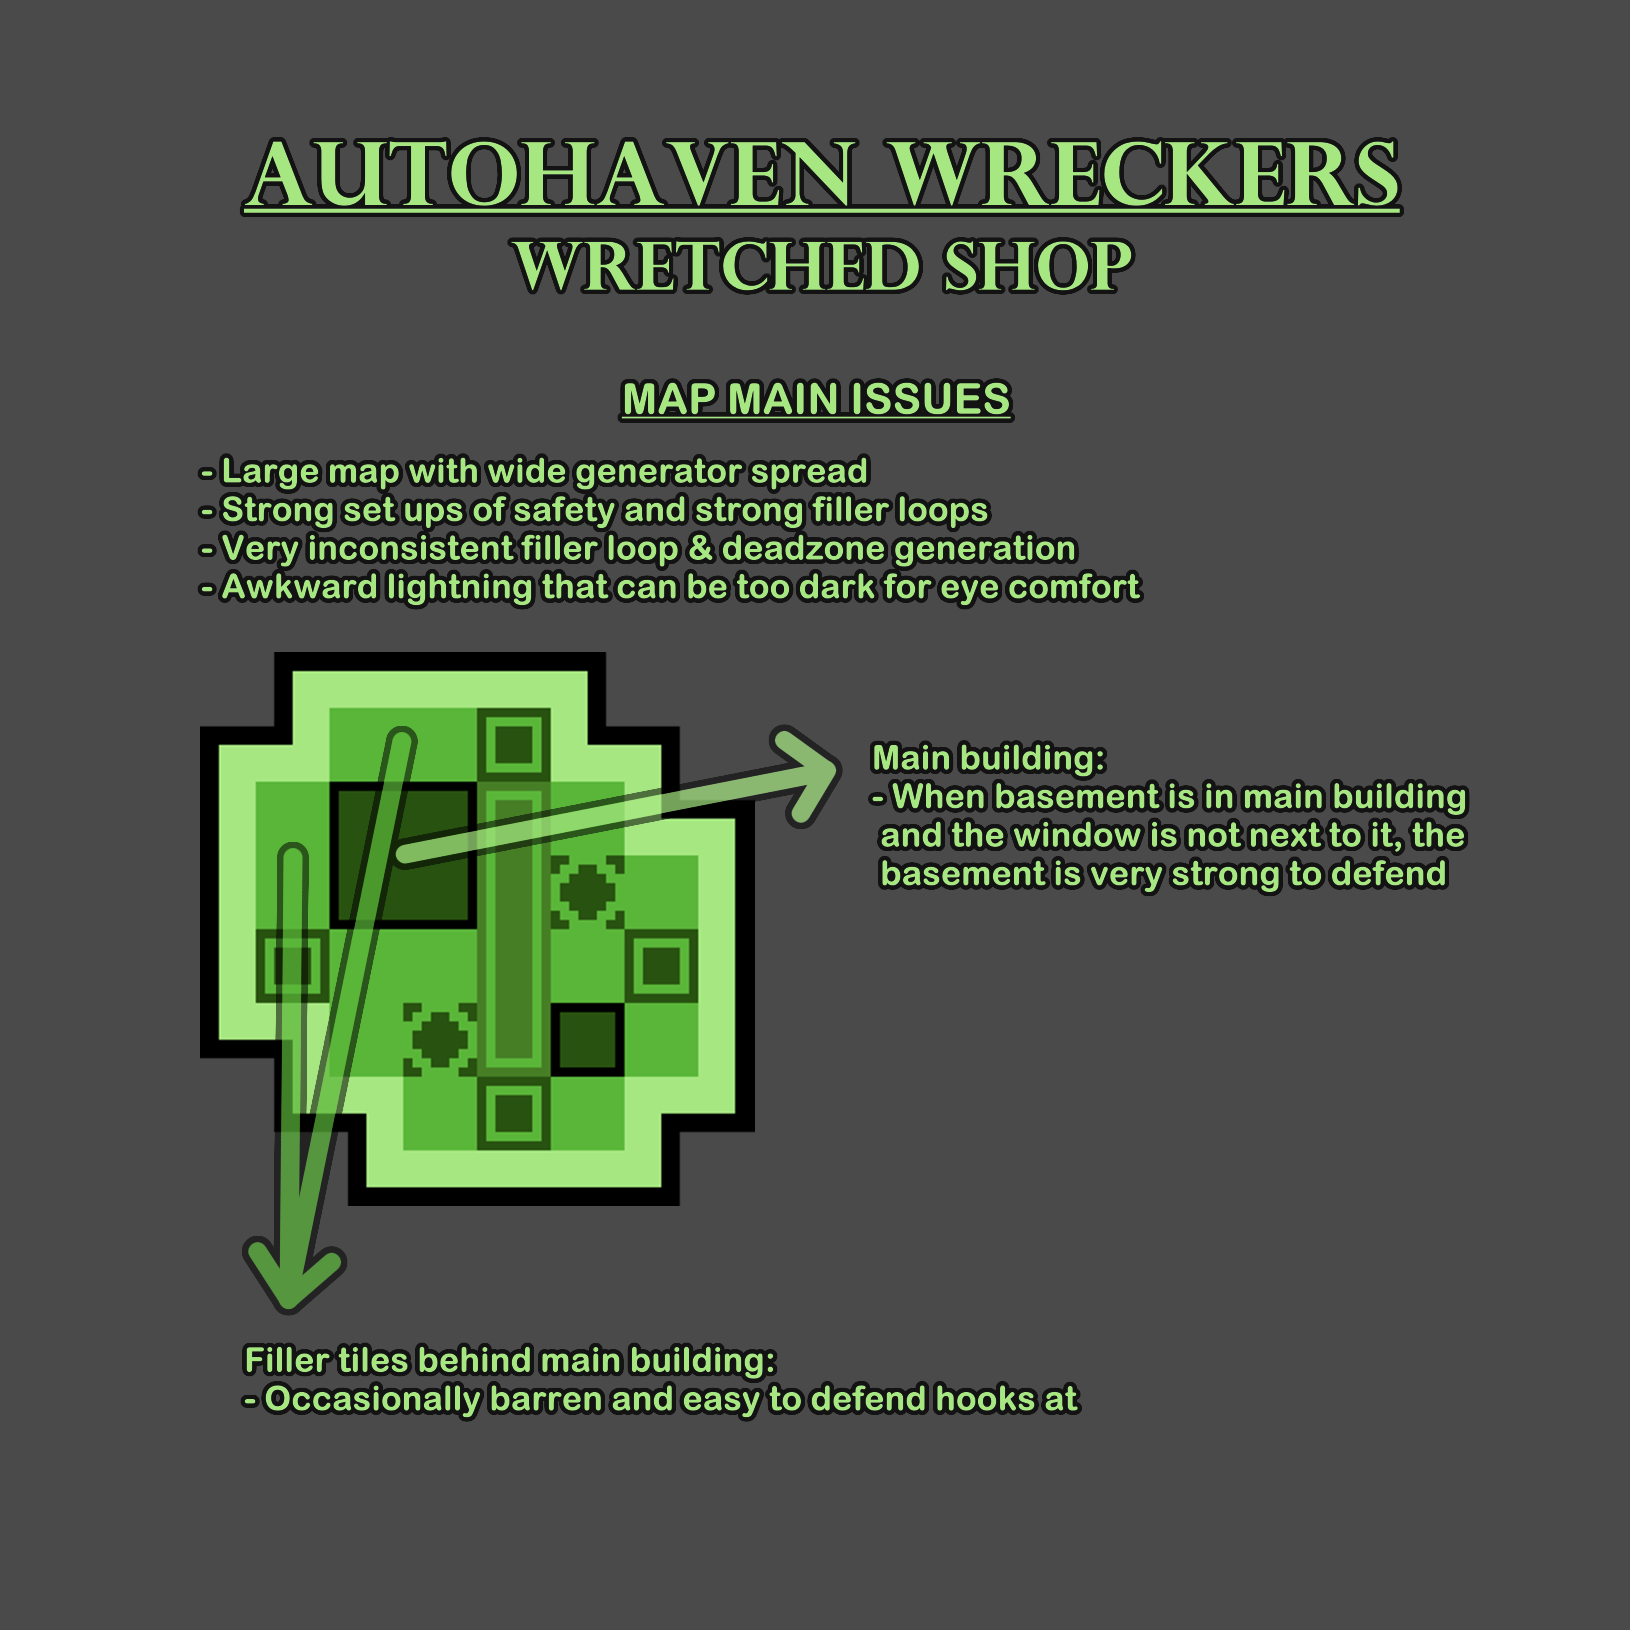
The realm Autohaven Wreckers could improve its lightning and the stronger filler loops could be nerfed slightly to then increase the pallet density a little.
The map Wretched Shop should get a size reduction which would help killers manage the generators as well as reduce the potential for deadzones which would also help survivors. The map should also stabilize its pallet density to reduce its vast discrepancy between trials. Main building could get some tweaks like a new extra opening on the back so basement is more accessible for both roles and so survivors aren't boringly trapped inside the building while chased.
-
Ironworks of Misery differs massively between variations, both sharing a large size that carries problems. The main building's second floor extrapolates the chase from the rest of the map a bit too much and the many totem spawns up there make boon totems very time wasting to get rid of. The crate fillers in MacMillan are a bit too strong (the rock fillers can be mindgamed if the survivor doesn't drop the pallet early so there is a risk-reward) but Ironworks of Misery II doesn't spawn normal crate fillers due to the agglomeration of predictable elements in the map.
Ironworks of Misery I favors survivors, it has a wide spread of generators that is hard to defend for the killer. It counts with a chain of mazetiles near shack that is often powerful along with complementary filler loops. The pallet count is highly inconsistent (about 8 to 17).
Ironworks of Misery II is one of the worst designed maps in the game, it is hard to tell which side it favors but that is hardly the problem. Its large size makes generators hard to patrol unless the killer plays territorial around the area near main building which despite being smaller than the other part of the map, somehow spawns more generators. That area of the map also spawns the most pallets (in total the map gets about 10 to 12 pallets, usually 10) which is heavily influenced by two factors: the 2 fixed hills (one between two mazetiles and main building and the other one in the center of the other side next to two mazetiles and diagonal to the landmark) and the overwhelming amount of road / path fillers that surround the center of the other side of the map, which collectively spawn very few pallets due to being linked together. This map is badly distributed to the point of generating absurd iterations where most pallets and generators are in the smaller side of the map and the larger side is awkwardly barren.
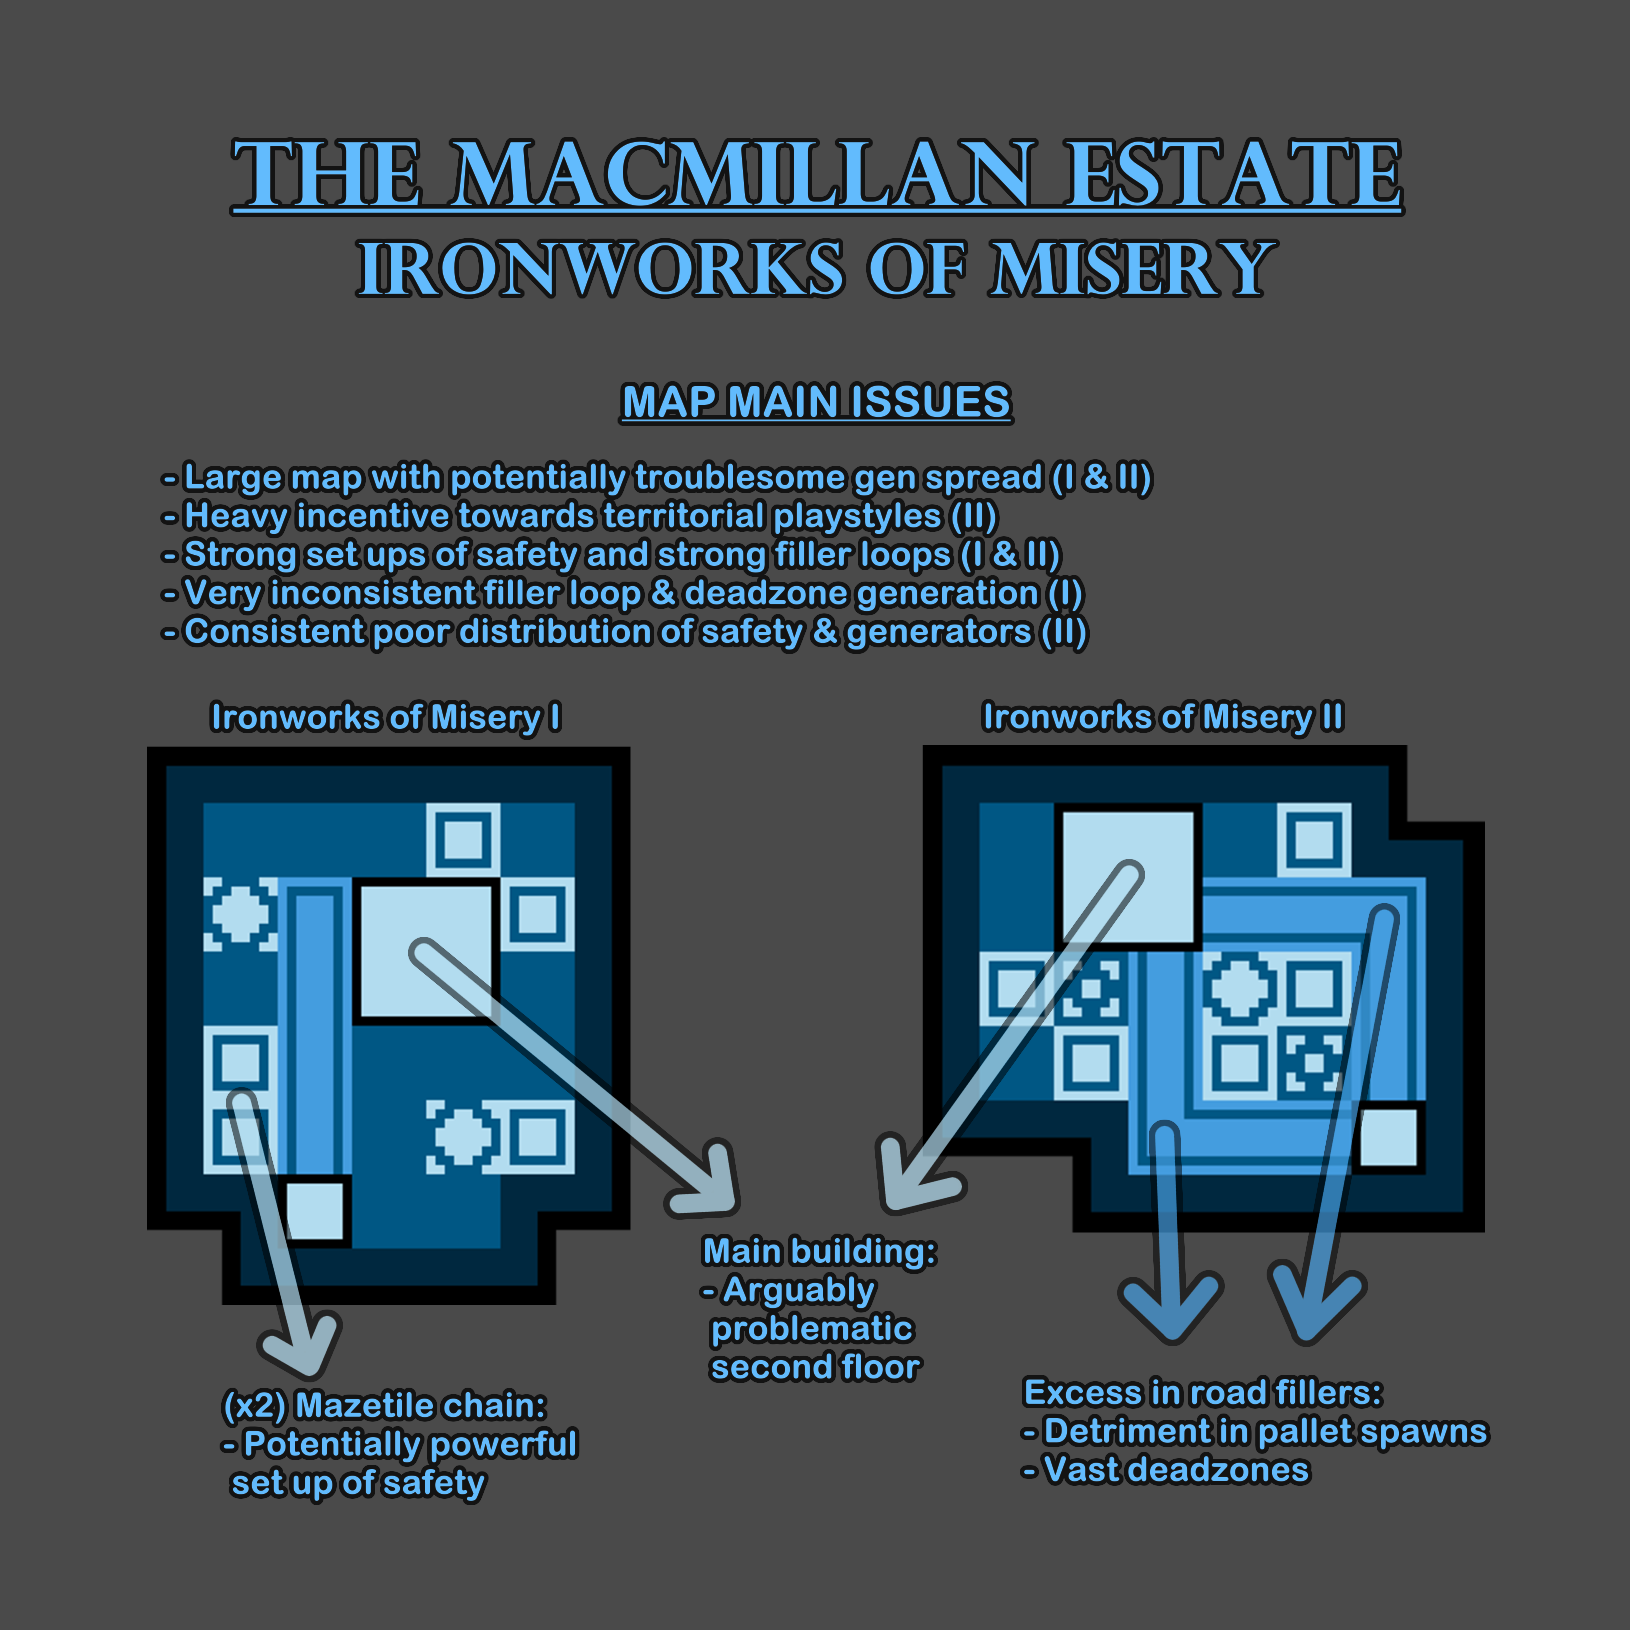
The realm The MacMillan Estate should receive a slight nerf to the design of crate fillers (where killers can't mindgame nor outplay a dropped pallet in most cases) to allow the filler loops to be more numerous and consistent.
Both versions of the map should keep 5 mazetiles since that is the appropriate amount for the realm. The main building might need some changes to the upper floor but at the very least it should still have some elevation (so balanced landing can still be used there).
Ironworks of Misery I should receive a size reduction and a minor adjustment to the mazetile chain where the landmark is placed inbetween, like in the example below.
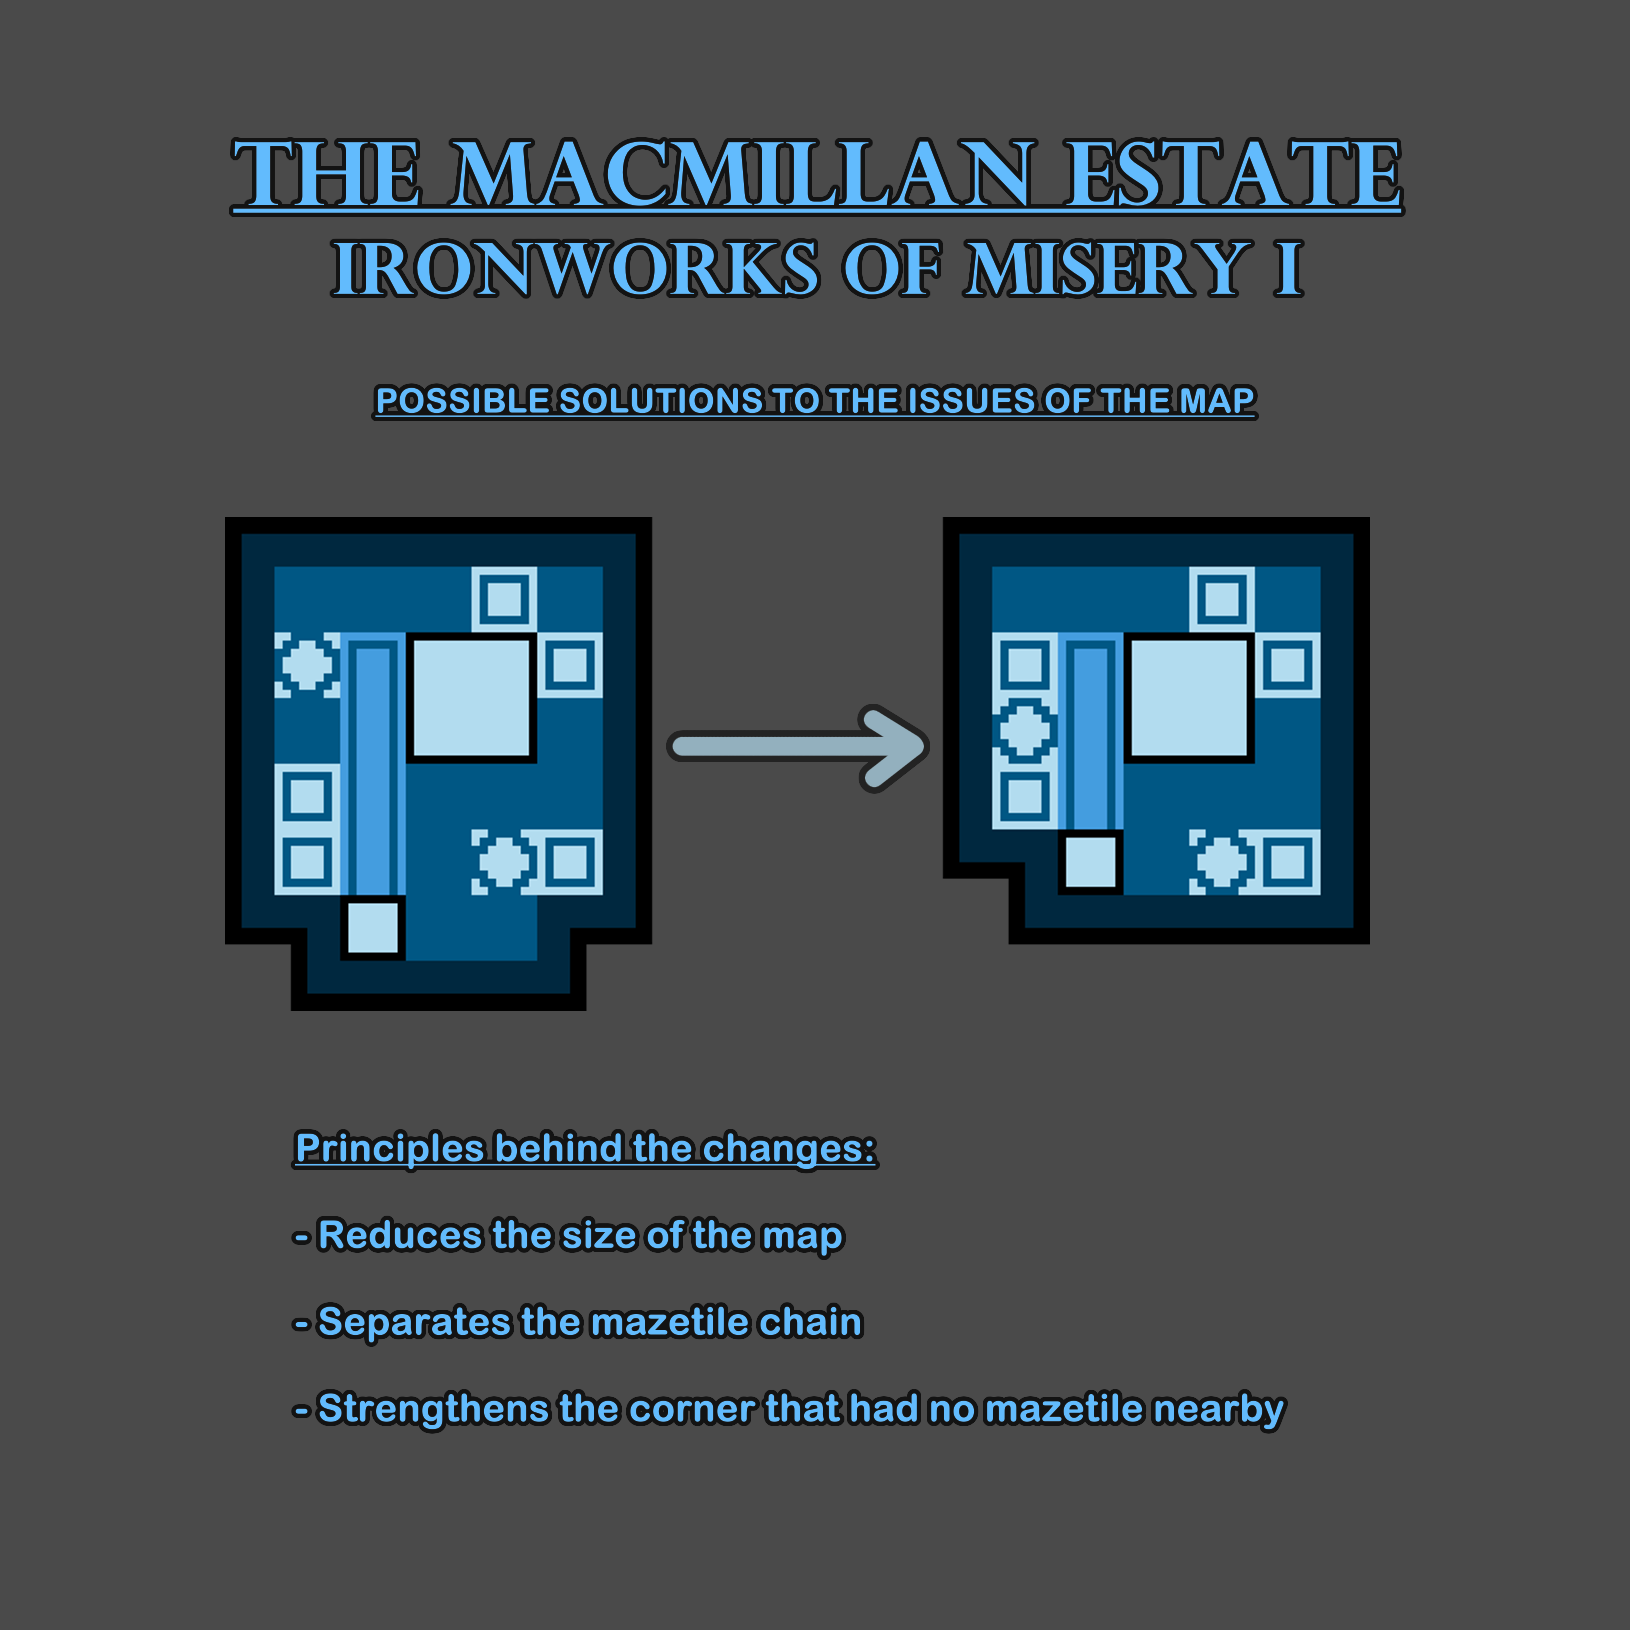
Ironworks of Misery II should get a layout overhaul that reduces the size of the map and the amount of road / path filler loops.
-
Coal Tower I is one of the most balanced maps in the game but it is not without some jarring flaws. Coal Tower II is different enough to the point of being killer sided. Both maps have issues with perimeters of generators that may or may not result hard to contest for survivors. The crate fillers in MacMillan are a bit too strong (the rock fillers can be mindgamed if the survivor doesn't drop the pallet early so there is a risk-reward) which can tilt the scales depending on the RNG.
Coal Tower I has a chain of 2 mazetiles that can turn problematic with the right set up. On the other side of the map from that chain, the single mazetile can potentially line up with main building's window (regardless of which window opens up, they always link to the same tiles around the building) creating a very powerful set up. There is a corner of the map composed by filler tiles that could be completely barren or full of loops. The pallet count is highly inconsistent (about 8 to 15 pallets), shifting the strength of the map a lot.
Coal Tower II has both mazetiles around main building potentially lining up with the window, doubling the chances for such a set up to happen. Unlike Coal Tower I, the survivors are very easily zoned both in chase and in the overall panorama of the match, which is mainly caused by the excessive amount of corners in the shape of the map combined with the consistently low amount of pallets (about 9 to 11). The (4 tiles) long path that crosses the middle of the map is very likely to not have many pallets and therefore contribute to the previous point by leaving the center so barren.
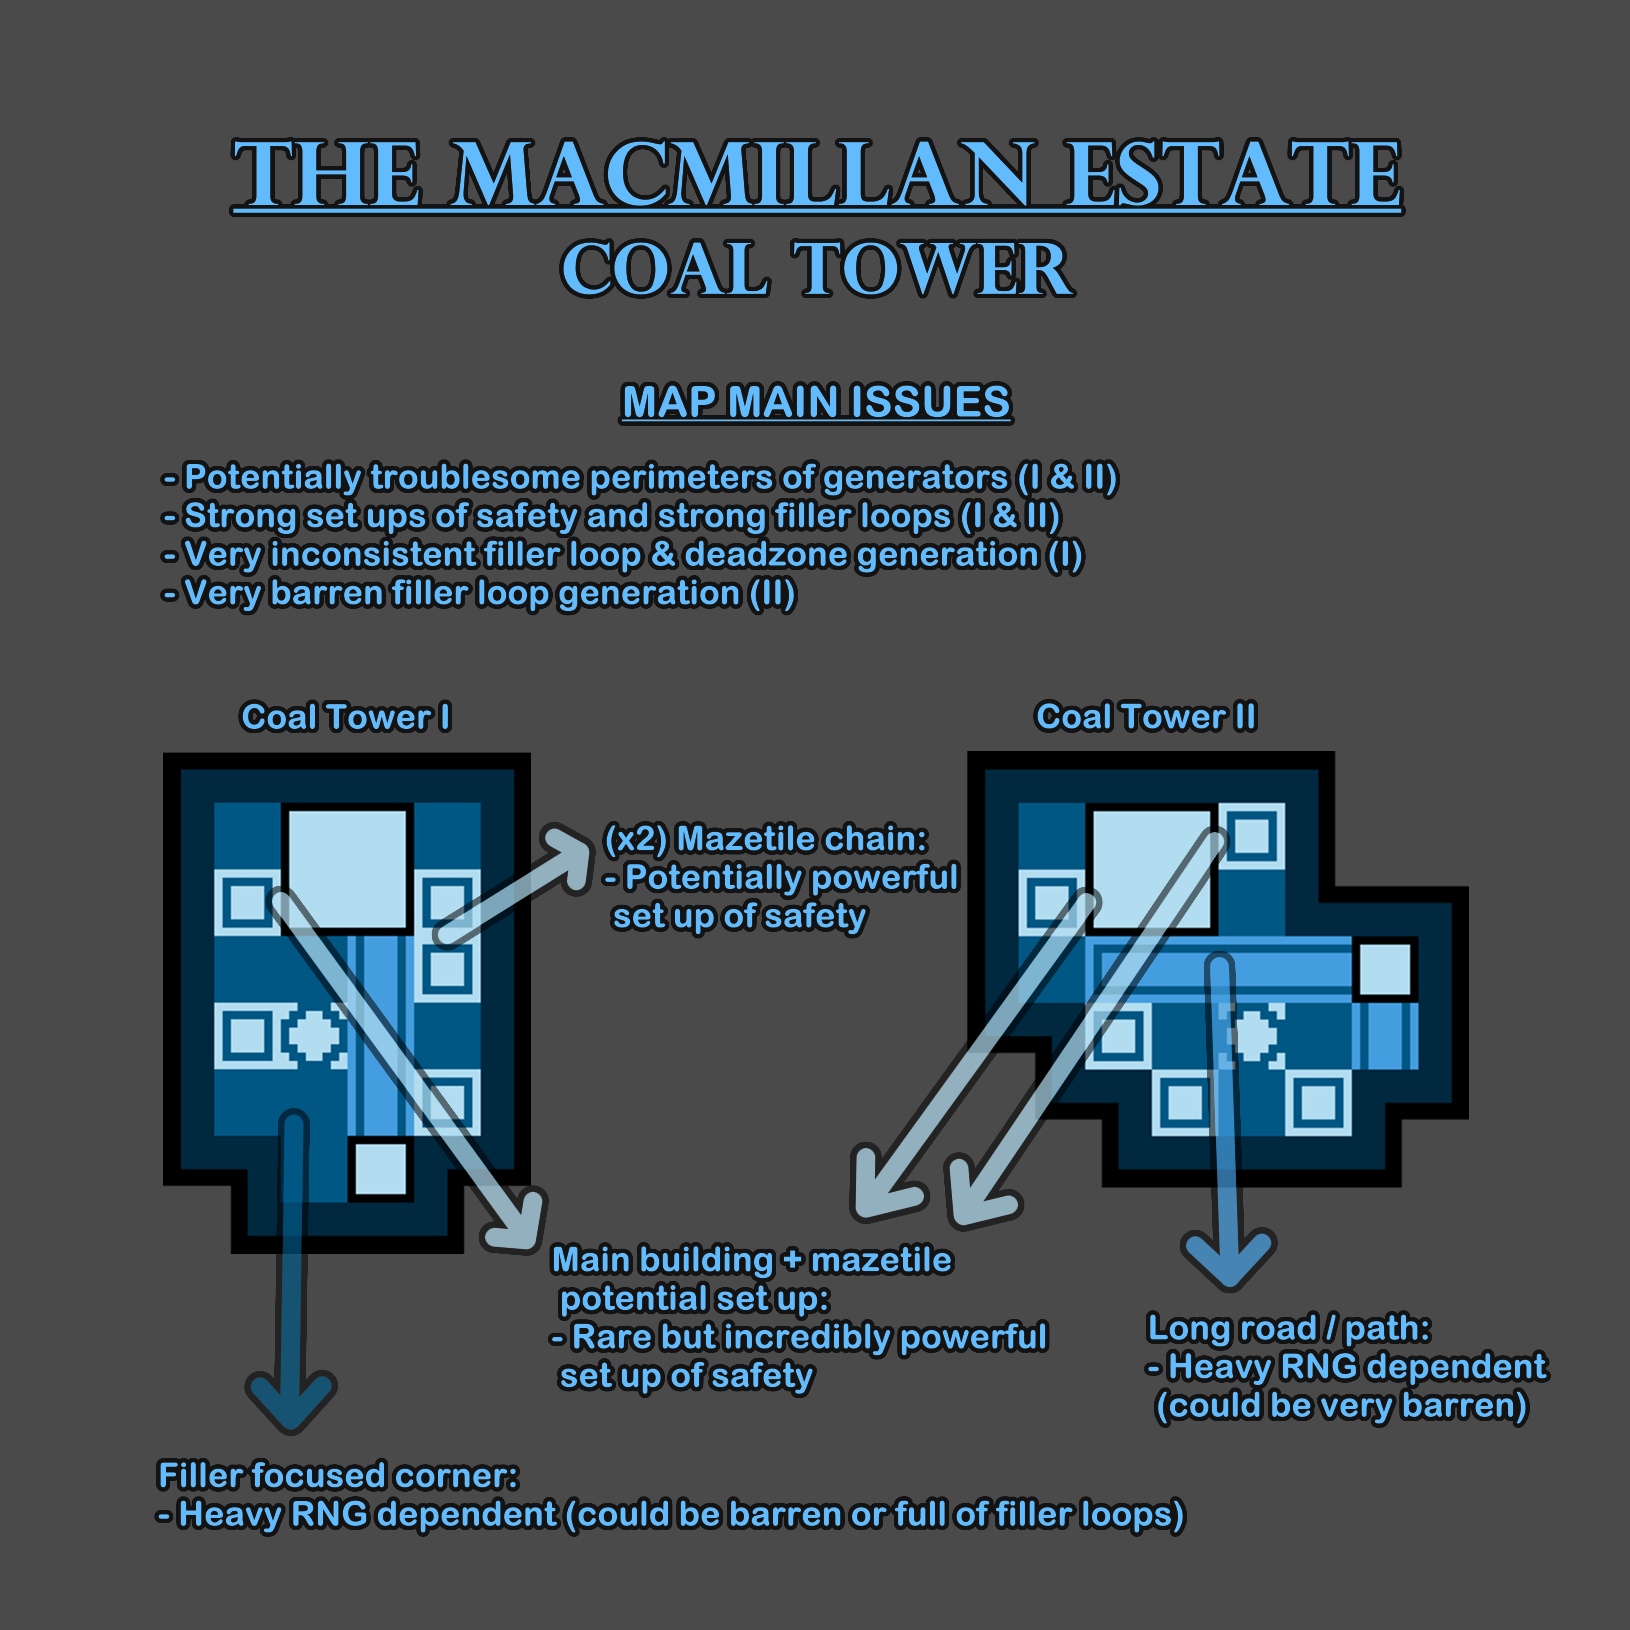
The realm The MacMillan Estate should receive a slight nerf to the design of crate fillers (where killers can't mindgame nor outplay a dropped pallet in most cases) to allow the filler loops to be more numerous and consistent.
Coal Tower I should stabilize its pallet count and it could relocate the mazetiles like in the example below to separate the chain, remove the potential set ups with main building, strengthen a corner near main to weaken the 3 gen perimeters and also reduce the randomness of the filler heavy corner.
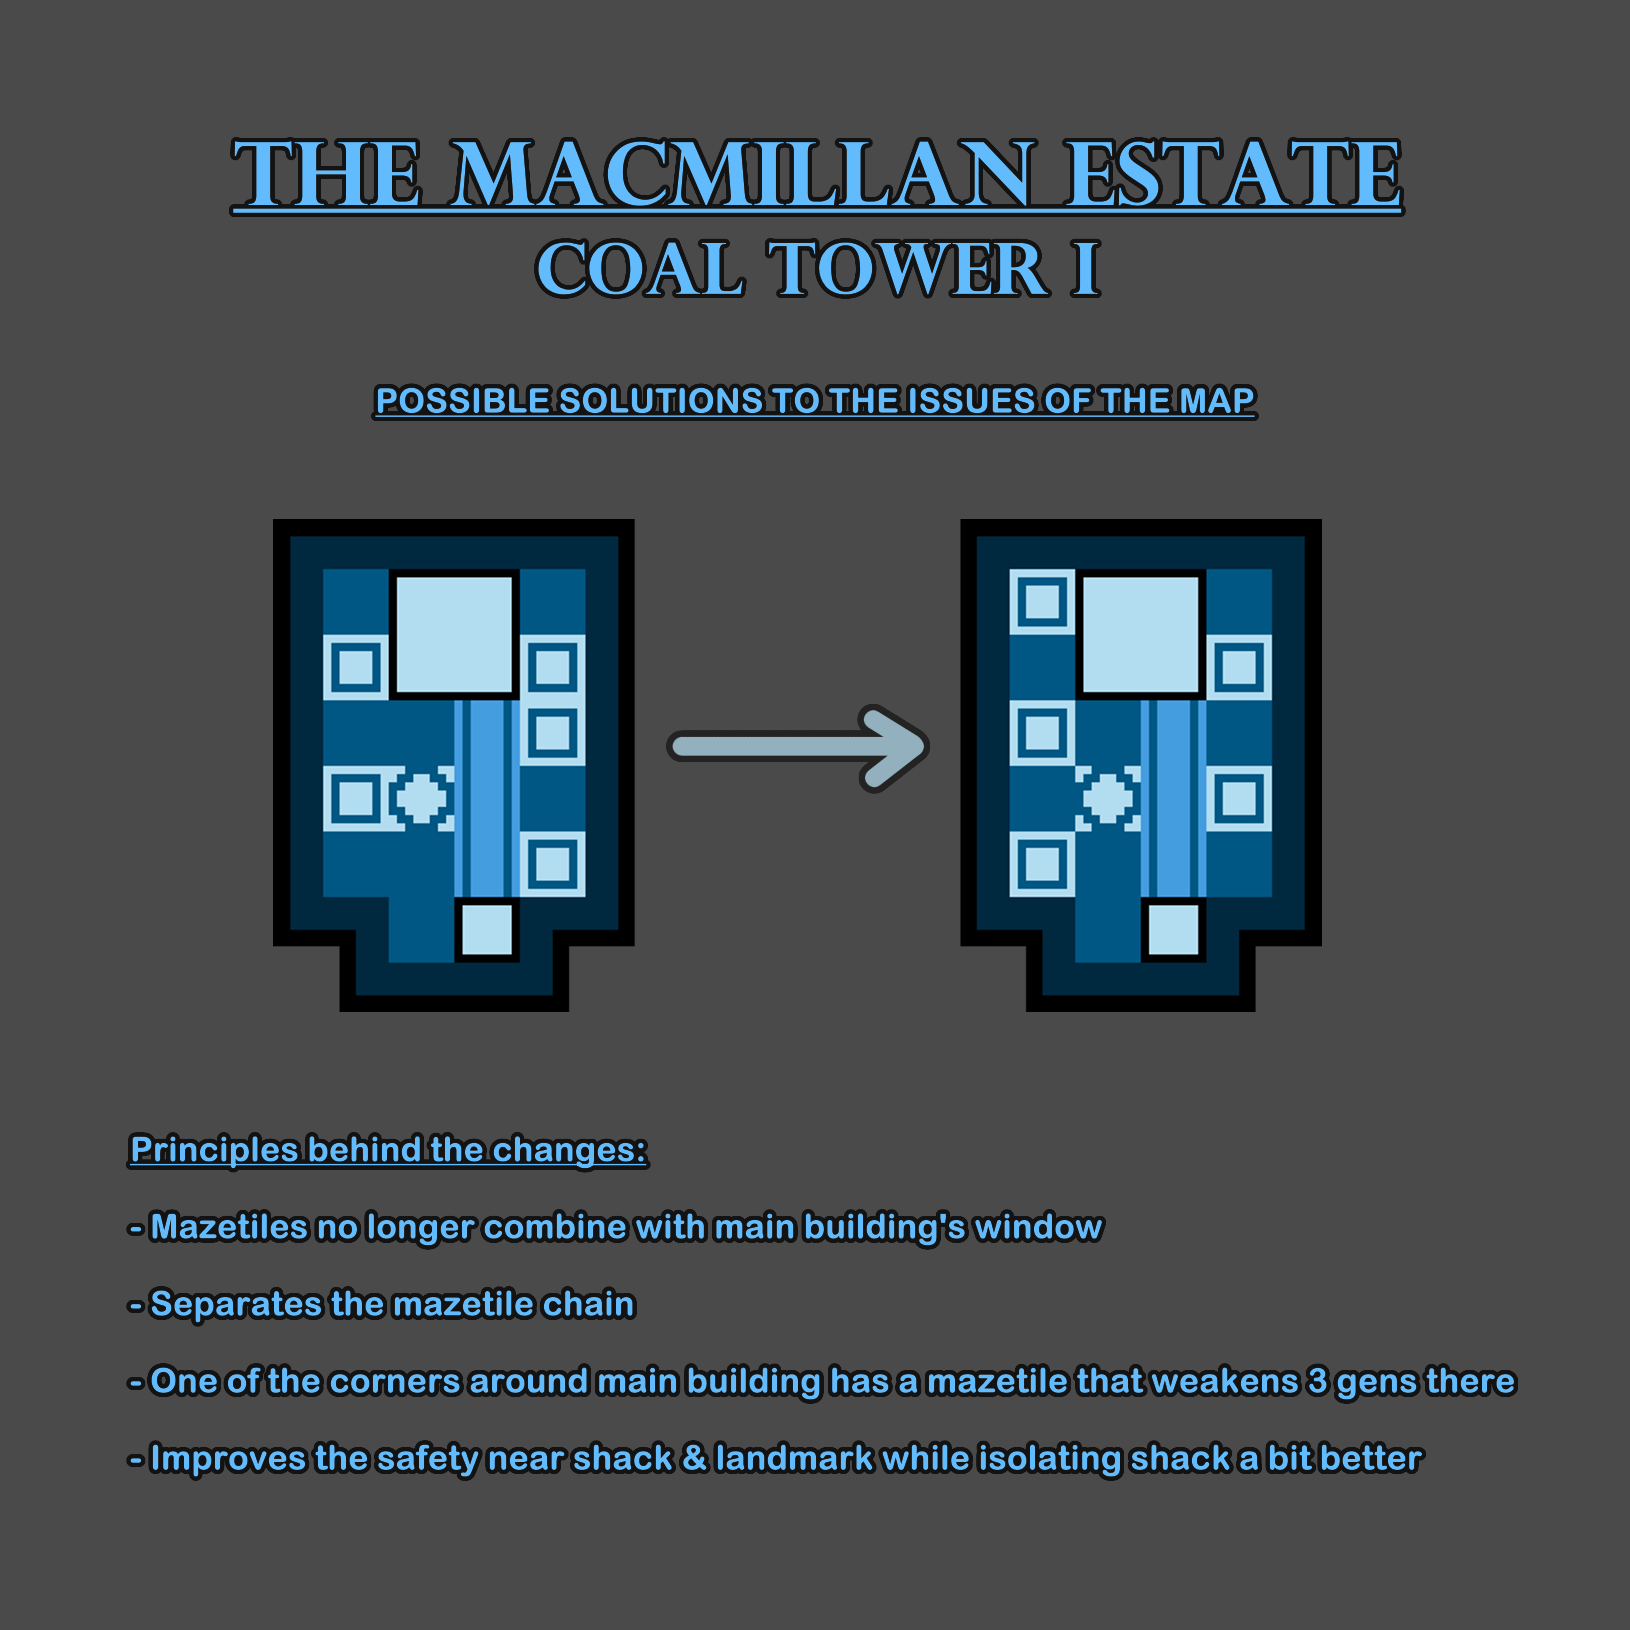
Both versions of the map should keep their 5 mazetiles since it is the right amount for its realm.
Coal Tower II needs a higher pallet count, relocate the 2 mazetiles around main to not line up with the window of the building and overall tweaks to the layout.
-
Groaning Storehouse differs from one version to another but both share the same issues, which are more prominent in variation I. The map favors survivors on version I and leans a bit more towards balanced on version II.
They are both large maps with an awkward shape that creates pockets with problematic gameplay, Groaning Storehouse I has 2 of these pockets and variation II has only 1 pocket which is shorter too. They spread the generators in such a way that some are so far from the rest that it is only worth patrolling the ones in the pockets when the spawns align with a favorable perimeter there. Defending hooks inside the pockets can make it very costful for the survivors to rescue because the killer can control the entrance to the pocket while ignoring the anti-facecamp mechanic. If the hook deep inside the pocket is disabled due to a sacrifice or sabotage, the killer may be unable to hook from there.
Main building's secondary window (the one unaffected by the status of the breakable wall) is highly problematic since some 4.4 m / s killers can be looped there indefinetely given they are uncapable of entering chase nor catching up (and their power doesn't get a line of sight for long enough) if the survivor has the proper headstart.
The amount of pallets is very inconsistent (about 8 to 16 in Groaning Storehouse I and about 8 to 12 in version II). The crate fillers in MacMillan are a bit too strong (the rock fillers can be mindgamed if the survivor doesn't drop the pallet early so there is a risk-reward). Groaning Storehouse I has 7 mazetiles which is too many, 5 would be sufficient. Groaning Storehouse II has the right amount of mazetiles, has more consistent pallet spawns and the pockets issue is less prominent, making it the better designed version of the two.
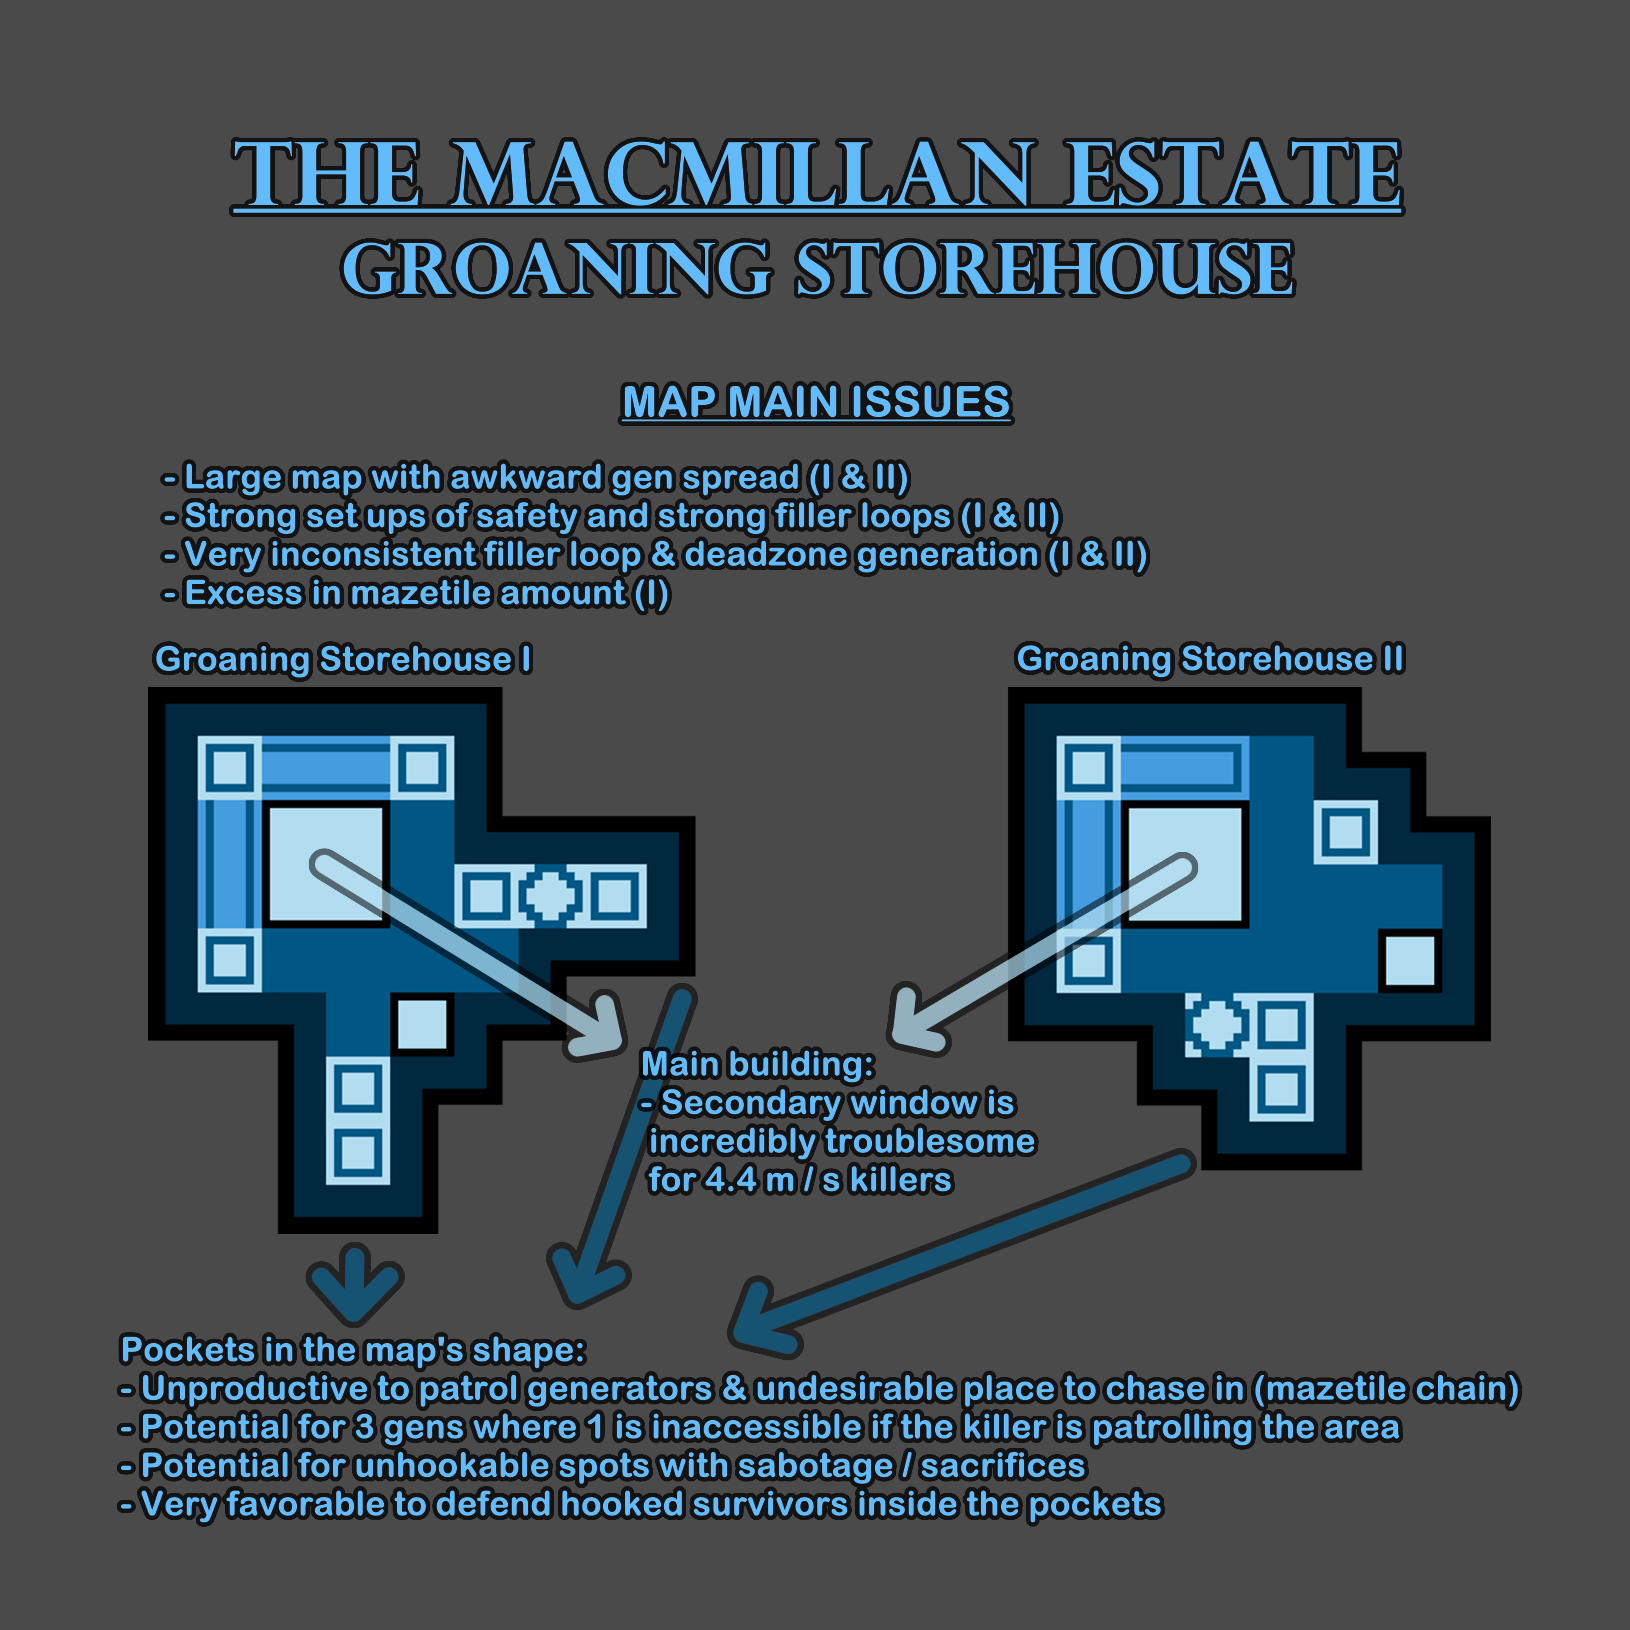
The realm The MacMillan Estate should receive a slight nerf to the design of crate fillers (where killers can't mindgame nor outplay a dropped pallet in most cases) to allow the filler loops to be more numerous and consistent.
Groaning Storehouse (I & II) should get their pocket shaped layout redesigned, main building's secondary window should be addressed, the pallet density should be stabilized and Groaning Storehouse I should reduce its mazetile amount to 5, while variation II keeps its amount at 5 too.
-
Shelter Woods has two versions that are quite alike with not that many differences, yet these are distinct: variation I has 3 mazetiles, 0 hills and a very unoptimized layout, while variation II has 4 mazetiles, 1 fixed hill next to the tree landmark and an optimized layout where all mazetiles and shack are placed along the edge of the map, leaving not as many gaps without structures. The main issues of the map are shared in both versions. The map could be regarded as slightly survivor sided, with variation II being more survivor favored than variation I.
There are 3 maps that rank as largest and Shelter Woods are 2 of the 3 maps, its vast size makes the generator spread quite troublesome and despite the map having consistent pallet counts in both versions (about 12 to 14 pallets in Shelter Woods I and 12 to 13 in Shelter Woods II), it results hard for survivors to find which rock have pallets due to the magnitude of the map and the fact all fillers are rock loops. The focus on rock fillers, with over half the pallets being filler loops, makes the chases feel too dull.
The MacMillan Estate is a realm that provides good consistent safety when the amount of mazetiles is 5, since it has 7 types of which 3 are strong (meaning that with 5, the survivors will at least have 1 strong type). Shelter Woods fails to meet this requirement in both versions, which is a subtle but important issue. Related to this, the locker distribution of the map is horrible because there are lockers only at the 3-4 mazetiles, main building and shack.
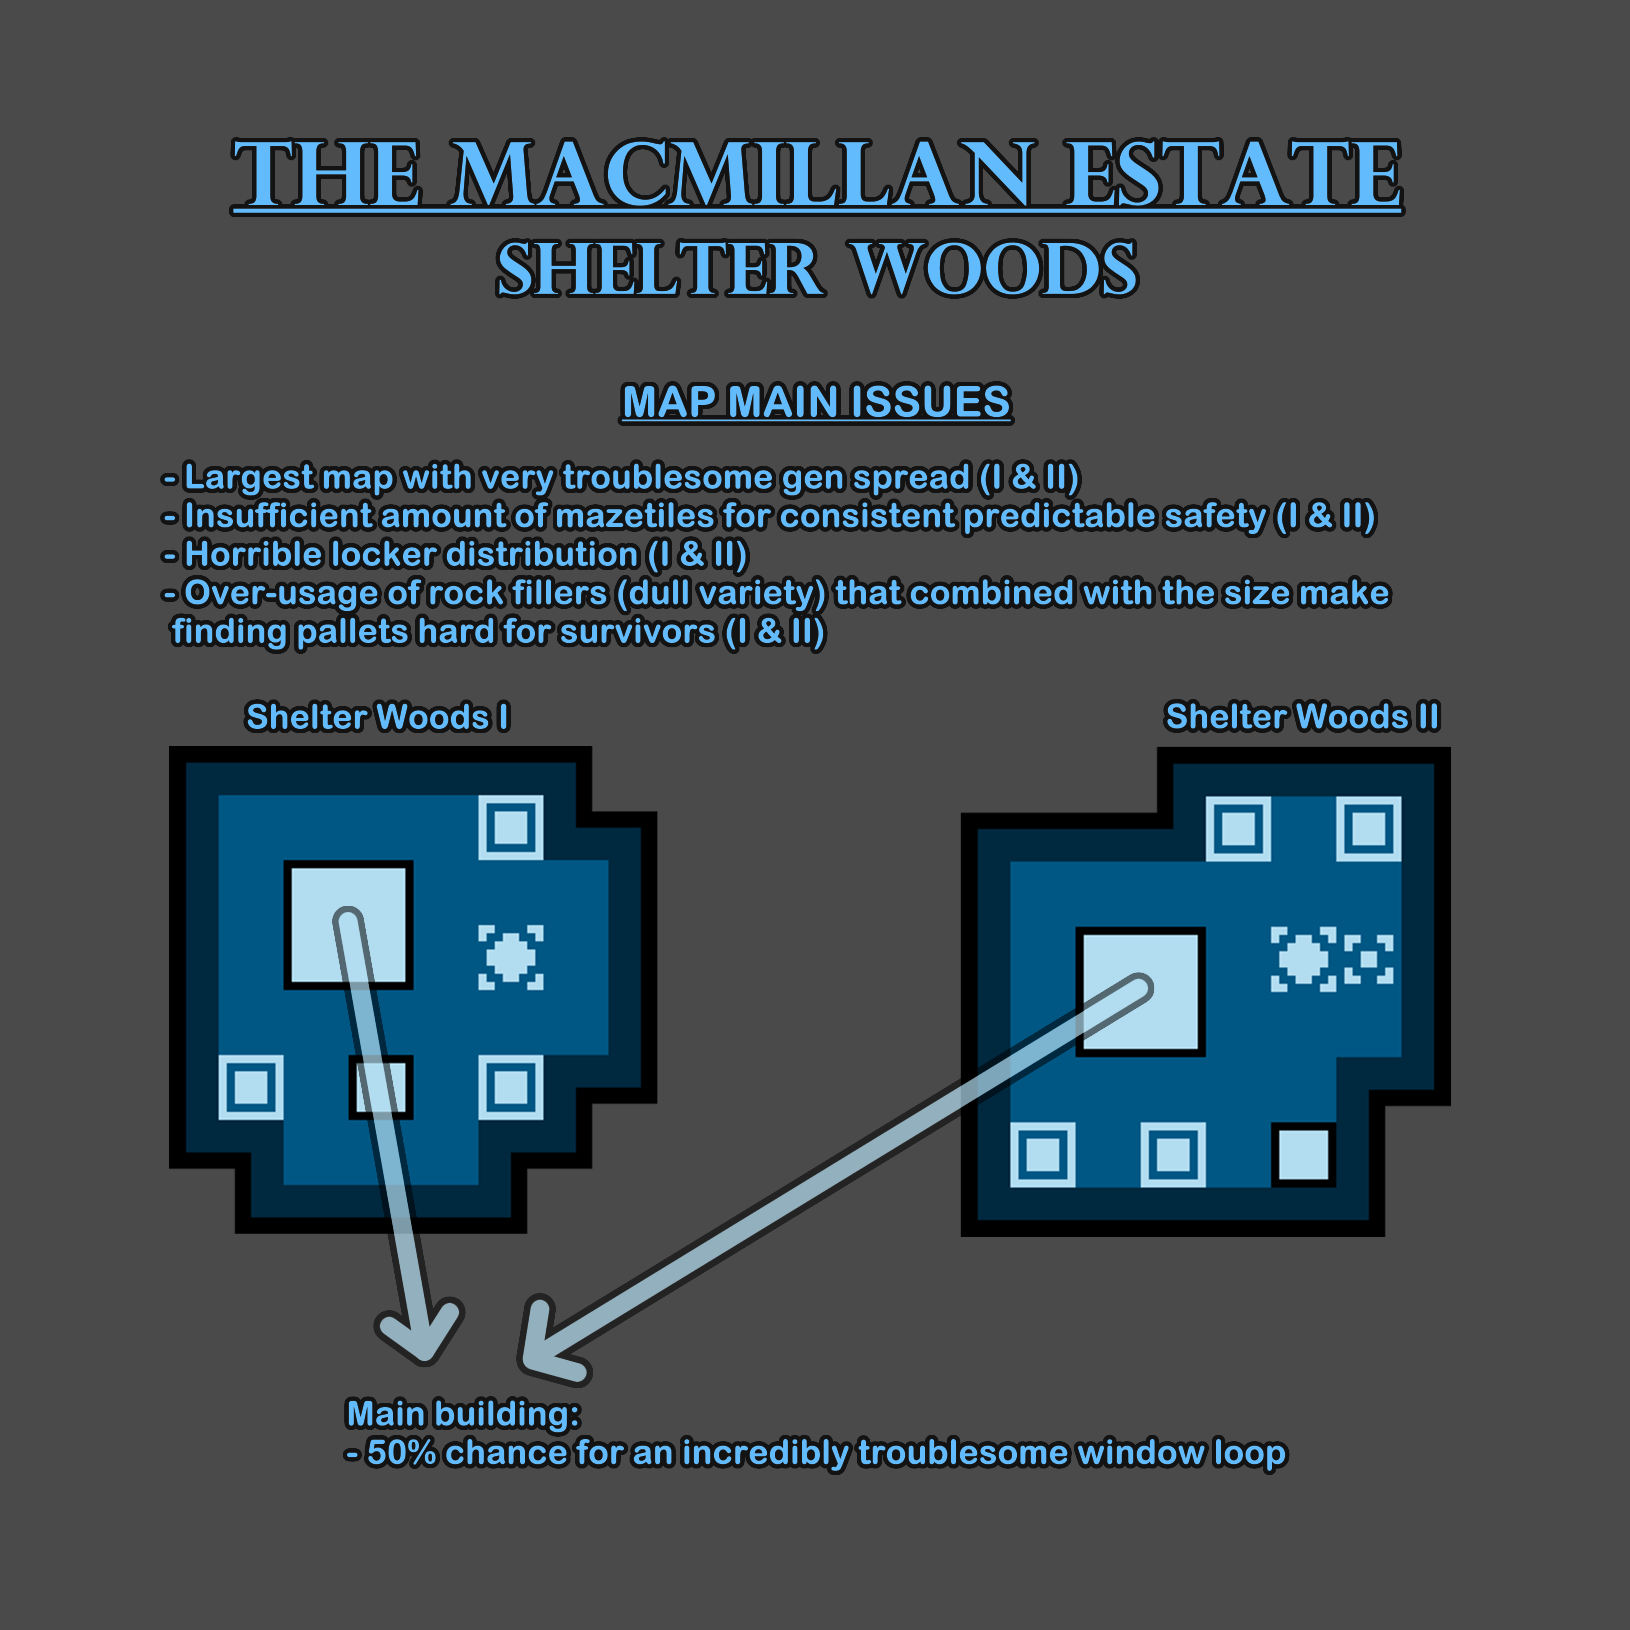
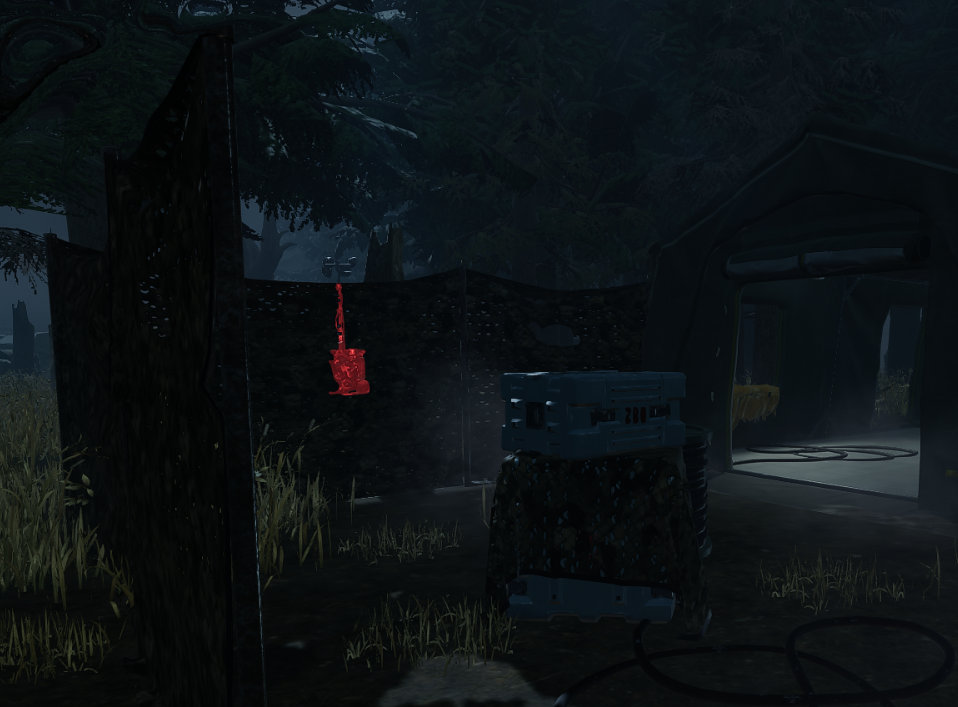
The main building counts with 4 fixed windows and 2 fixed pallets, but one of the windows has a variable at the loop it belongs, since the doorway next to it switches from side to side. When the resulting loop has the L shape, this loop becomes "an infinite" because the survivor can stay out of chase (with the right initial distance) and vault the window endlessly without being caught while being able to keep track of the killer through the wall (which is not fully opaque). Without a compatible power or a window blocking perk, the killer can't outplay this loop.
Shelter Woods should reduce its size and increase its mazetile count to 5 to add consistency to the predictable safety, make the rock filler loops not so prominent and improve the locker distribution of the map. The main building "infinite" should be addressed too.
-
Suffocation Pit has 2 versions that differ greatly from one another. Both variations are large maps with an arguably troublesome generator spread that count with the same amount of mazetiles and landmarks; they also stand out in the realm for having crate and rock filler loops but no road crate filler loops.
Suffocation Pit I has a long shape with a clustered middle full of mazetiles and inserted edge of the map walls that divide the map in two sides. This layout manipulates the gameplay of the map by heavily punishing a killer that takes chases anywhere and plans to pressure the team through many hooks, while a more territorial playstyle can potentially give an edge to the killer by holding the middle while defending hooked survivors and / or generators on one side of the map (which at times can be unevenly spread across sides). On top of the issued gameplan, there is a crippling problem with the pallet count in this version of the map (about 8 to 17) due to the absurd discrepancy in amount between trials as well as the potential for deadzones given that all 5 mazetiles are located in the middle and filler loops are this inconsistent.
Suffocation Pit II has a more "standard" layout and is probably preferred by most people eventhough it is not the "classic" version of the map. It favors survivors, probably more than any other map in the realm, but other than a chain of 2 mazetiles that are adjacent to each other, there is nothing that stands out too much. The map is subtly too large so the killer struggles to defend the gens, the pallet count (about 10 to 14 with average 13) is decently consistent (which is good) but the crate fillers in MacMillan are a bit too strong (the rock fillers can be mindgamed if the survivor doesn't drop the pallet early so there is a risk-reward), which combined makes the difference.
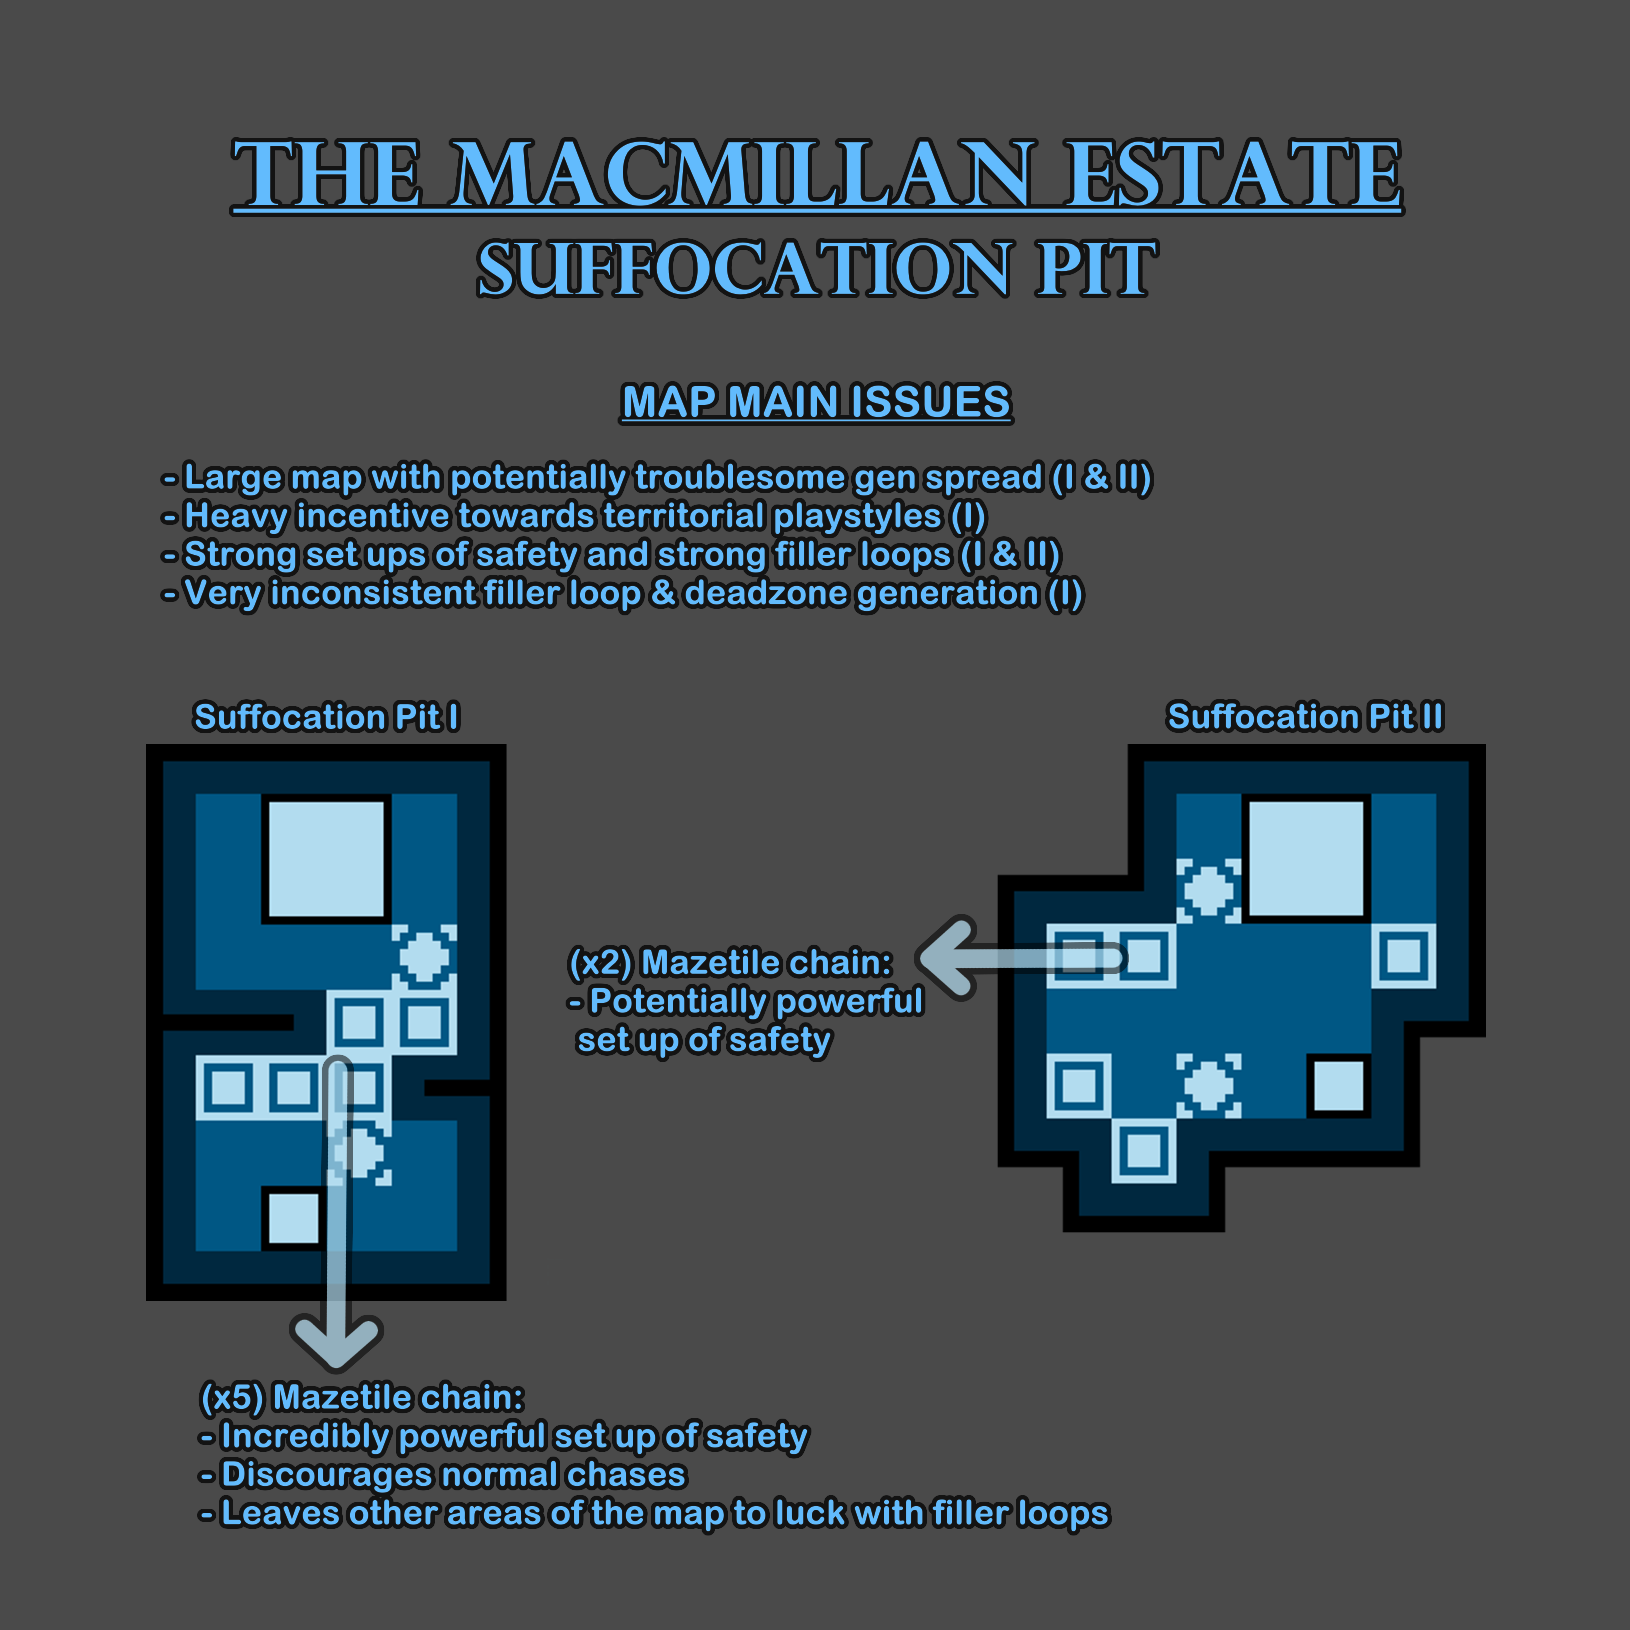
The realm The MacMillan Estate should receive a slight nerf to the design of crate fillers (where killers can't mindgame nor outplay a dropped pallet in most cases) to allow the filler loops to be more numerous and consistent.
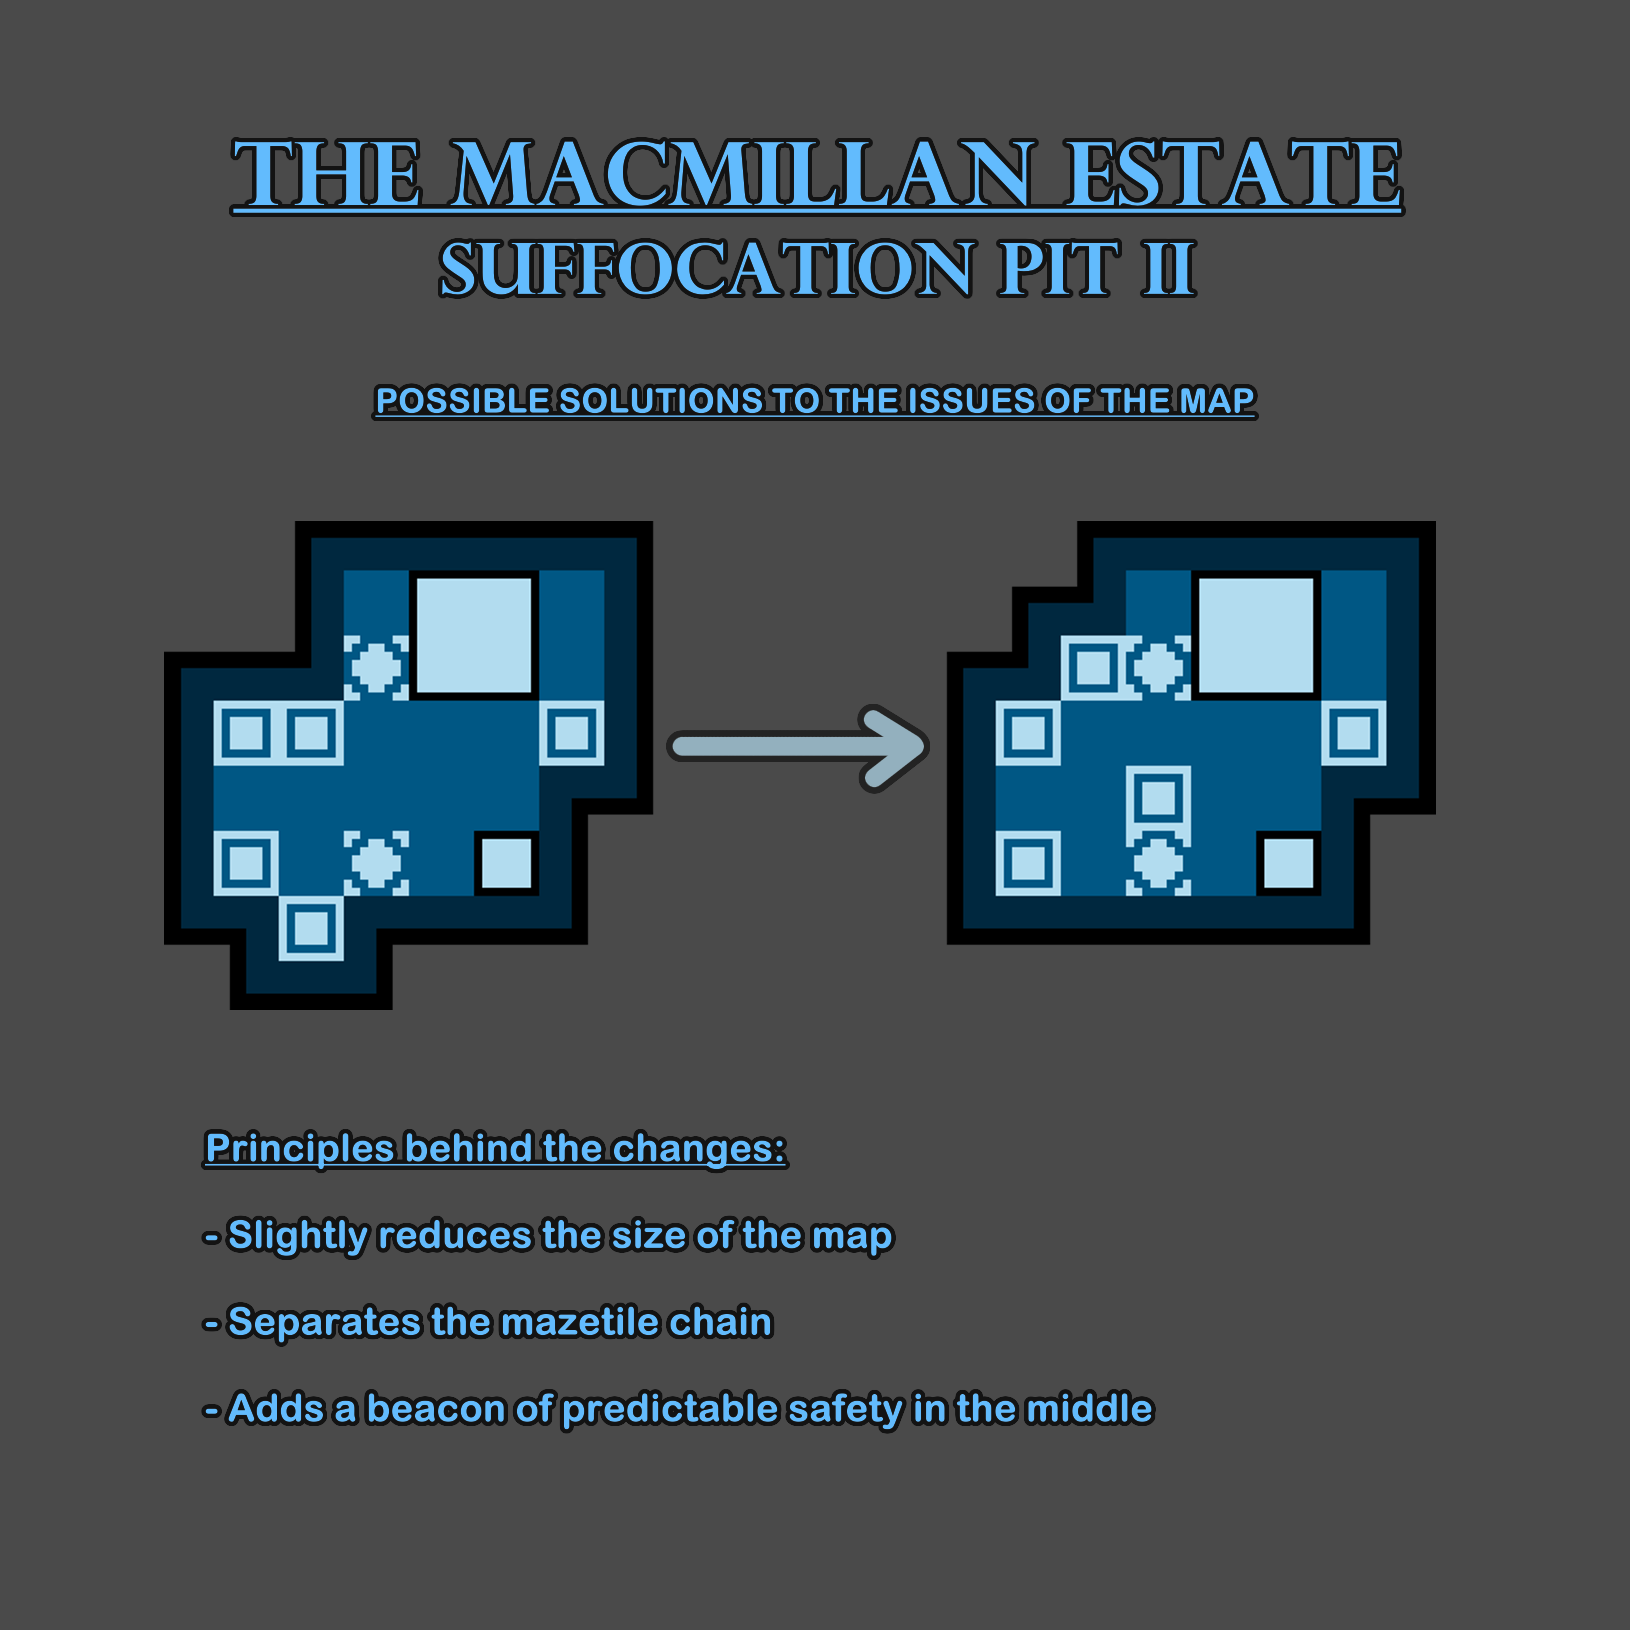
Suffocation Pit I should stabilize its pallet density to be more consistent & consider a layout overhaul and size reduction. Suffocation Pit II should separate the 2 adjacent mazetiles and slightly reduce its size (very minimally, like in the example below). Both versions should keep their 5 mazetiles, which is the amount that is stable for this realm (given the 7 types that are found in the realm).
-
Rancid Abattoir is a slightly killer favored map that carries problems from its realm and that suffered a rework that brought plenty of new issues to the map while not necessarily addressing all of the old ones. The 2 corn exclusive fillers tiles (where only a few weak filler loops spawn) isolate the shack away from the rest of the map. The size of the map got slightly increased for no reason and the shape got altered, 2 of its 5 mazetiles were removed and the pallet count remained the same while acquiring corn filler loops that replace some of the pallets, altogether making the map get 4 more corn tiles on average, in an update that was supposed to make the corn less prevalent in the realm of Coldwind Farm.
Coldwind Farm always had a very unique ruleset for its mazetiles, having both consistency and good distribution. Ever since the patch 6.6.0 (hidden mazetile RNG change that affected over 20 maps), Rancid Abattoir would always have 2 jungle gyms (classic pallet & window mazetile), 1 pallet gym (classic pallet only mazetile), 1 LT (classic double window mazetile) and 1 additional pallet gym or LT; the mazetiles would have one jungle gym in one corner of the map all the time and then have the other jungle gym on one of the two mazetiles furthest from it, granting the map with good distribution of safety. Unfortunately, the last Coldwind Farm update ruined this ruleset by removing 2 of the 5 mazetiles in the map, leaving the map lacking in strength in this department that is such a pillar to good balance (since mazetiles are loops that offer decent or strong safety while introducing risk-reward where survivors can drop the pallet early to be safer at the cost of losing the resource quicker vs the survivor not dropping the pallet to preserve it yet allowing the killer to potentially mindgame them to get a hit, which doesn't happen on most filler loops where the survivors keep visual on the killer all the time).
Despite the rework removing 2 of the 5 mazetiles (1 more than necessary), it still let a mazetile and a landmark be adjacent to each other, keeping the unpleasant possibility of having a set up that includes the cowtree (sacrificial tree) and a jungle gym, which will occur 1/6 of the time (since the cowtree will be there half the time and the jungle gym will be there a third of the time).
The realm Coldwind Farm is known for having very strong safety yet not a very high amount of pallets, favoring skilled survivors over killers since the limited amount of safety is enough to excel but the less skilled survivors can be at a frustrating disadvantage. This unfair and unfun gameplay loop is enabled by the filler loops, their low amount yet overwhelming safety grant the survivors too few loops to play with and don't allow the killer to outplay most of them (unless their chase power does). All the haybale filler loops are safe and some even trick the killer into attempting mindgames when the survivor can see them over the loop (but the killer can't see the survivor). The plank focused fillers overall lean more towards semi safe except for one that is excessively large with a tractor on one side and a very large L shaped long side (this loop is absurdly safe). The new corn located fillers are unsafe.
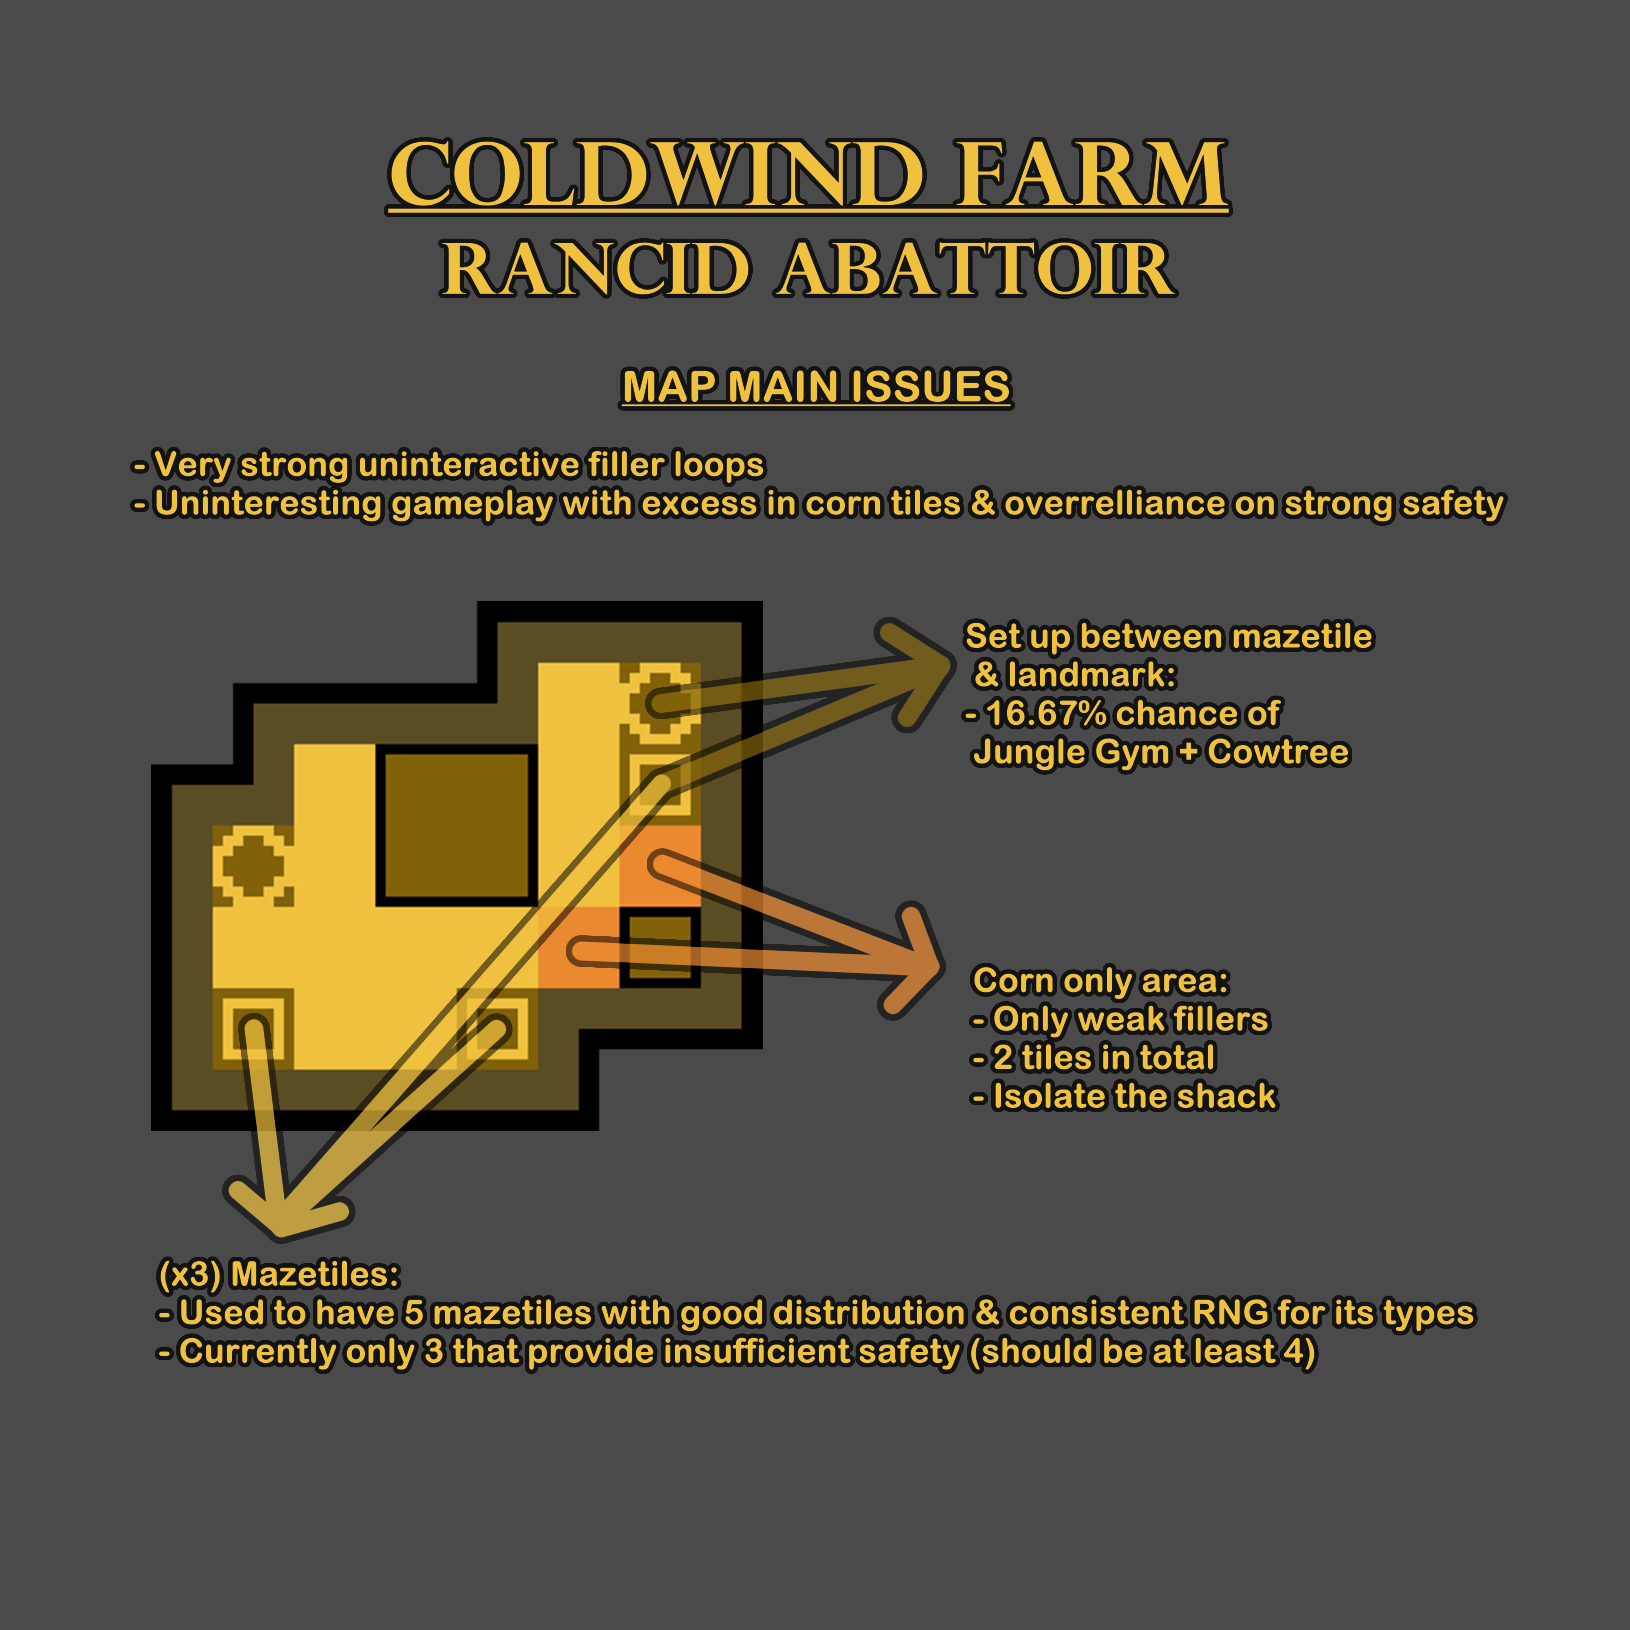
The realm Coldwind Farm should receive nerfs to the strong fillers while increasing the pallet density to compensate (and therefore make the gameplay more interactive with more loops for the survivors to use yet more room for the killer to outplay them).
The map Rancid Abattoir should increase its mazetile count to 4 while incorporating a ruleset that lets it have 2 jungle gyms, 1 pallet gym and 1 LT where the 2 jungle gyms don't appear near each other, achieving consistency and good distribution of safety. The landmarks should be relocated to not be directly adjacent to the mazetiles in order to avoid powerful set ups.
-
Torment Creek is a survivor favored map that carries problems from its realm and has a massive size that makes the generators hard to defend. Unlike its realm mates, this map has no fillers tiles that are exclusively corn tiles (where only a few weak filler loops spawn), making where most of those spawn partially unpredictable. The vast size of the map and its low pallet count produce very awkward deadzones around the map.
Coldwind Farm always had a very unique ruleset for its mazetiles, having both consistency and good distribution. Ever since the patch 6.6.0 (hidden mazetile RNG change that affected over 20 maps), Torment Creek would always have 2 jungle gyms (classic pallet & window mazetile), 1 pallet gym (classic pallet only mazetile) and 1 LT (classic double window mazetile); if main is located North, one of the jungle gyms would be placed at the pair of mazetiles on East side and the other at the pair on West side, granting the map with good distribution of safety. Unfortunately, the last Coldwind Farm update ruined this ruleset and now the good distribution is not assured and there is a huge disparity in strength given that now you can have a second LT spawn, randomly removing one jungle gym so one trial can have 2 jungle gyms and another can have only 1.
The realm Coldwind Farm is known for having very strong safety yet not a very high amount of pallets, favoring skilled survivors over killers since the limited amount of safety is enough to excel but the less skilled survivors can be at a frustrating disadvantage. This unfair and unfun gameplay loop is enabled by the filler loops, their low amount yet overwhelming safety grant the survivors too few loops to play with and don't allow the killer to outplay most of them (unless their chase power does). All the haybale filler loops are safe and some even trick the killer into attempting mindgames when the survivor can see them over the loop (but the killer can't see the survivor). The plank focused fillers overall lean more towards semi safe except for one that is excessively large with a tractor on one side and a very large L shaped long side (this loop is absurdly safe). The new corn located fillers are unsafe but they dont weaken Torment Creek at all since they aren't replacing other loops and instead add on top. The road fillers are still very safe loops.
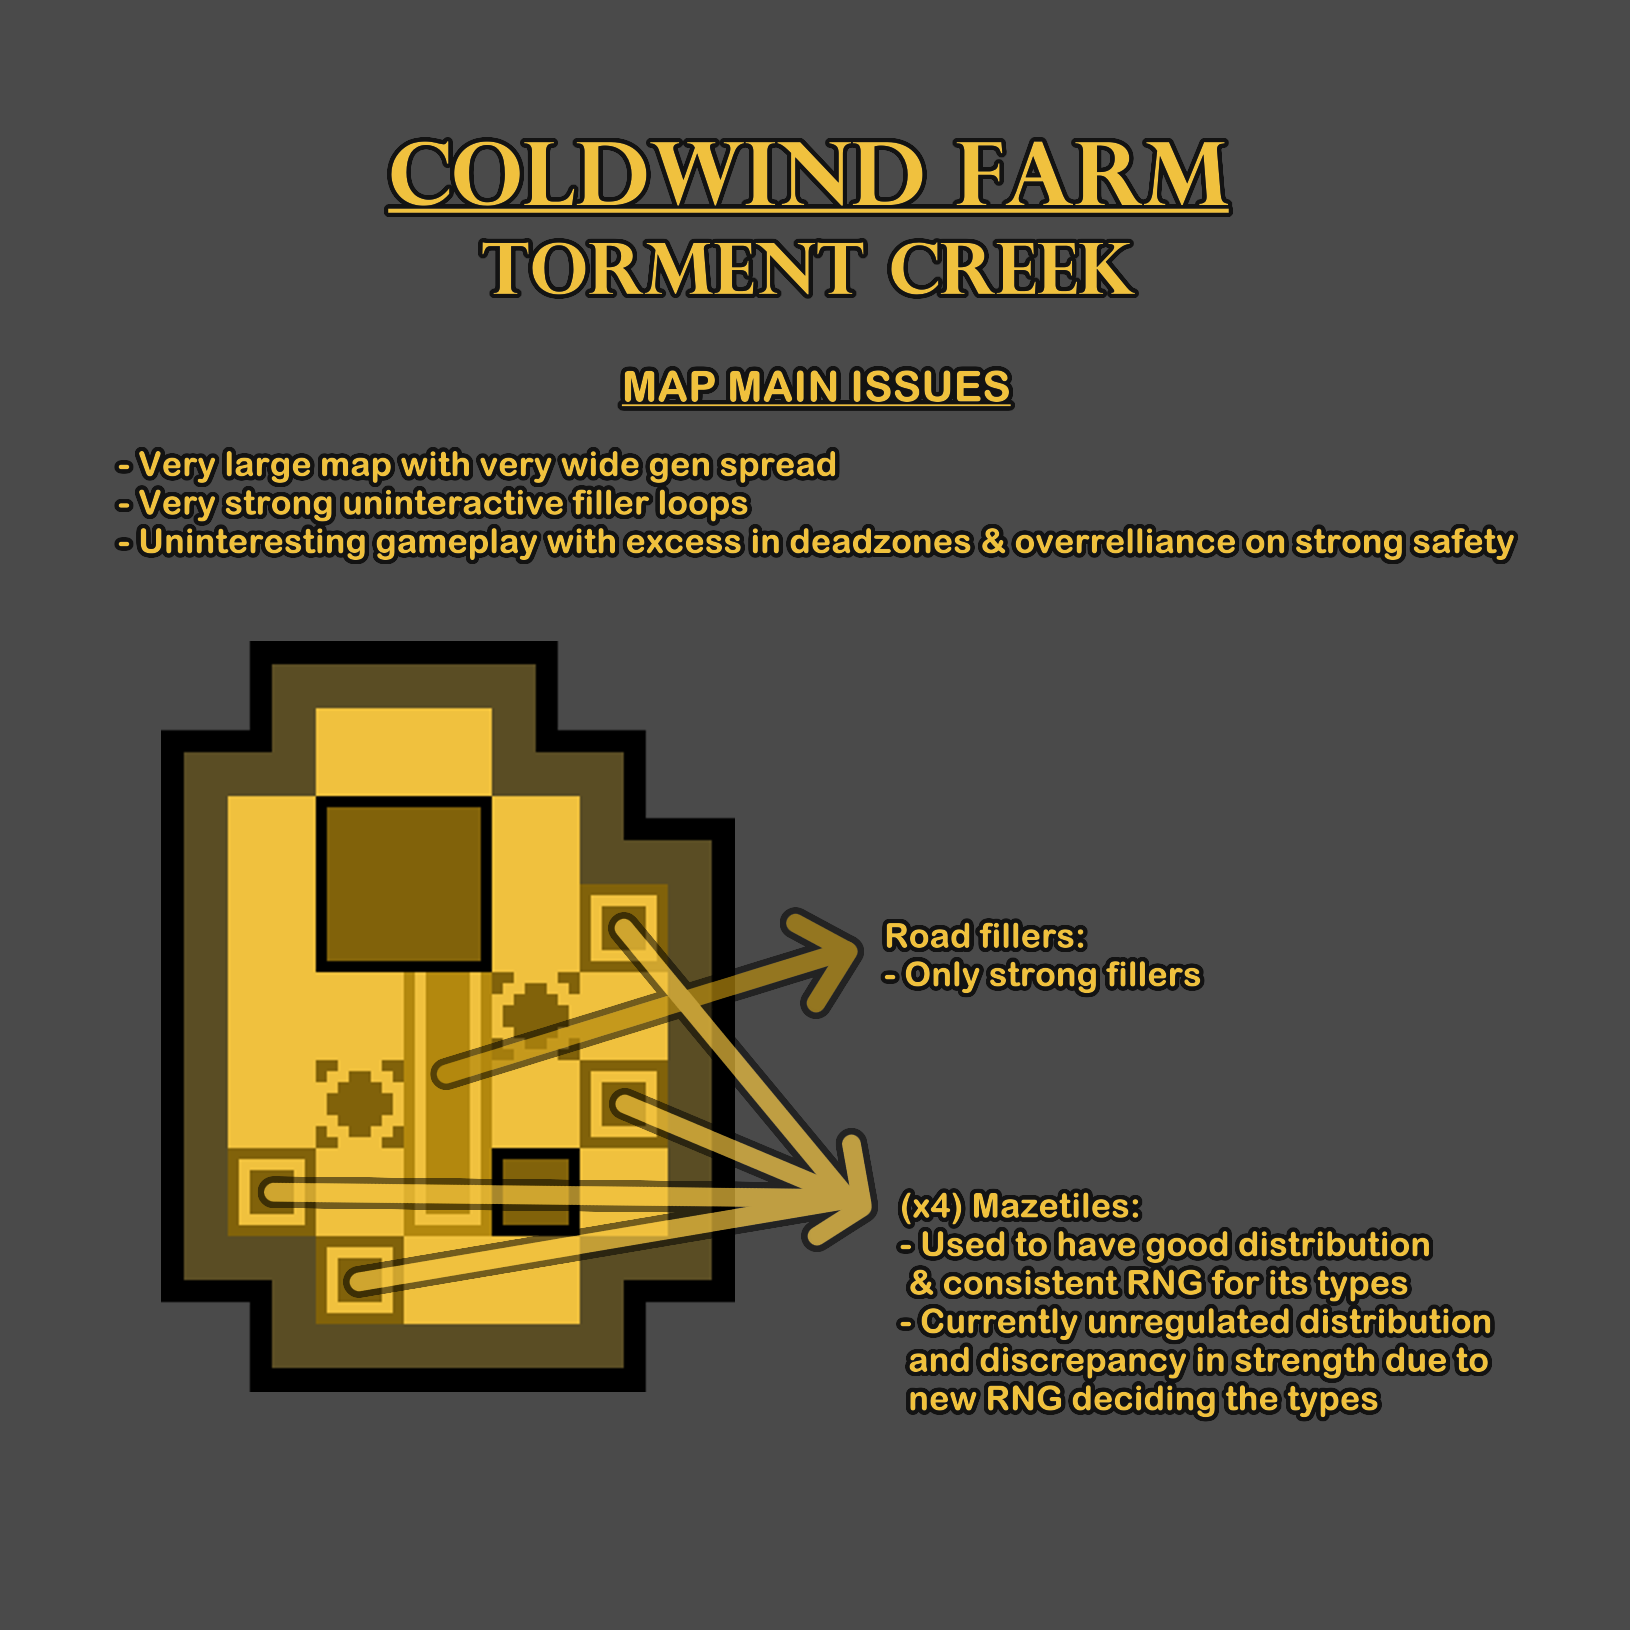
The realm Coldwind Farm should receive nerfs to the strong fillers while increasing the pallet density to compensate (and therefore make the gameplay more interactive with more loops for the survivors to use yet more room for the killer to outplay them).
The map Torment Creek should recover its old mazetile ruleset or one similar to it, in order to increase the consistency and distribution of safety. The size of the map should be reduced to give the killer a better chance to defend the generators and the amount of mazetiles should remain as 4, no less than that.
-
Fractured Cowshed is a slightly survivor favored map that carries problems from its realm and has a still large size that makes the generators hard to defend. The 3 corn exclusive fillers tiles (where only a few weak filler loops spawn) around main building offer some awkward areas away from the road fillers (where only specific strong filler loops spawn).
Coldwind Farm always had a very unique ruleset for its mazetiles, having both consistency and good distribution. Ever since the patch 6.6.0 (hidden mazetile RNG change that affected over 20 maps), Fractured Cowshed would always have 2 jungle gyms (classic pallet & window mazetile), 1 pallet gym (classic pallet only mazetile) and 1 LT (classic double window mazetile); the mazetiles would be divided in two pairs and each pair would have one jungle gym, granting the map with good distribution of safety. Unfortunately, the last Coldwind Farm update ruined this ruleset (despite the overhaul on the map's layout being positive) and now the good distribution is not assured and there is a huge disparity in strength given that now you can have a second LT spawn, randomly removing one jungle gym so one trial can have 2 jungle gyms and another can have only 1.
The realm Coldwind Farm is known for having very strong safety yet not a very high amount of pallets, favoring skilled survivors over killers since the limited amount of safety is enough to excel but the less skilled survivors can be at a frustrating disadvantage. This unfair and unfun gameplay loop is enabled by the filler loops, their low amount yet overwhelming safety grant the survivors too few loops to play with and don't allow the killer to outplay most of them (unless their chase power does). All the haybale filler loops are safe and some even trick the killer into attempting mindgames when the survivor can see them over the loop (but the killer can't see the survivor). The plank focused fillers overall lean more towards semi safe except for one that is excessively large with a tractor on one side and a very large L shaped long side (this loop is absurdly safe). The new corn located fillers are unsafe while the road fillers remain as very safe loops.
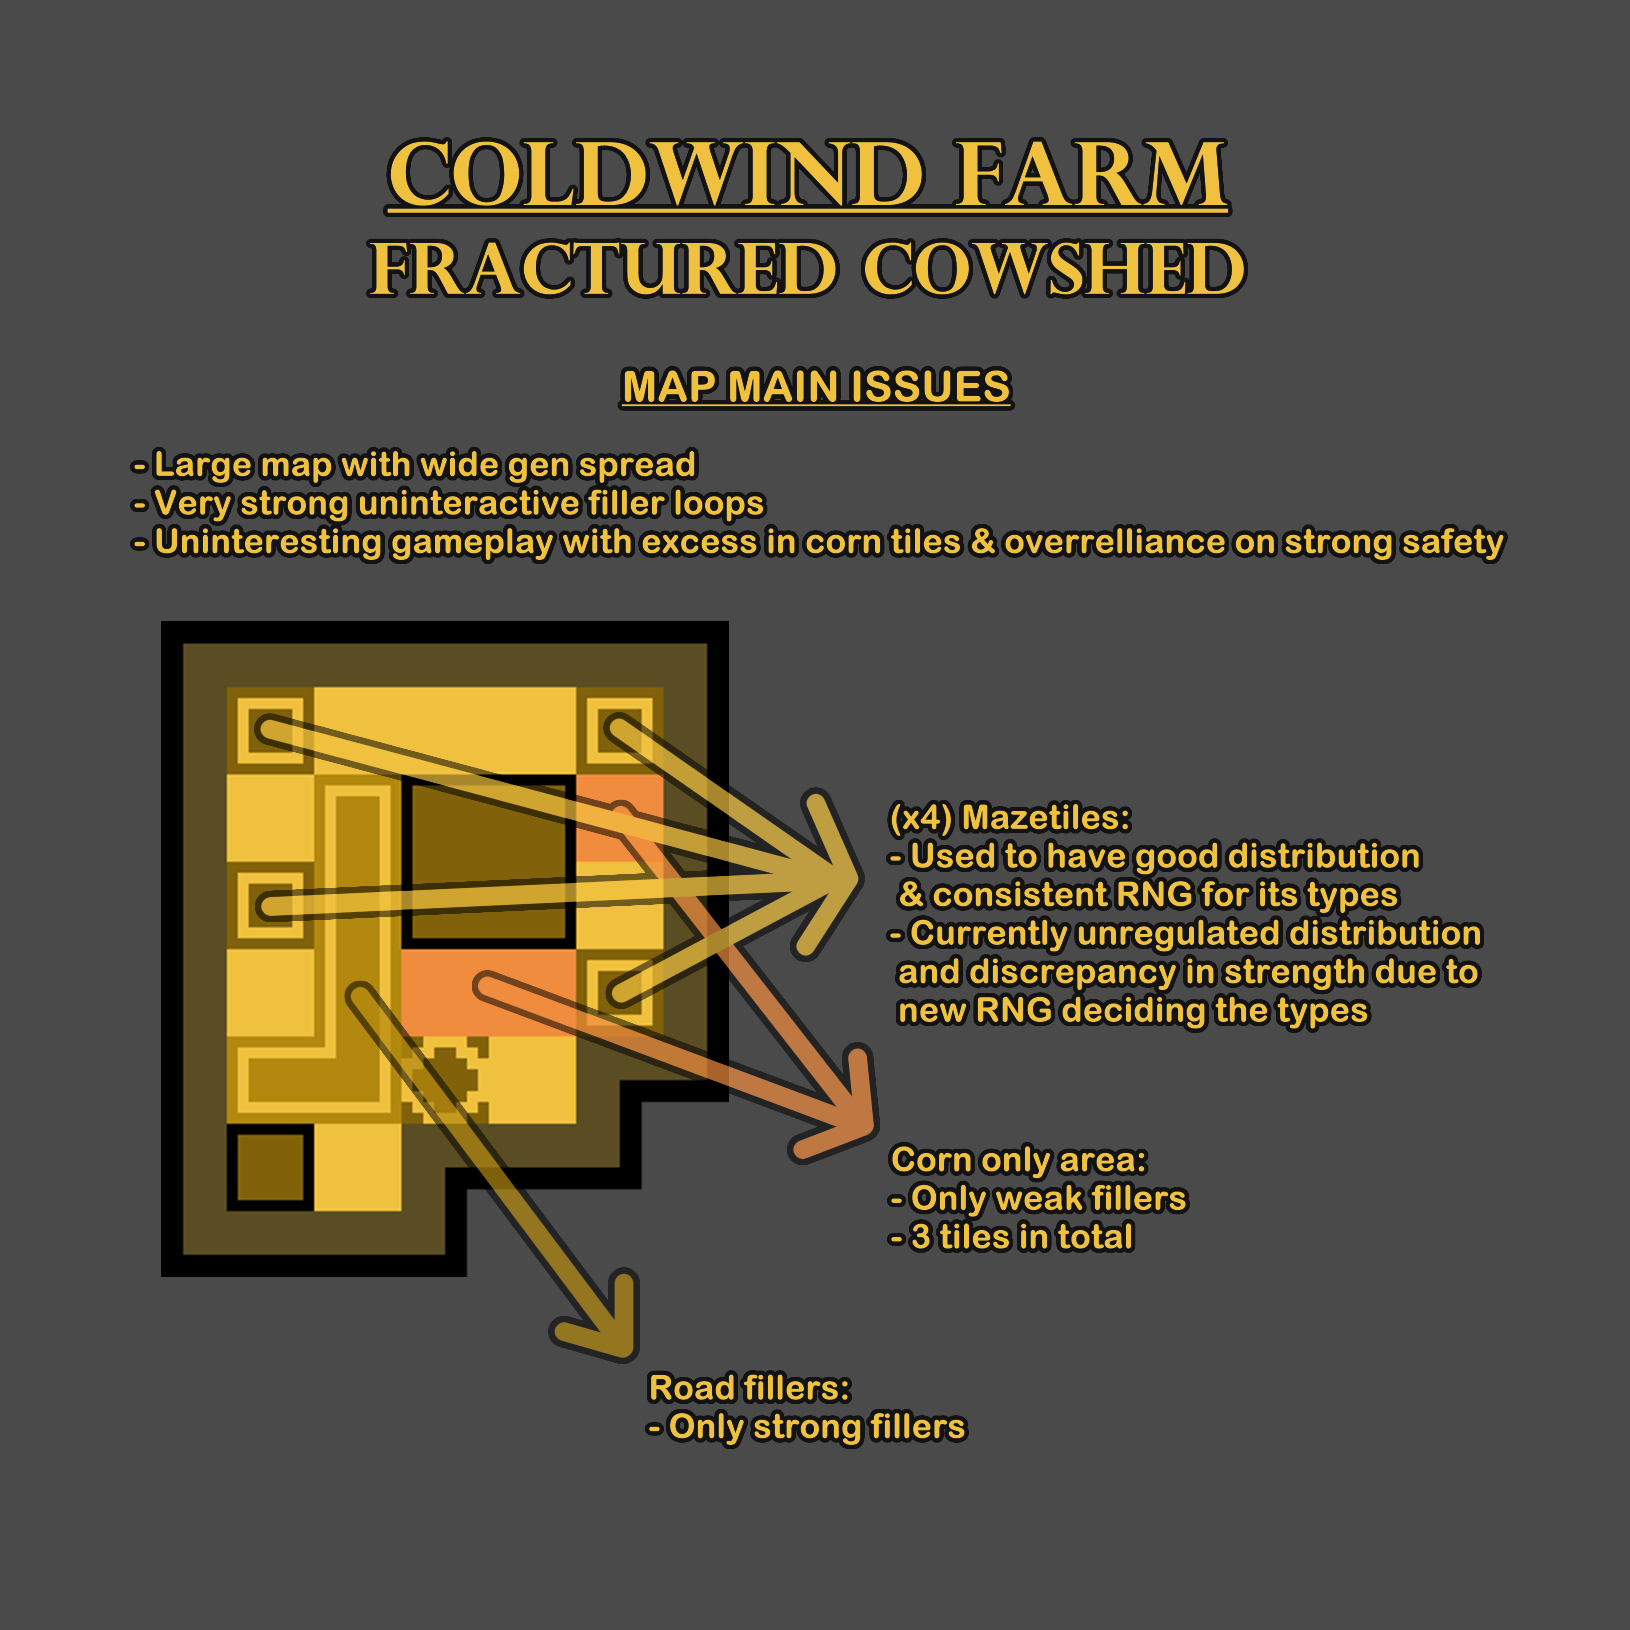
The realm Coldwind Farm should receive nerfs to the strong fillers while increasing the pallet density to compensate (and therefore make the gameplay more interactive with more loops for the survivors to use yet more room for the killer to outplay them).
The map Fractured Cowshed should gain a mazetile ruleset similar to the one of its old layout, in order to increase the consistency and distribution of safety. The size of the map should be reduced even if so slightly to give the killer a better chance to defend the generators and the amount of mazetiles should remain as 4, no less than that.
-
The Thompson House is a slightly survivor favored map that carries problems from its realm and has a long shape that makes the generators hard to defend. The 5 corn exclusive fillers tiles (where only a few weak filler loops spawn) in the middle of the map push the gameplay towards the edges of the map (where the strong loops are lined up) and also protect the survivors from being in the line of sight of the killer (which will make the killer waste more time patrolling).
Coldwind Farm always had a very unique ruleset for its mazetiles, having both consistency and good distribution. Ever since the patch 6.6.0 (hidden mazetile RNG change that affected over 20 maps), The Thompson House would always have 2 jungle gyms (classic pallet & window mazetile), 1 pallet gym (classic pallet only mazetile) and 1 LT (classic double window mazetile); if main is located North, one of the jungle gyms would be placed at the pair of mazetiles on East side and the other at the pair on West side, granting the map with good distribution of safety. Unfortunately, the last Coldwind Farm update ruined this ruleset and now the good distribution is not assured and there is a huge disparity in strength given that now you can have a second LT spawn, randomly removing one jungle gym so one trial can have 2 jungle gyms and another can have only 1.
The realm Coldwind Farm is known for having very strong safety yet not a very high amount of pallets, favoring skilled survivors over killers since the limited amount of safety is enough to excel but the less skilled survivors can be at a frustrating disadvantage. This unfair and unfun gameplay loop is enabled by the filler loops, their low amount yet overwhelming safety grant the survivors too few loops to play with and don't allow the killer to outplay most of them (unless their chase power does). All the haybale filler loops are safe and some even trick the killer into attempting mindgames when the survivor can see them over the loop (but the killer can't see the survivor). The plank focused fillers overall lean more towards semi safe except for one that is excessively large with a tractor on one side and a very large L shaped long side (this loop is absurdly safe). The new corn located fillers are unsafe but they dont weaken The Thompson House at all since they aren't replacing other loops and instead add on top.
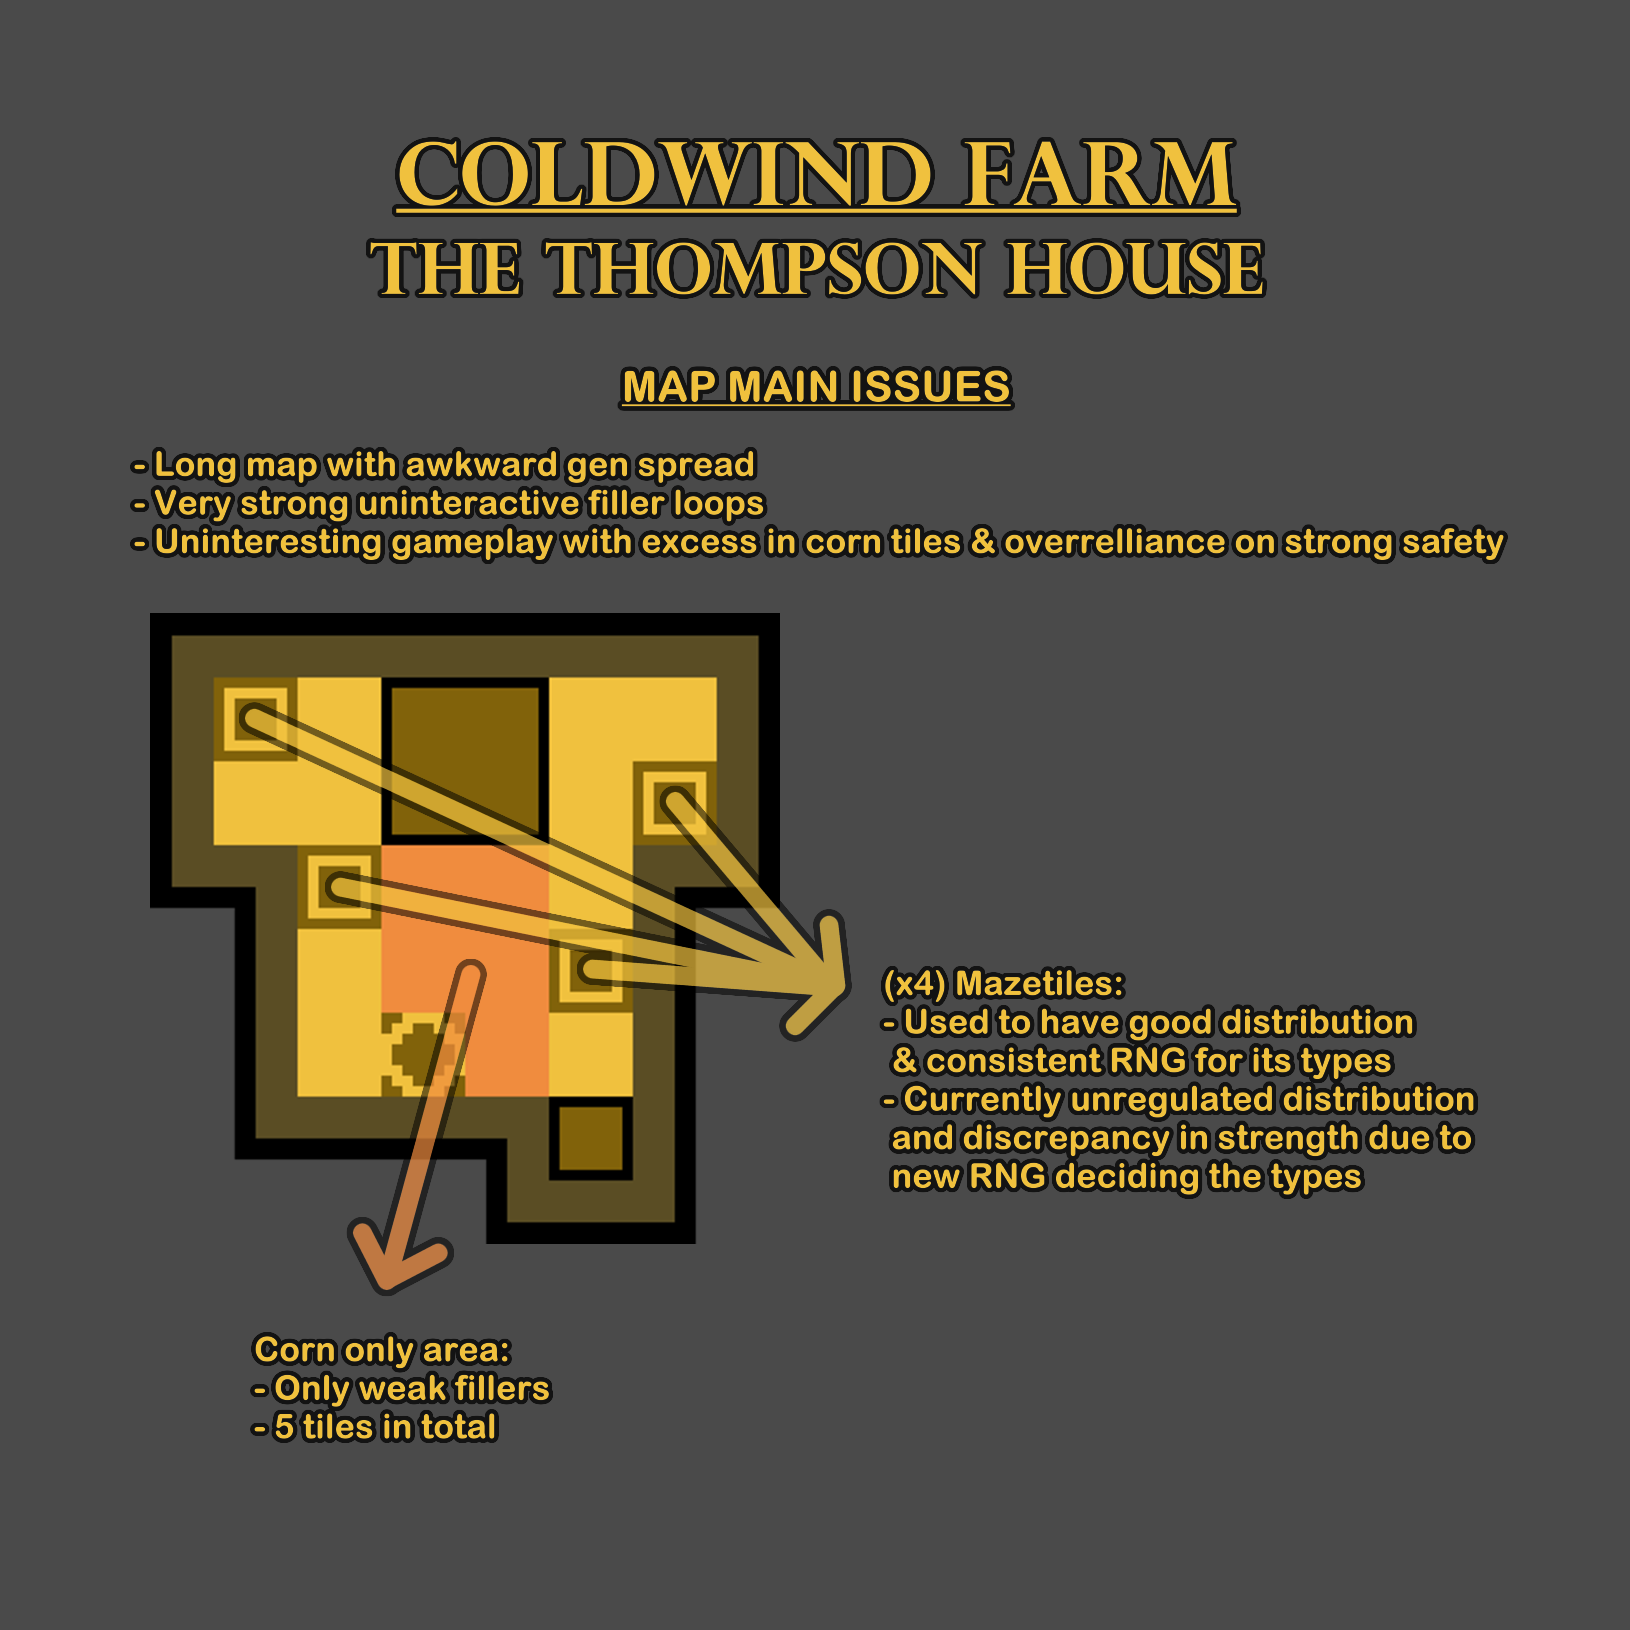
The realm Coldwind Farm should receive nerfs to the strong fillers while increasing the pallet density to compensate (and therefore make the gameplay more interactive with more loops for the survivors to use yet more room for the killer to outplay them).
The map The Thompson House should recover its old mazetile ruleset or one similar to it, in order to increase the consistency and distribution of safety. The length of the map should be reduced to give the killer a better chance to defend the generators and the amount of mazetiles should remain as 4, no less than that.
-
Rotten Fields is a survivor favored map that carries problems from its realm and counts with a massive size that spreads the generators far and wide. The emphasis in having 12 corn exclusive filler tiles (where only a few weak filler loops spawn) makes the generators very easy to find (and therefore to repair efficiently) for the survivors while not giving the killer good lines of sight to not waste time patrolling generators that survivors aren't repairing. The layout has its best safety (except shack) on the edges so the corn area forces survivors to take chases around the outskirts of the map (when ending chases near the edge of the map is the tactically superior strategy by default since the killer takes longer to pressure the rest of the survivor team).
Coldwind Farm always had a very unique ruleset for its mazetiles, having both consistency and good distribution. Ever since the patch 6.6.0 (hidden mazetile RNG change that affected over 20 maps), Rotten Fields would always have 3 jungle gyms (classic pallet & window mazetile), 1 pallet gym (classic pallet only mazetile) and 1 LT (classic double window mazetile); the 2 mazetiles that go along the same edge of the map would never be 2 jungle gyms together so there was a warranty of good distribution of safety. Unfortunately, the last Coldwind Farm update ruined this ruleset and now the good distribution is not assured and there is a huge disparity in strength given that now you can have a second LT spawn, randomly removing one jungle gym so one trial can have 3 jungle gyms and another can have only 2.
The realm Coldwind Farm is known for having very strong safety yet not a very high amount of pallets, favoring skilled survivors over killers since the limited amount of safety is enough to excel but the less skilled survivors can be at a frustrating disadvantage. This unfair and unfun gameplay loop is enabled by the filler loops, their low amount yet overwhelming safety grant the survivors too few loops to play with and don't allow the killer to outplay most of them (unless their chase power does). All the haybale filler loops are safe and some even trick the killer into attempting mindgames when the survivor can see them over the loop (but the killer can't see the survivor). The plank focused fillers overall lean more towards semi safe except for one that is excessively large with a tractor on one side and a very large L shaped long side (this loop is absurdly safe). The new corn located fillers are unsafe but they dont weaken Rotten Fields at all since they aren't replacing other loops and instead add on top.
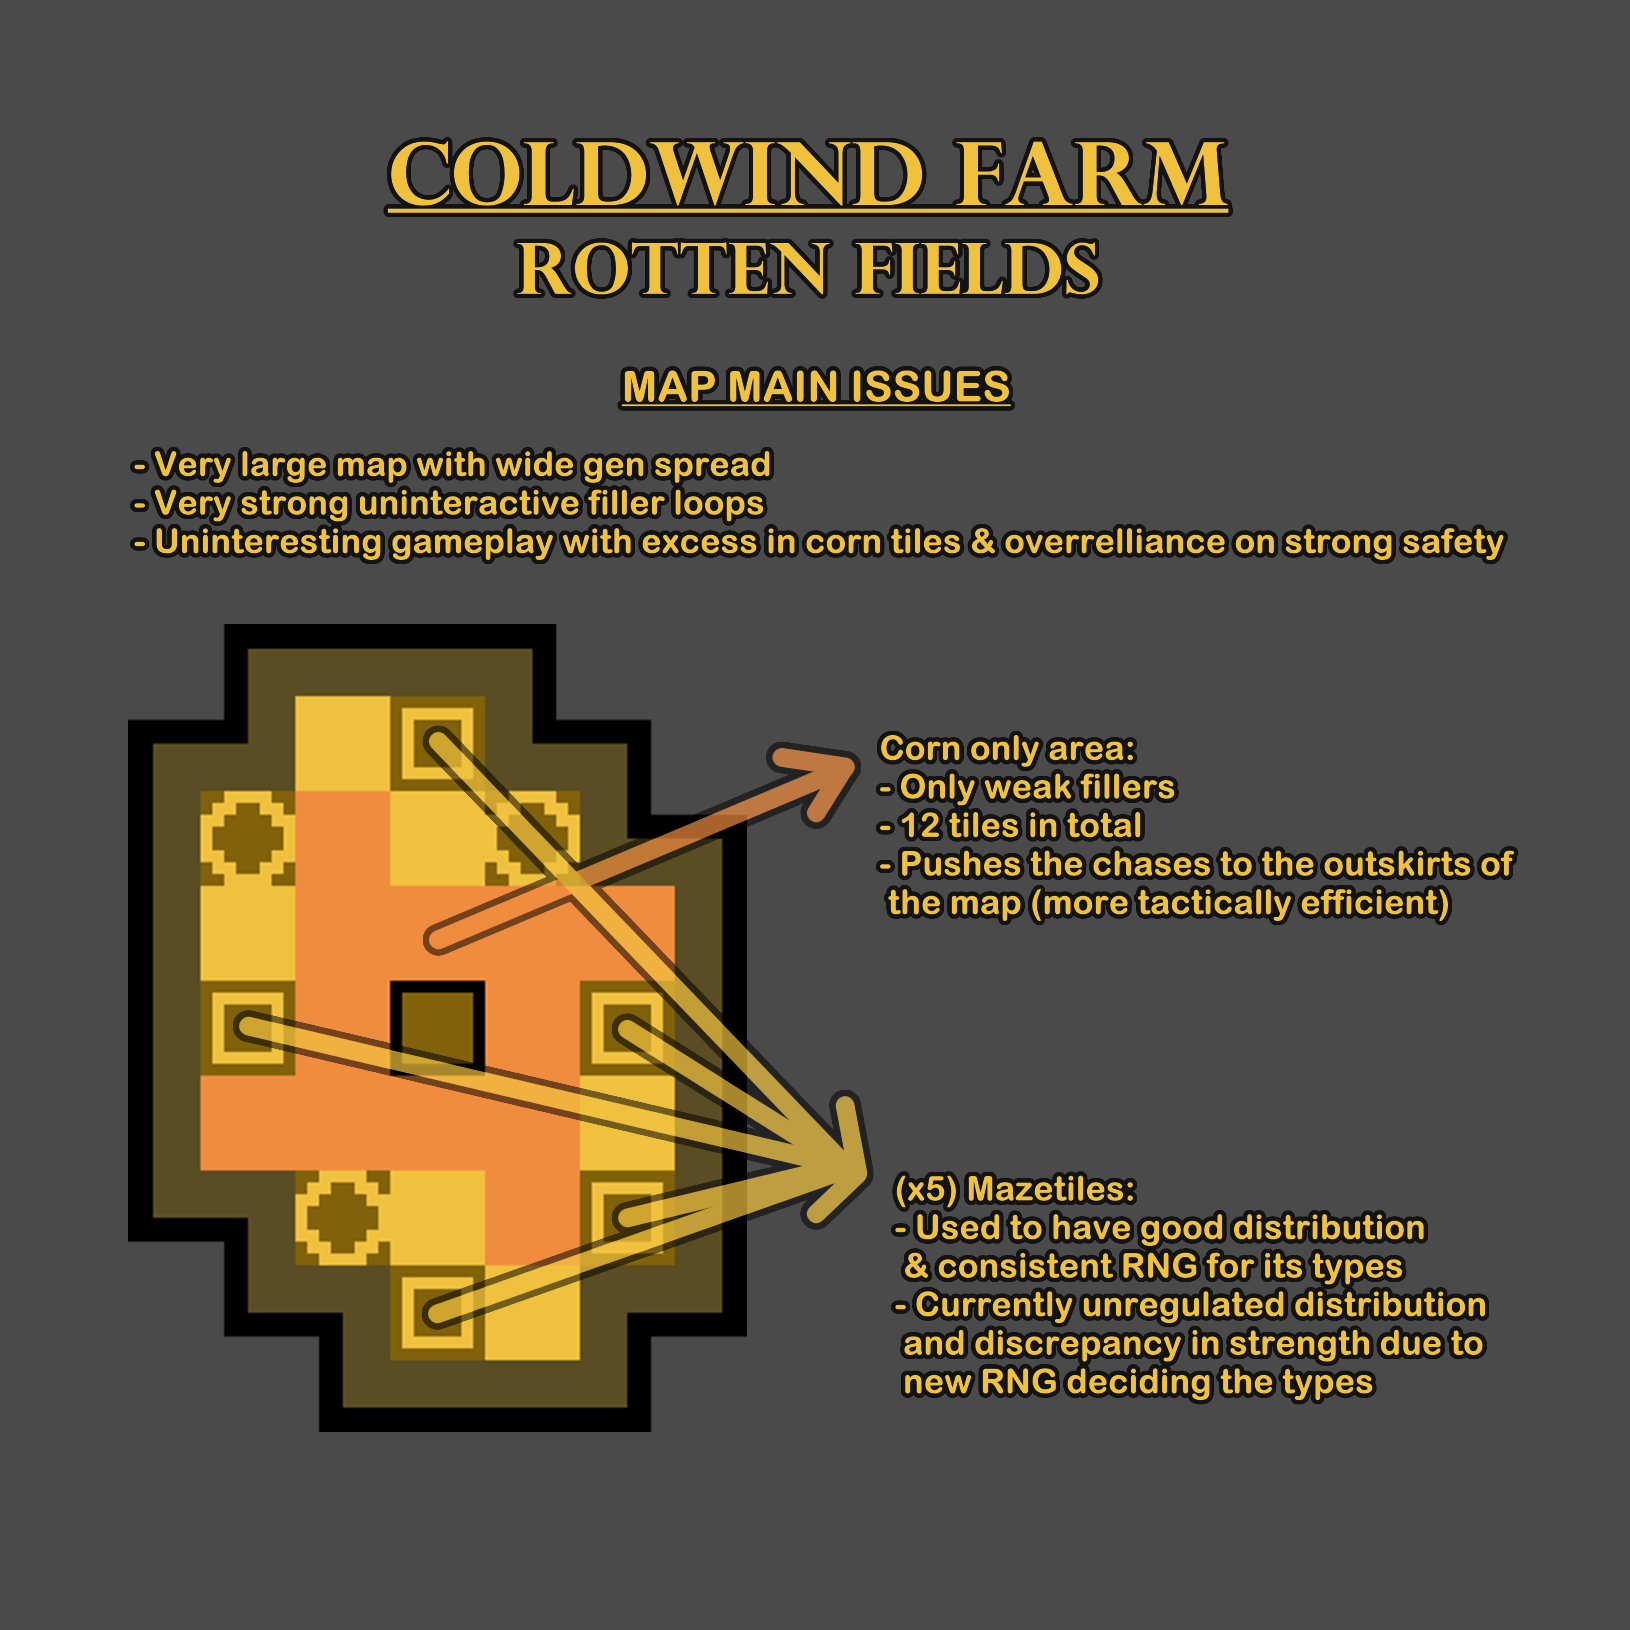
The realm Coldwind Farm should receive nerfs to the strong fillers while increasing the pallet density to compensate (and therefore make the gameplay more interactive with more loops for the survivors to use yet more room for the killer to outplay them).
The map Rotten Fields should recover its old mazetile ruleset or one similar to it, in order to increase the consistency and distribution of safety. The size of the map should be reduced to give the killer a better chance to defend the generators and the amount of mazetiles should either remain as 5 or decrease to 4, no less than that.
-
Father Campbell's Chapel could be considered one of the best maps in the game and is far less troublesome than its realm mate (Disturbed Ward), yet it is not without flaws.
The shape of the map may or may not be problematic when it comes to perimeters of generators that are hard to contest when the killer is defending them, though it is still unclear if the recent gen regression update solves the issue.
The main building is very prominent in the outcome of the trial since it is in the very middle and it counts with 3 different configurations of windows that are all maybe a bit too powerful. Survivors can constantly make use of it in chase and heavily detriment the killer's chances. Its pallets are rather inconsistent.
Many of the filler loops in the realm are both very safe and easy to use. They also have some clutter that may interfere with the killer's power which is a problem that is also present in some of the mazetiles. While the pallet count in the map is usually not very high (which is justified with the vast presence of the main building) it can unusually spike up. The carnival landmark is not fully consistent with its safety.
Shack is complimented by an adjacent mazetile (that is a jungle gym half the time) and the filler loops around them. This combination results problematic at times.
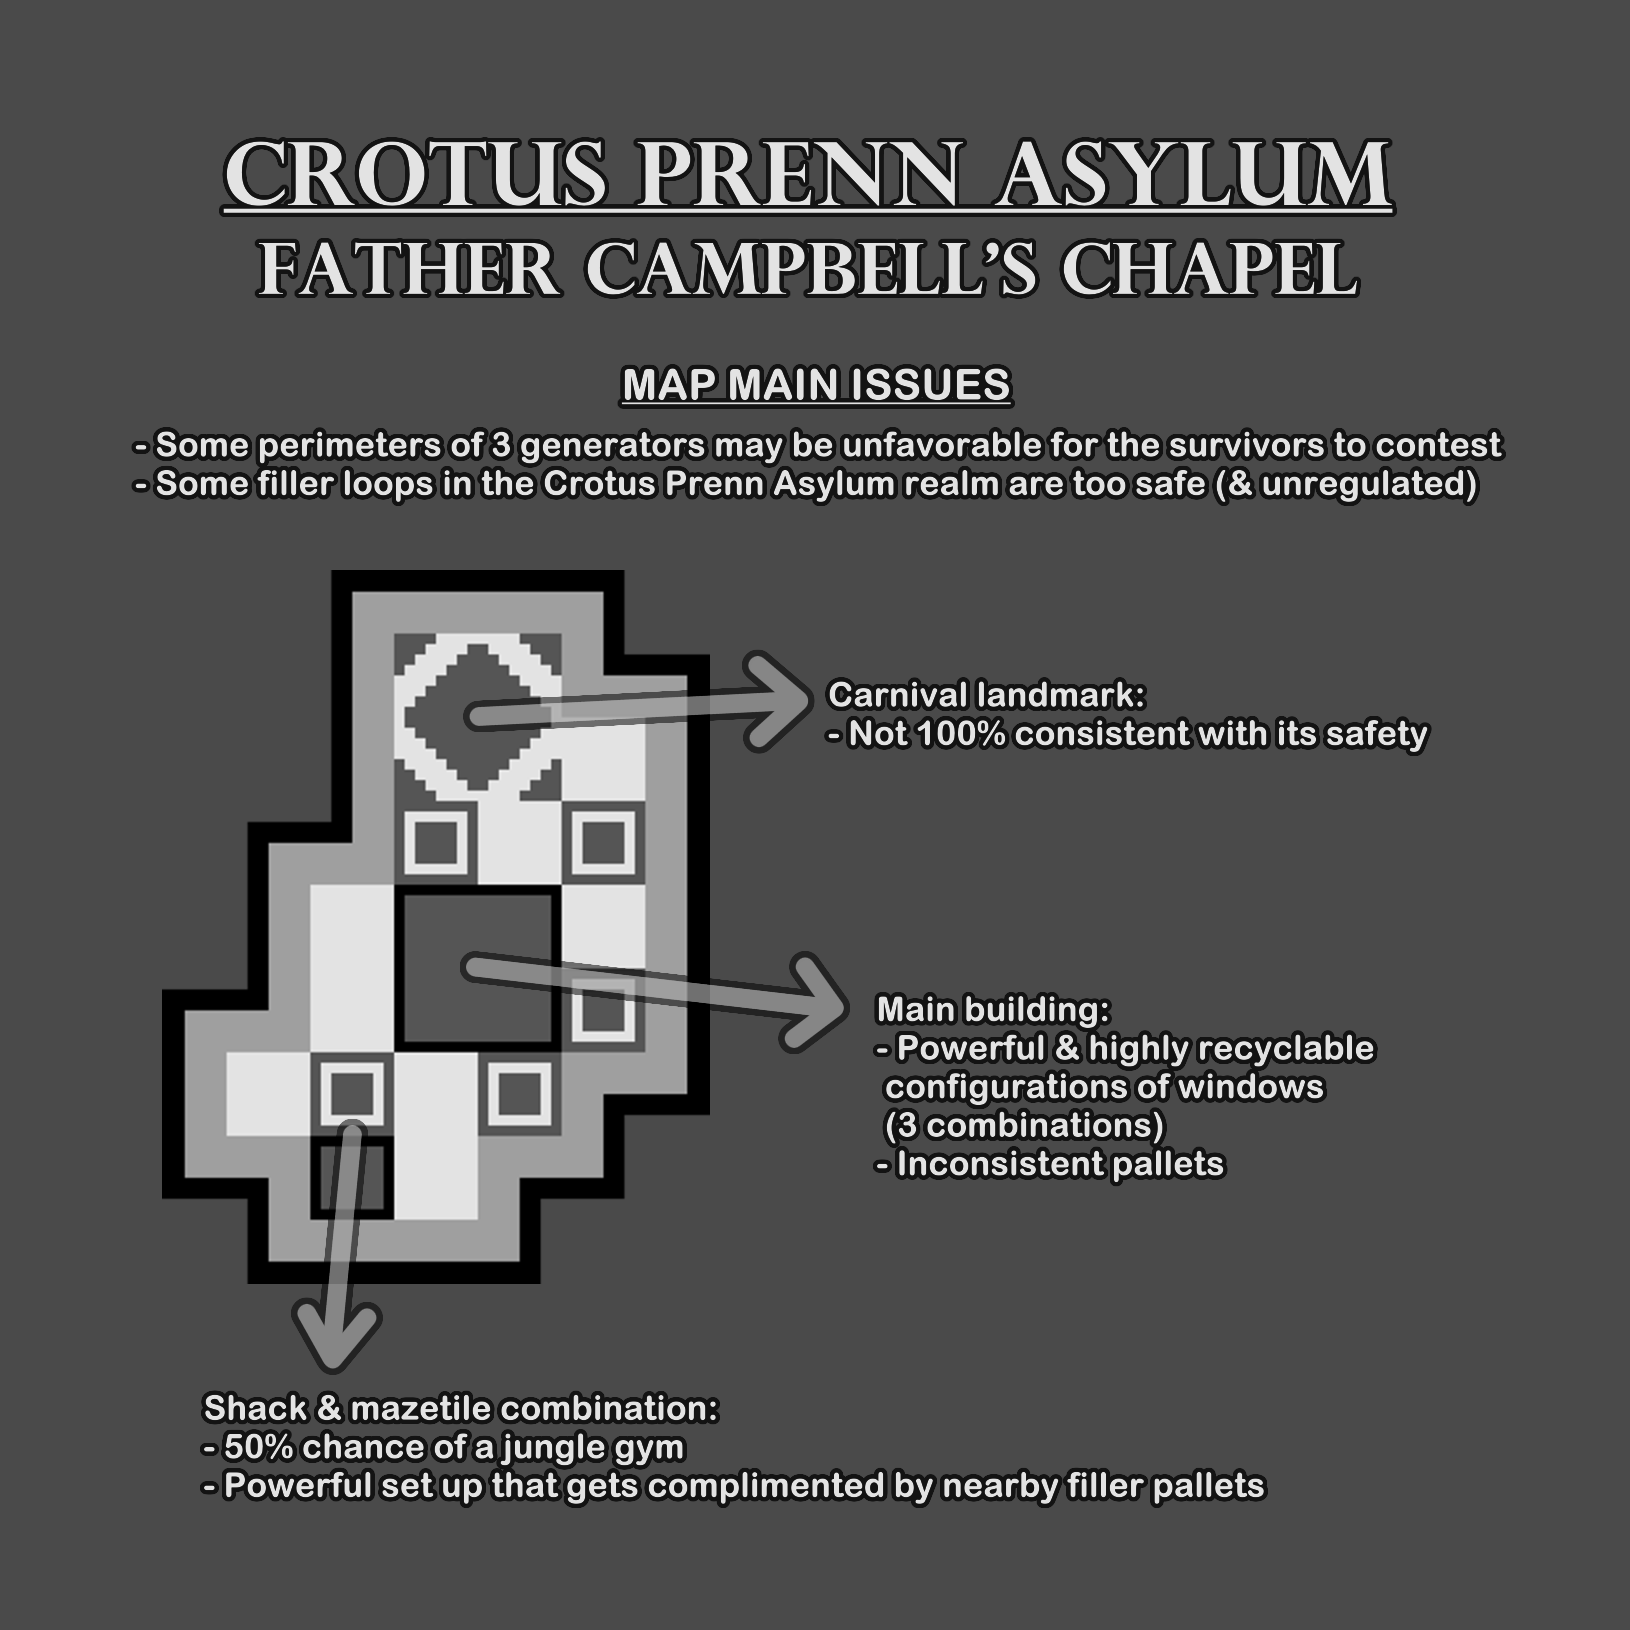
While the map has its flaws, it also has very positive features too:
- The main building is very charming.
- The mazetiles (5 in total) have an oddly unique ruleset that works quite well and allow 3 of them to be directly adjacent to the main building without creating problematic set ups most of the time.
- The map size is not an issue.
While the realm needs the fillers to be tweaked, the map could slightly increase its pallet count to compensate while also weakening main building, separating shack from the mazetile and making the carnival landmark fully consistent with its resources.
-
Disturbed Ward has stood out as one of the most survivor sided maps for a very long time. Its massive size (4th largest) along with the awkward shape and its outstanding main building make the generators incredibly hard to defend on a normal basis. The layout itself is also certainly confusing for many players, making them feel uncomfortable in this map.
The main building plays a huge role in the outcome of the trial, its safety and its size are a beacon for the survivor team and the fact that it is located in the middle ensures it will be used if the survivors are fit to the task. It is not easy to reach a hook from inside the building. Some of the entrances have awkward collisions.
The 3 landmarks (the greenhouse, the small courtyard and the pathway with benches) at the main entrance of the main building are treated like filler loops and do not spawn their respective pallets consistently, which makes that area of the map specially unpleasant for survivors.
Many of the filler loops in the realm are both very safe and easy to use. They also have some clutter that may interfere with the killer's power which is a problem that is also present in some of the mazetiles. The mazetiles count is 7, an amount that is excessive (specially with 4 of them being 2 pairs of connected tiles), it should be reduced to 5 or 4 (not less or other problems would arise).
The pockets in the shape of the map are incredibly problematic. First of all, they make some generators very unproductive to defend, while also having a chance of having 3 generators very close to each other in that area and the one deep inside the pocket will be unreachable with the killer patrolling around. Second, they have a pair of connected mazetiles that make ending a chase there highly valuable to the team since the killer will be very far from the rest of the map while the survivor does not need to sacrifice chase time. Third, a broken hook (due to sabotaging or a sacrifice) can easily make it impossible to reach a hook from there. Fourth, a killer can decide to defend a hooked survivor deep into the pocket and control the entrance to said pocket to not allow the team to go through unharmed (making the rescue very costful for the team).
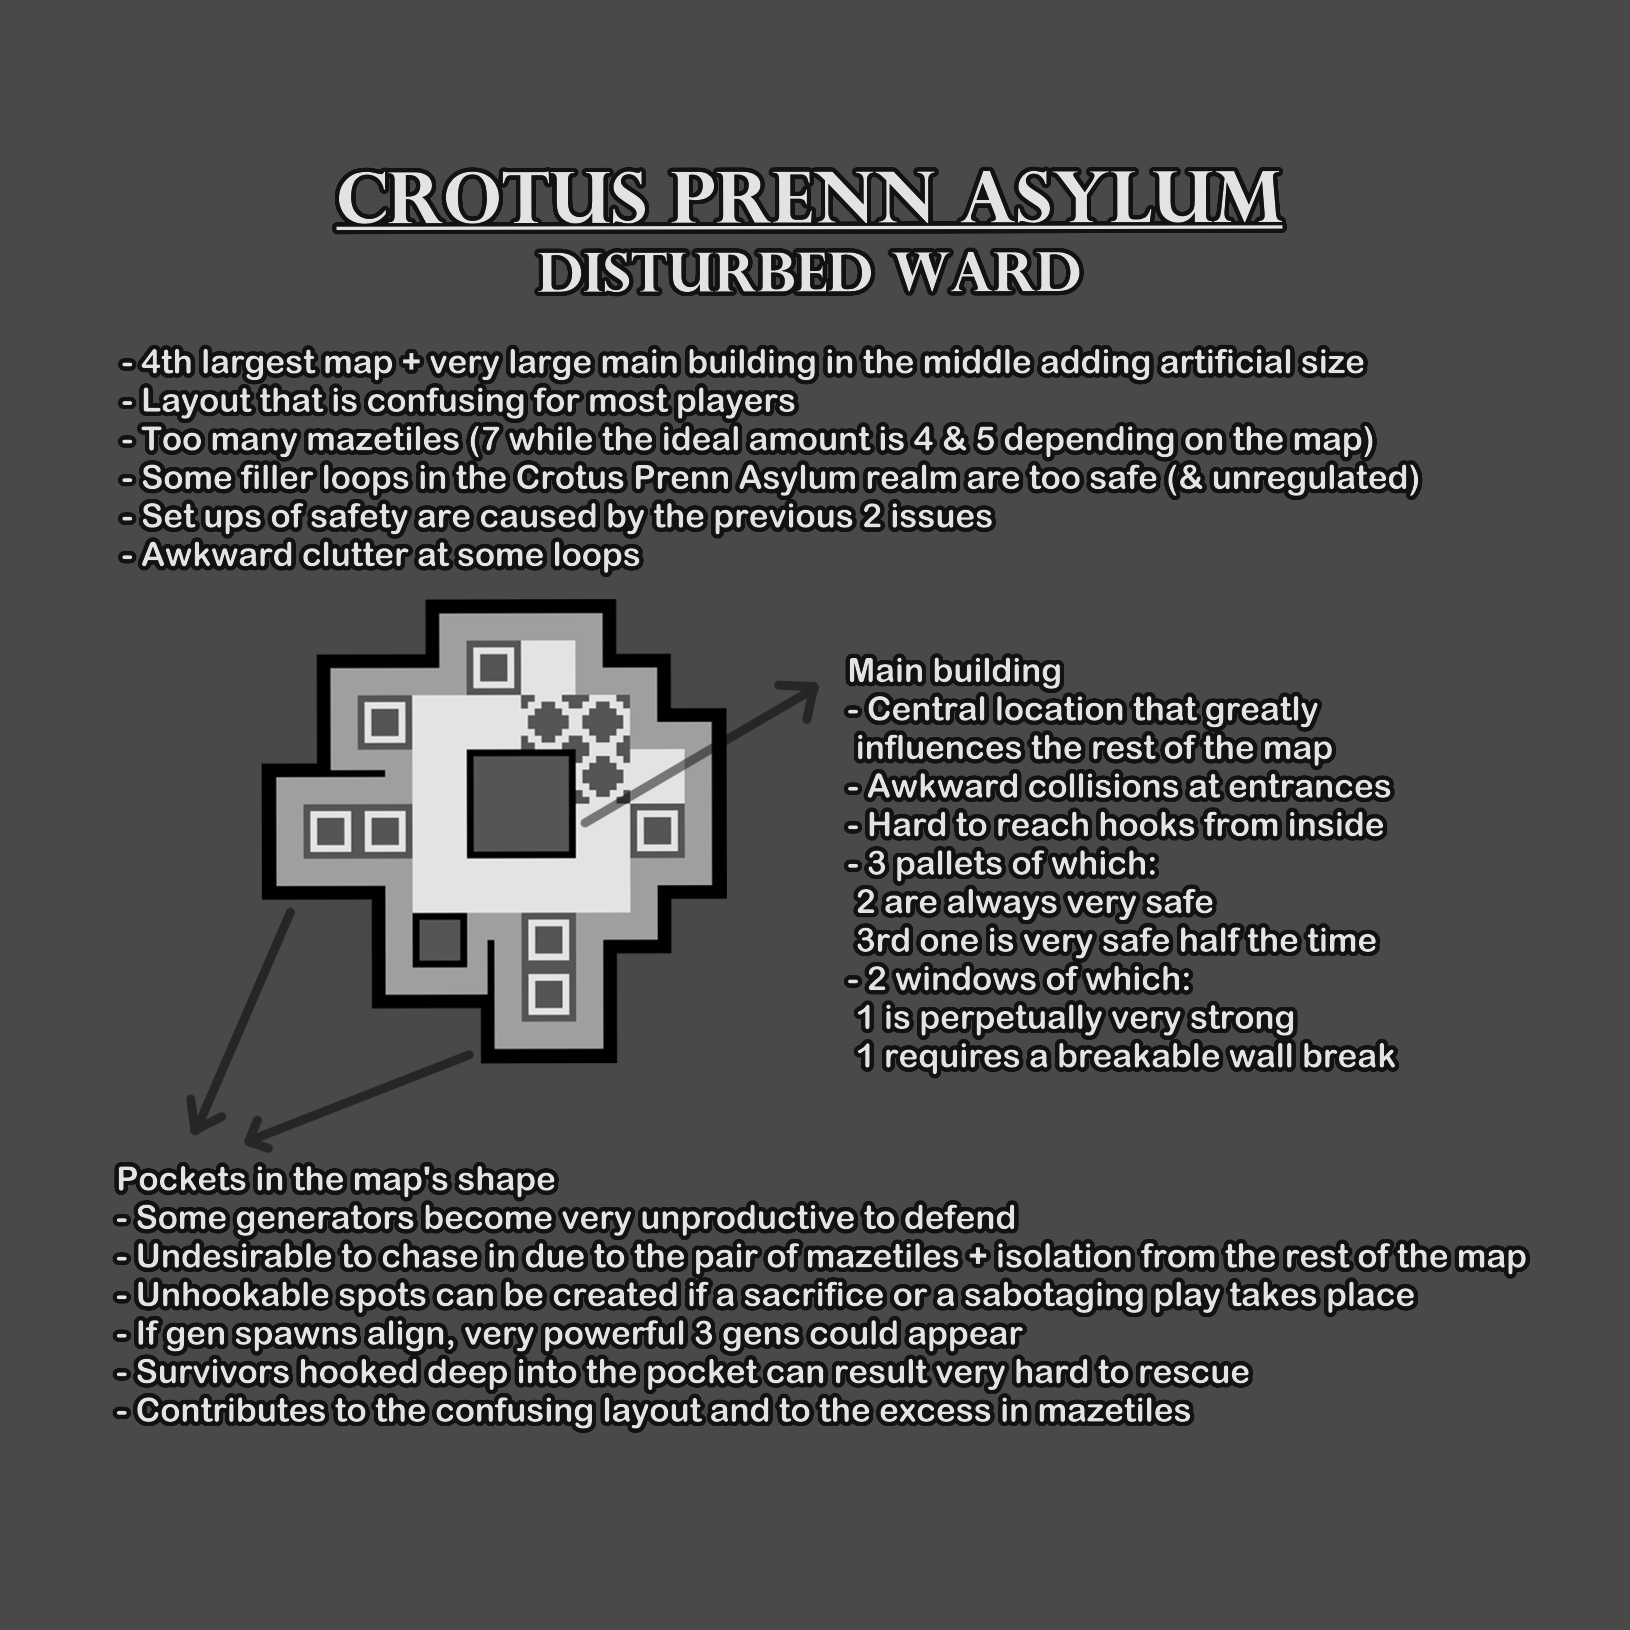
The realm Crotus Prenn Asylum needs to at least address the clutter issue and the overtuned filler loops.
The map Disturbed Ward requires a rework to its size, shape and layout while removing the pockets, weakening main building, reducing the mazetile count from 7 to 4-5 and maybe making the 3 minor landmarks more consistent with their pallets.
-
Lampkin Lane may be greatly different from its old version and it may not be as absurdly survivor sided as before, but it is still one of the worse designed maps in the game.
The size of the map is already large but the 5 houses along with some generators spawning near the edge of the map add artificial size that make the generators incredibly hard to defend for the average killer (thankfully the problematic genlock situation got solved at one point). Main building with both basement and the upstairs hook can be very hard to rescue from. The oddly wide road has a very vast line of sight that can hurt both sides with very uninteractive situations: killers can defend an area / hook and potentially not allow anyone to rescue; survivors can start running away very early to start using the very strong houses which happen to benefit a lot from long headstarts.
Most of the houses provide very dull and plain gameplay with their windows since most killers just can't play around them and have to partake on a very long effort to get a hit that can be extended even longer if the survivor is crafty with their perks (using an exhaustion perk to transition to another house and force the killer to catch up for even longer).
The beige and the grey houses have 2 windows on the same wall, a very powerful combination that by itself is absurdly strong if the survivor has enough head start to use it. Two of the houses are connected to each other, making for a very strong area where the survivor can transition from one to the other very often and they can perfectly be the beige and grey houses, so those 2 outstanding houses could be indeed paired together.
Main building and the beige & blue houses always spawn in the map in fixed or predictable spots, where as the other 2 houses take from a pool of 3 types, which include one that can't be entered and that is vastly inferior to the other options. This alone adds a jarring variability in the safety of the map.
On the other hand, while most filler pallets in the map are strong, they are inconsistently placed to the point that the road may or may not spawn with a massive deadzone, introducing a strength variability that can be frustrating for either role.
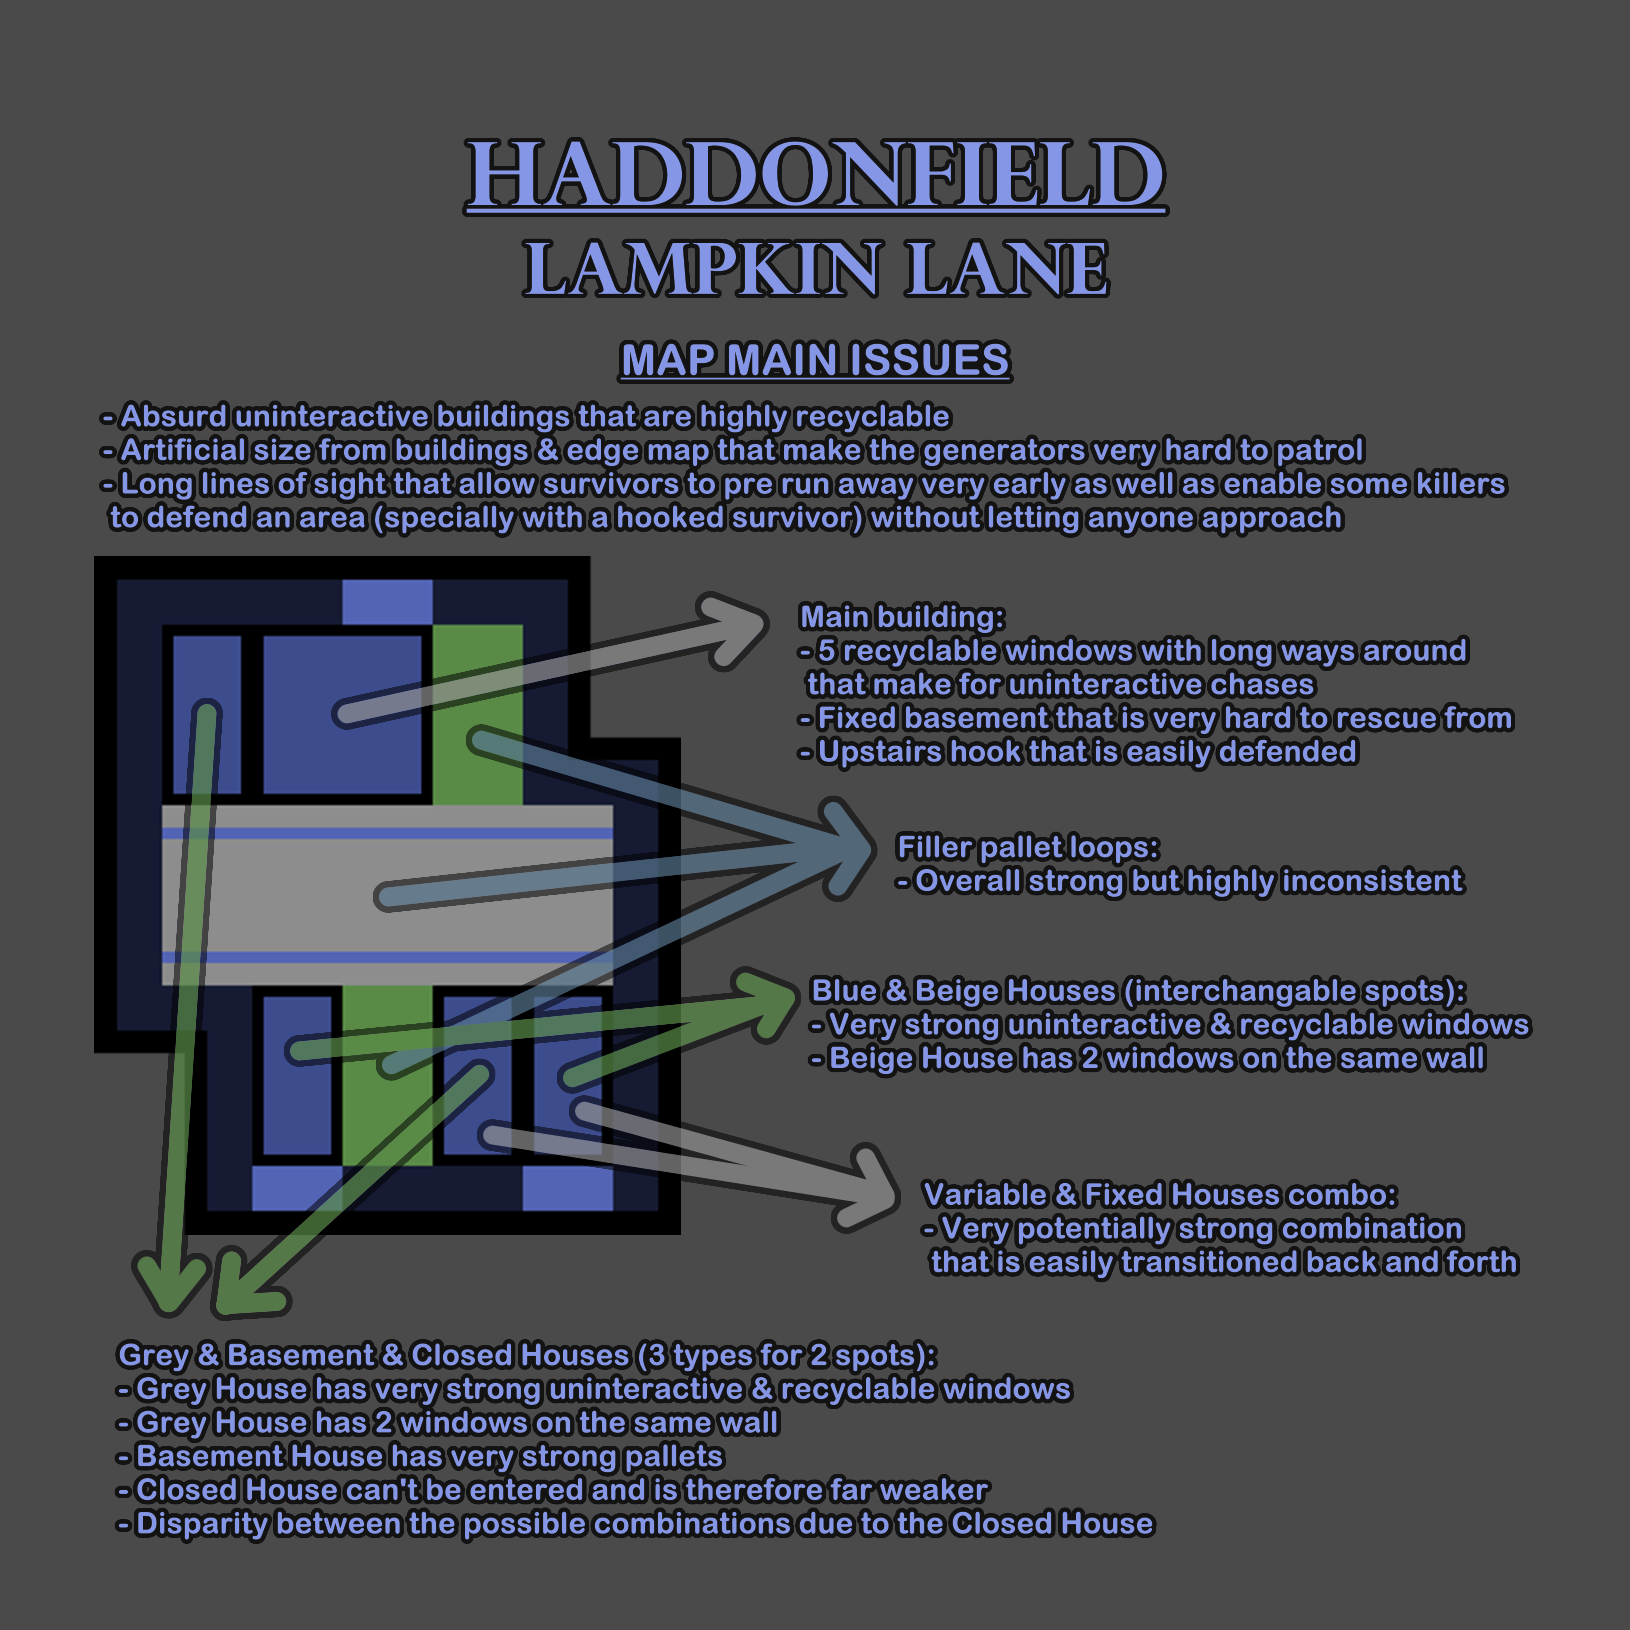
Issues that need to be addressed in this map are: making the filler & house loops more interactive, stabilize the fillers to be more consistent and well spread, reduce the width of the road (and therefore the size of the map).
-
Badham Preschool is one of the most survivor favored maps and that is including every single of the 5 variations that the map has. The size of the maps is not particularly large but the multi-building nature of it vastly difficults the task for the killer to patrol the generators, since checking inside the buildings as well as navigating around them artificially increases the downtime between chases.
The main building is specially powerful when it comes to delaying the killer, since navigating through it in a chase is very time wasting and extrapolates the chase from the rest of the map, making it really hard for the killer to incorporate themself into the match once the chase is finished. It counts with 5 pallets and 2 windows: 3 of the pallets are fixed and located outside along with 1 window at the fence in the front, the other 2 pallets are placed inside, 1 at ground floor and 1 in the underground, each of them with 2 possible spots; the 2nd window is also in the underground. The 2 breakable walls help corralling the survivors so breaking them would only expand their options in chase (specially the one near the generator since it enhances the fence window) yet the killer might still need to break them to reach a hook outside since it is very troublesome to hook survivors from the underground if basement is not in main building (and if it is, it becomes unhealthy with how powerful it is to defend it).
The basement house is both powerful and dull gameplay wise, allowing for little interaction between killer & survivor. On the other hand, the two-story house is far more interactive and therefore a betterly designed building. Both landmark houses are surrounded by randomly generated fences that may have extra window vaults and that sometimes may be extremely long to the point of covering the long side of the landmark tile perimeter (32 m).
With the 5 pallets of main building and the single pallet from Shack and each house landmark, we account for 8 predictable pallets at the buildings of the map. The filler loops are overall quite strong & easily connected with each other and the buildings; and they are surprisingly as predictable as the buildings. The amount of filler pallets is fixed per map and so is the distribution between the garden and road tiles. The only time there is variability in the amount of pallets in all but Badham Preschool II is when a filler loop at the end of the road spawns 2 pallets in the same tile, which is absurd on itself.
In all but Badham Preschool I, some tiles in the road are deadzones which only make the filler distribution more predictable (and both ends of the road are deadzoned in Badham Preschool II which is why it is the only one that can't get a double pallets filler).
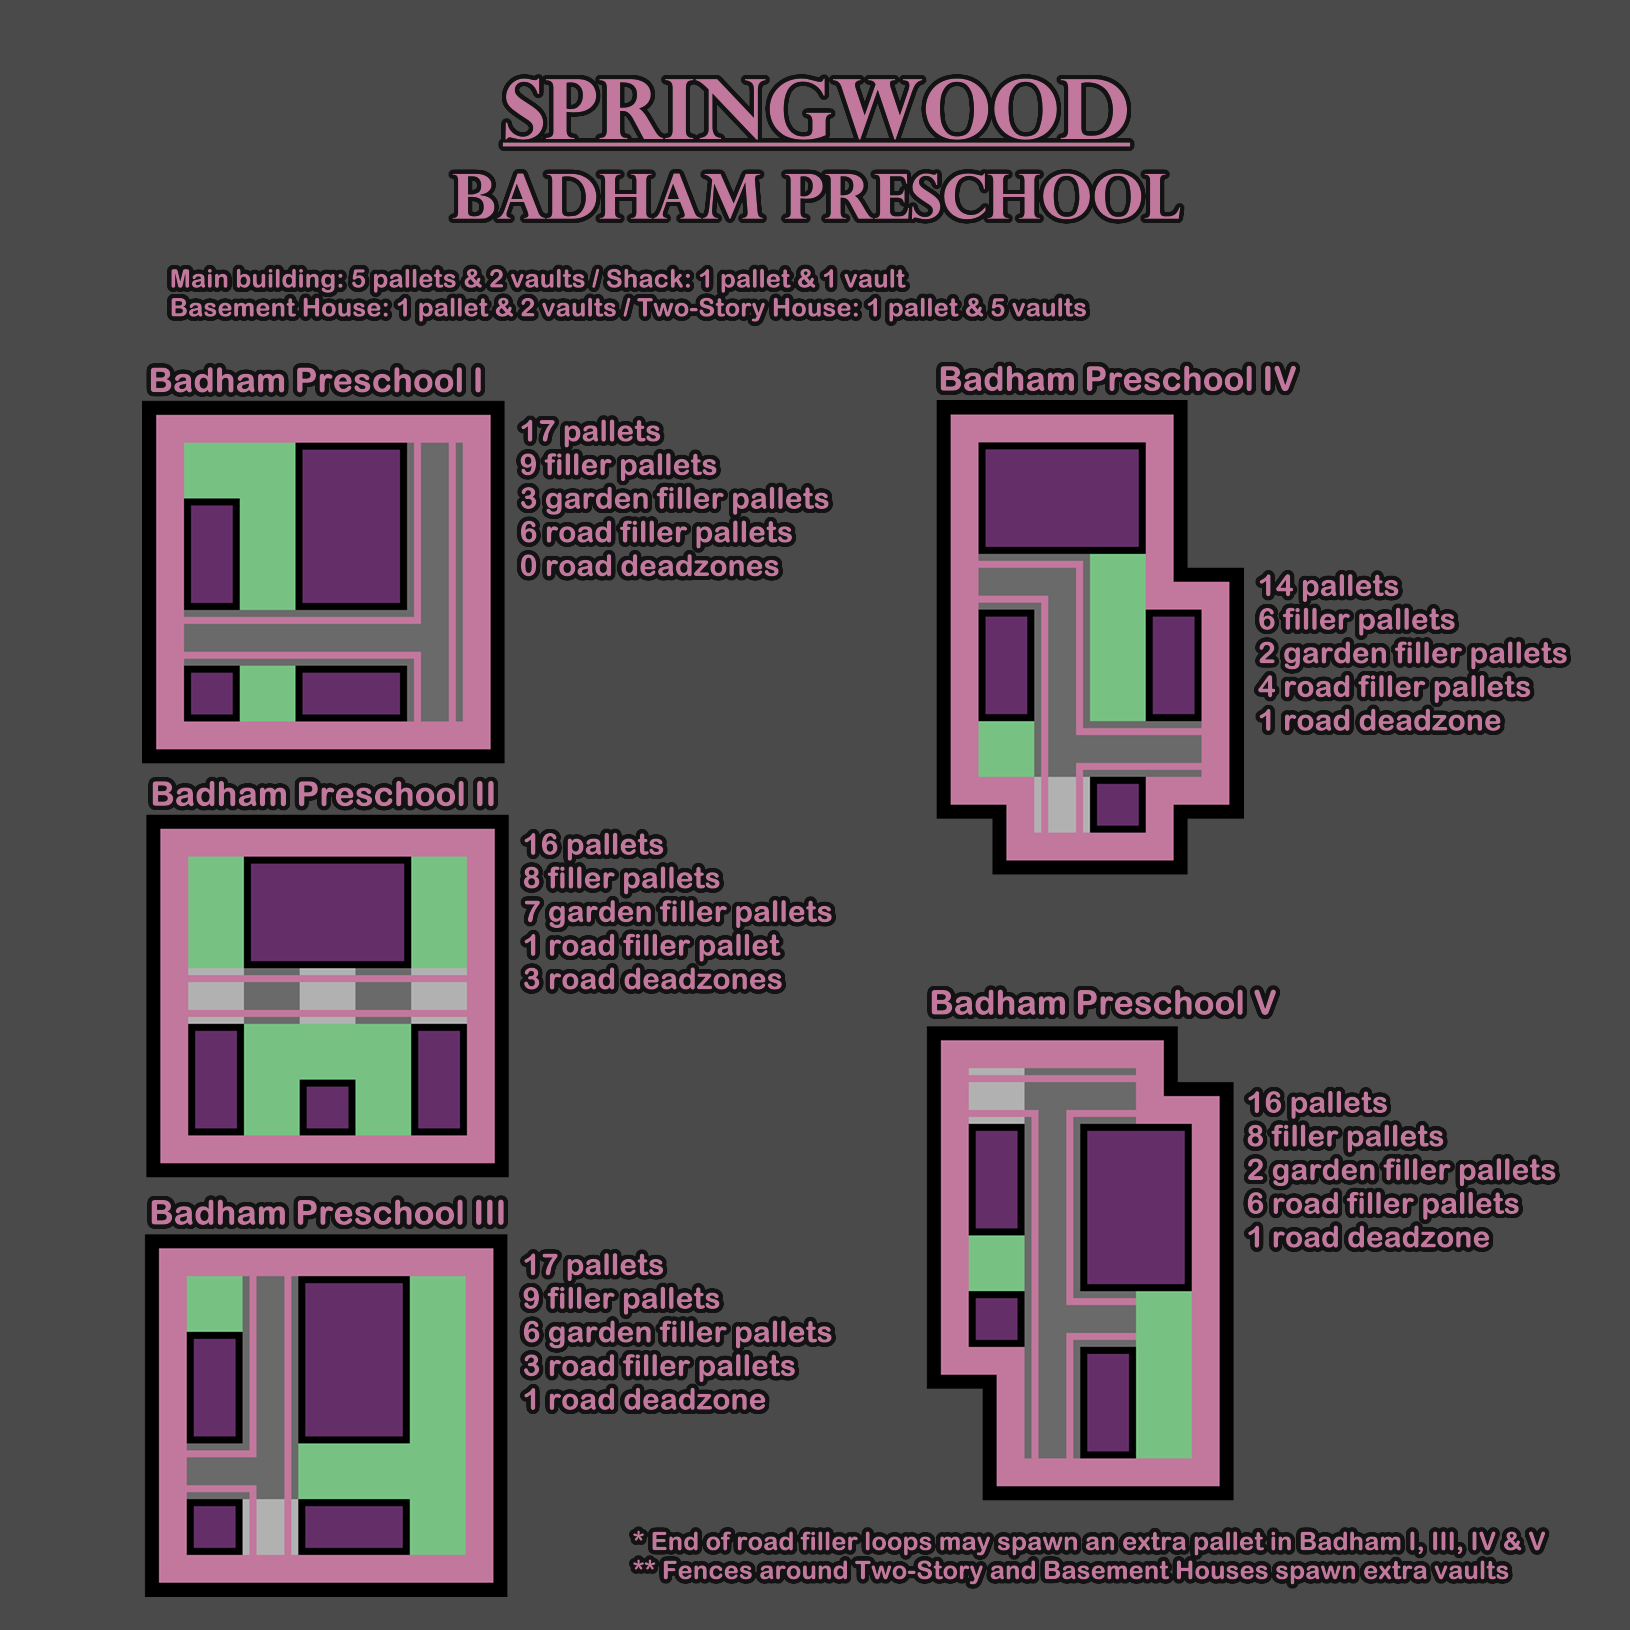
Badham Preschool I and III are particularly similar layout wise, variation I focuses more on the road fillers while variation III focuses on the garden fillers. They both have 17 pallets, version I has 3 at gardens and 6 at roads, while version III has 6 at gardens and 3 at roads. Version III also has 1 road deadzone and it is overall a bit weaker than version I because the generators don't spawn as consistently behind main building where many of the garden tiles (the specialty of version III) are found; while version I does get more generators in the road in front of main building (note that the buildings are always facing the road so main building is turned around between these 2 variations).
Badham Preschool II may as well be the strongest out of the 5 (all of them are very survivor favored regardless) since it uses the size of the map to its fullest with its even building distribution. It gets 7 filler pallets in the garden tiles (which are 9 in total) and 5 of the garden tiles are around the shack, meaning that at least 3 and potentially 5 filler loops will be enhacing the shack as well as allowing the survivors to rotate to either of the landmark buildings. It is also note worthy that it is the least likely to get generators in the middle of the road, which makes the fact that it has 3 road deadzones not as problematic for the survivors and it overall makes the generator spread abnormally wide.
Badham Preschool IV & V have a longer shape, version IV counts with the least pallets but it might have the hardest to defend generators given its layout and how it keeps both house landmarks relevant in the middle and therefore harder to ignore. Version V has 16 pallets just like version II, but it is far easier to divide the map than any other version (with the intention to defend an area).
As a result, all 5 Badham Preschool maps are incredibly safe, hard to patrol and outstandingly predictable, giving survivors a very advantageous set of circumstances.
-
Grim Pantry is a map with very pronounced features and it usually favors survivor but that doesn't mean the problems that survivors have to endure are none. Similar to The Pale Rose, it drags core issues from its realm, Backwater Swamp, which is yet to receive a graphical update. A stand out problem of both maps but specially in Grim Pantry is the absurd distance between hooks, making finding a hook really hard sometimes, specially if the killer is carrying the survivor from the bottom floor of the main building or the cabin landmark; which is all enhanced by sometimes having to reach a hook in the edge of the map (forcing the killer away from the generators they need to patrol next).
The gen spread is also an issue in Grim Pantry (due to the edge map generators randomly widen the playground to patrol) and the sudden perimeters of gens in close proximity are not to be ignored either.
Regarding the safety of the map, the cabin landmark in Grim Pantry is far safer and more impactful than the shrimp boat from The Pale Rose, which helps with the consistency of the safety (eventhough the filler loops are still erratically distributed, there is only 1 mazetile and the pier landmark vastly differs between iterations). On a side note, the cabin landmark doorways are erratic when there is no gen on the second floor (normally you see both doorways locked and they open up once the generator is repaired, but when the generators are around the cabin the doorways can be both open or one may be closed up).
The main building of Grim Pantry is so overwhelmingly strong that it completely breaks the flow of the safety in the map, chasing inside it is highly undesirable for the killer and it can singlehandlely tip the scales for the survivor team.
Another issue that affects the realm but specially this map is the totem locations, given that totems can spawn at the edge of the map, it can be very hard for the survivors to find them, while Grim Pantry also has 2 fixed totem spots at the rocks of the slope corners around the shack (making 2 totems very easy to find and the other 3 relatively very hard).
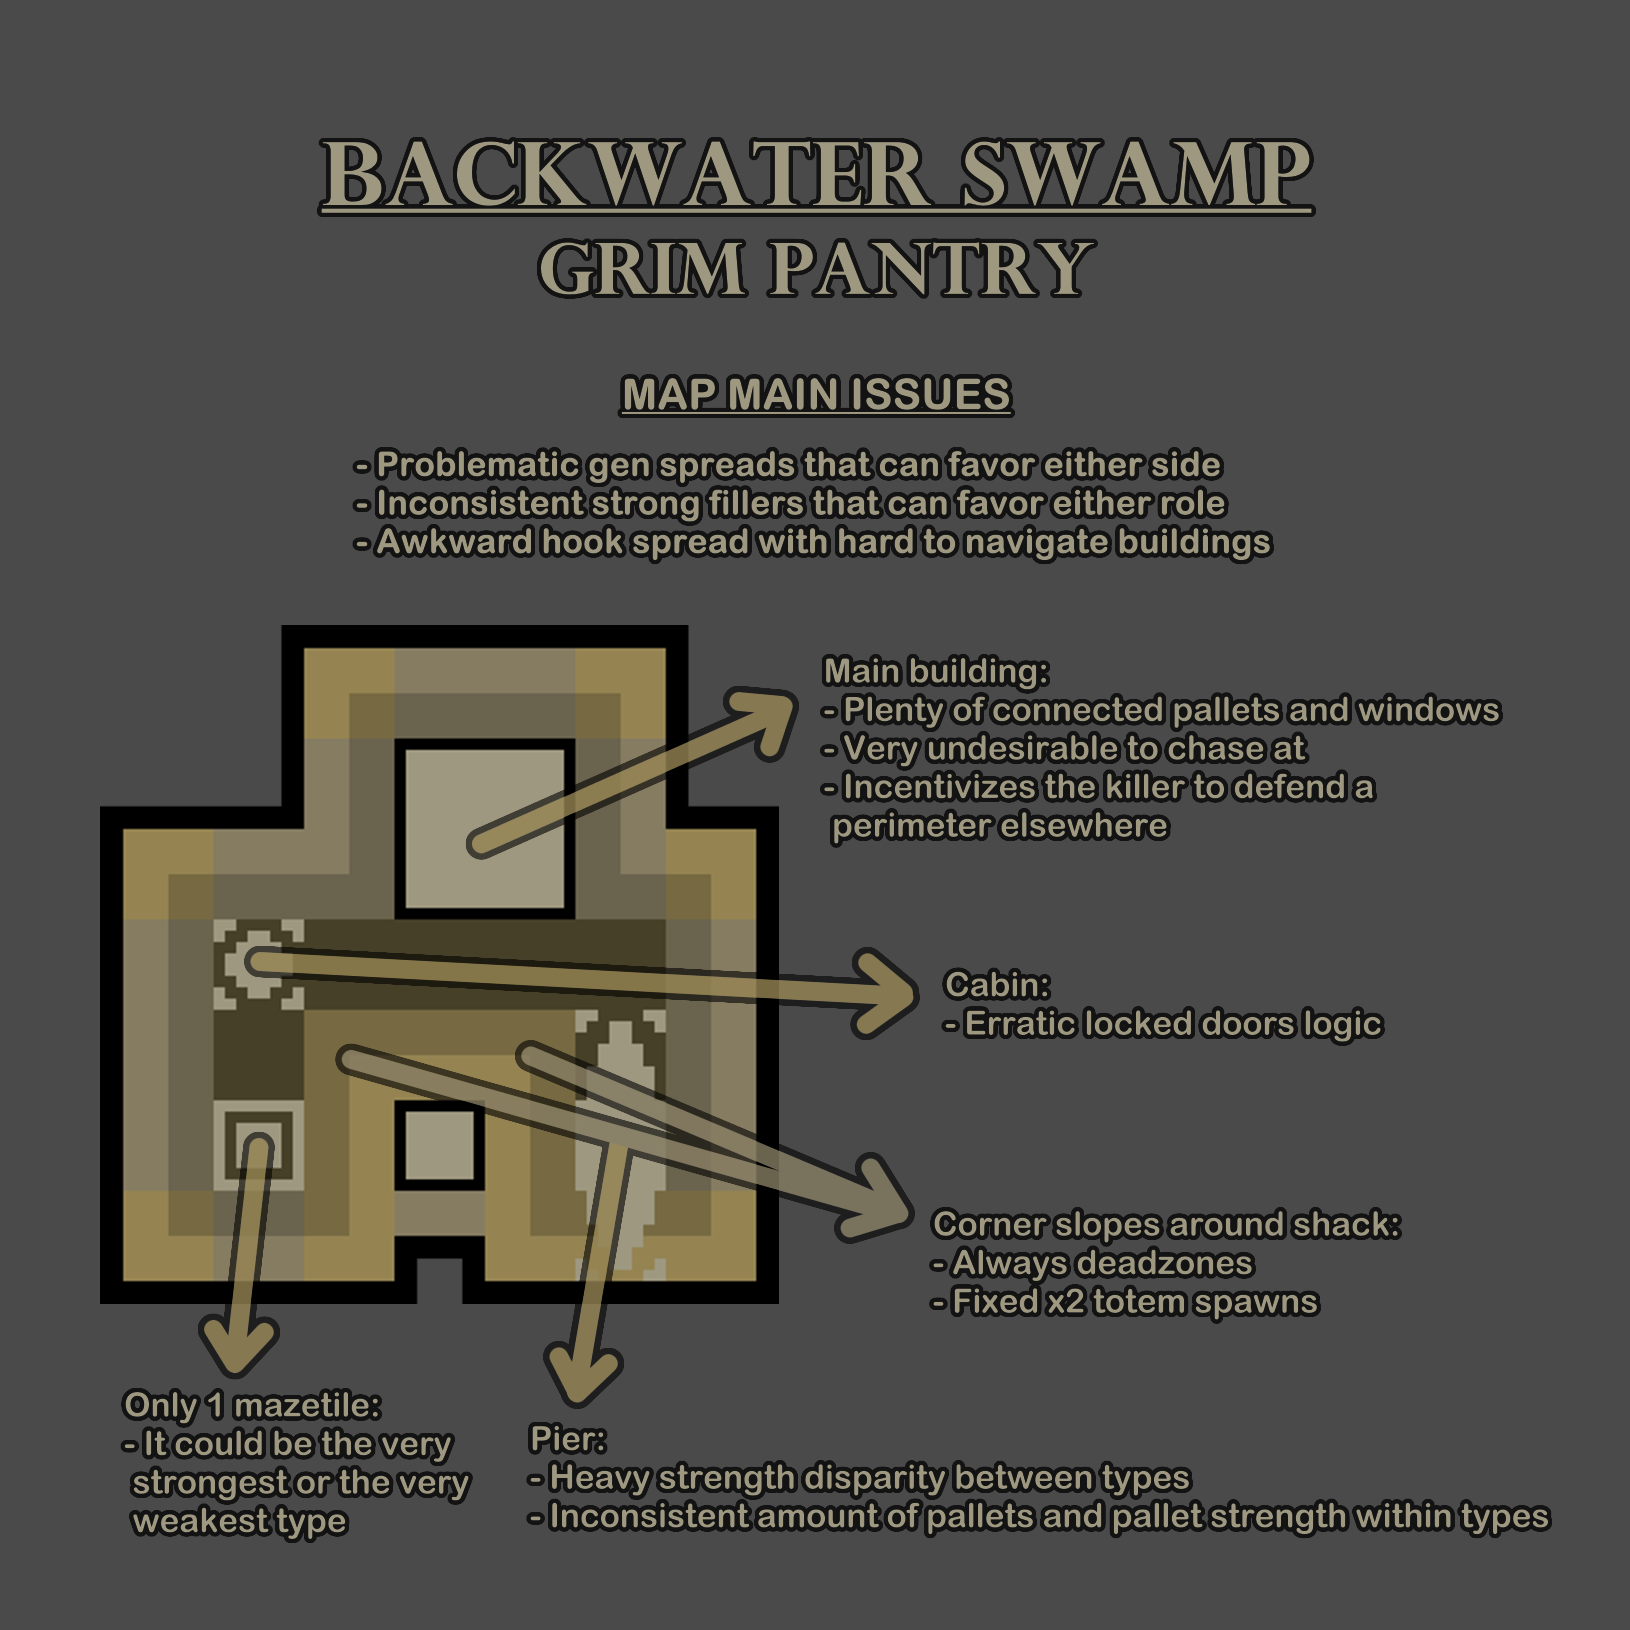
Just like its realm-mate, Grim Pantry needs its realm, Backwater Swamp, to get graphically updated (regardless of that implying if the slopes are tweaked or not).
The map itself finds the most problems with the inconsistent safety of the filler loops / mazetile / pier as well as the overwhelming strength of its main building.
-
The Pale Rose is one of the most inconsistent maps in the game, stating which role it favors is not an easy task due to how radical it gets from one trial to another. On top of everything it suffers from the obsolete design of its realm, Backwater Swamp, which is yet to receive a graphical rework.
When it comes to the generators, the expanded size from the slopes at the edge of the map can be utilized by the spawned generators to erratically widen the areas to defend / repair at, which usually favors survivors, but at the same time, depending on how the generators spawn, it can backfire and allow the killer to defend a territory that envolves 3-4 generators and that is particularly hard to contest for the survivors (since 1 gen will be at the edge of the map and they won't be able to go through to repair it with the killer around).
When it comes to safety, the main building is both strong, interesting and has consistent pallets & windows (with some variability), yet there is a factor that is purely additive and random, that being a log with a vault that may or may not spawn outside of the boat but still inside its tile terrain. The shrimp boat landmark is also consistent and doesnt stand out too much, the real problems are found within the rest of the map (with the exception of the shack).
The filler loops are quite strong but their generation is heavily inconsistent to the point where in one trial you can have a middle of the map that is extremely barren and devoid of resources and in another trial you can find several connected safe loops. As of recent changes, the type of fillers that you can find in certain areas of the map (like the middle) has increased, not without weird occurrances like filler loops spawning 2 pallets in 1 tile.
The slope-expanded terrain at the edge of the map doesn't spawn any loops other than in the corners, which may or may not spawn a characteristic log window loop. The corners adjacent to shack can also spawn pallets at rock-tree loops. The slopes around shack (not in edge map) can randomly spawn strong filler loops that support the shack itself but the slope between shack and the shrimp boat is always a deadzone.
There is only 1 mazetile which is the most extreme display of inconsistent strength in the mazetiles of a map since you can have the strongest or the weakest and there is no room to smooth the discrepancy since there are no other mazetiles. The pier landmark is an even greater source of variable strength, since its 3 different versions differ a lot from each other and they do not provide consistent resources (depending on the type that includes amount and / or quality of the pallets).
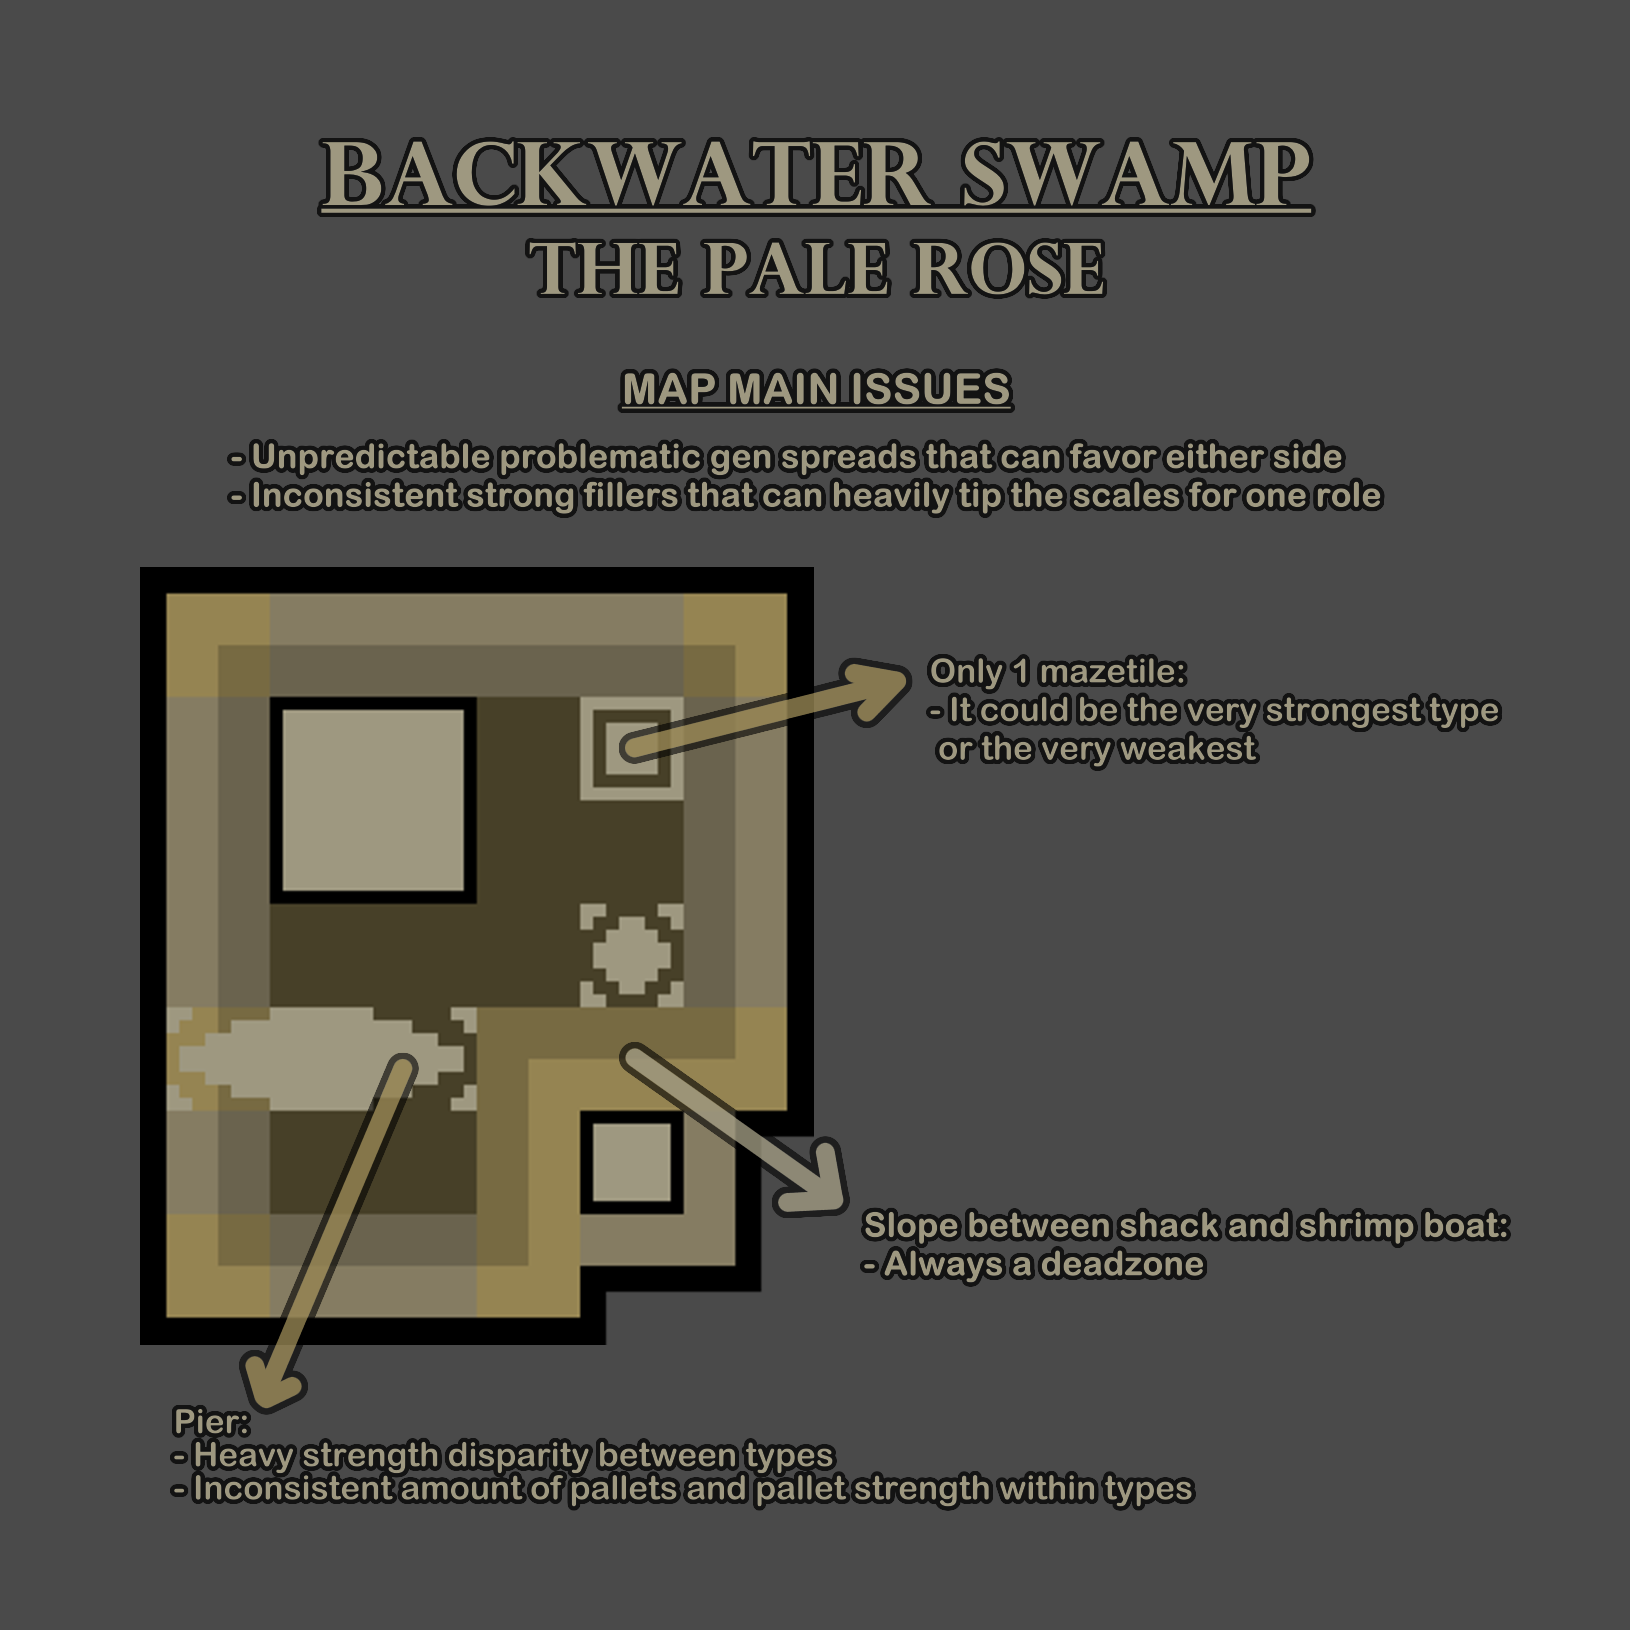
The realm itself needs its graphic update, if that includes toning down the slopes and therefore normalizing the realm I guess is not up to the community to decide.
As for what The Pale Rose needs specifically, the inconsistency in resources is clearly an issue to target.
-
Sanctum of Wrath shares a lot of the issues with Family Residence and it can also be considered a balanced map, maybe leaning to killer side a bit more, again not for the good reasons.
Similar to its "realm-mate", killers can't afford to cross the map constantly, the shape of Sanctum of Wrath is particularly two-sided with a very thin middle, it utilizes its size in an awkwardly expanded way that makes the gen spread quite wide. For this reason and the fact that the gen spread can sometimes be distributed unevenly across sides (instead of 3 on each side and 1 in the middle, you can see 4 on one side, 2 on the other and 1 in the middle), killers are heavily encouraged to follow territorial playstyles while holding the thin middle to make crossing sides hard for the survivors, specially while using the main building as a watch tower to keep control of where the survivors are.
Survivors have inconsistent & unreliable safety where the long landmarks (Shrine & Gazebo) and the courtyard landmark are not guaranteed to spawn their respective pallets. Unlike Family Residence and any other map, Sanctum of Wrath has a shack that shares tile placing with another landmark, meaning that it moves around (from side to side, changing tile spot with the courtyard) and the map has 3 possible basements & 2 possible shack locations. While this feature is incredibly charming, it is outshined by the two-sided shape of the map and it ends up contributing to the inconsistency that survivors have to deal with.
Main building has 2 pallets (1 above and 1 below, both with 2 possible spots each) and 4 windows, all with dropdowns (3 of them quite tall ones). Just like Family Residence's, this main building is particularly weak but in Sanctum of Wrath's case it is even worse since the killer benefits from its height to control the map and also the fact it is in the middle denying loop connection between stronger tiles. The mazetiles are also 4 (ideal amount considering its 7 types, it should not be reduced) but they are located in such ways that some are isolated and others are directly adjacent to landmarks (allowing occasionally absurd chains of loops that are yet again inconsistent).
On top of the safety, survivors also have to deal with the territorial strategies that are so incentivized by the map and not only the killer can hold the middle to tactically punish crossing the map but they can also zone survivors into the side they are already in, making vulnerable off the hook survivors particularly uncapable of holding a proper chase, since they might be in an area with limited or already used resources and they can hardly make it to a better place without the assitance of certain valuable perks.
The total resources of pallets that survivors can count with is of aprox. 11 to 15 but 2 are gonna be spent on main building and the rest are gonna be unevenly split between both sides, considering that the killer will likely not play on the other side, survivors have a very low pallet count for the reduced space they are gonna be playing in if the killer does employ the tactics that benefit them.
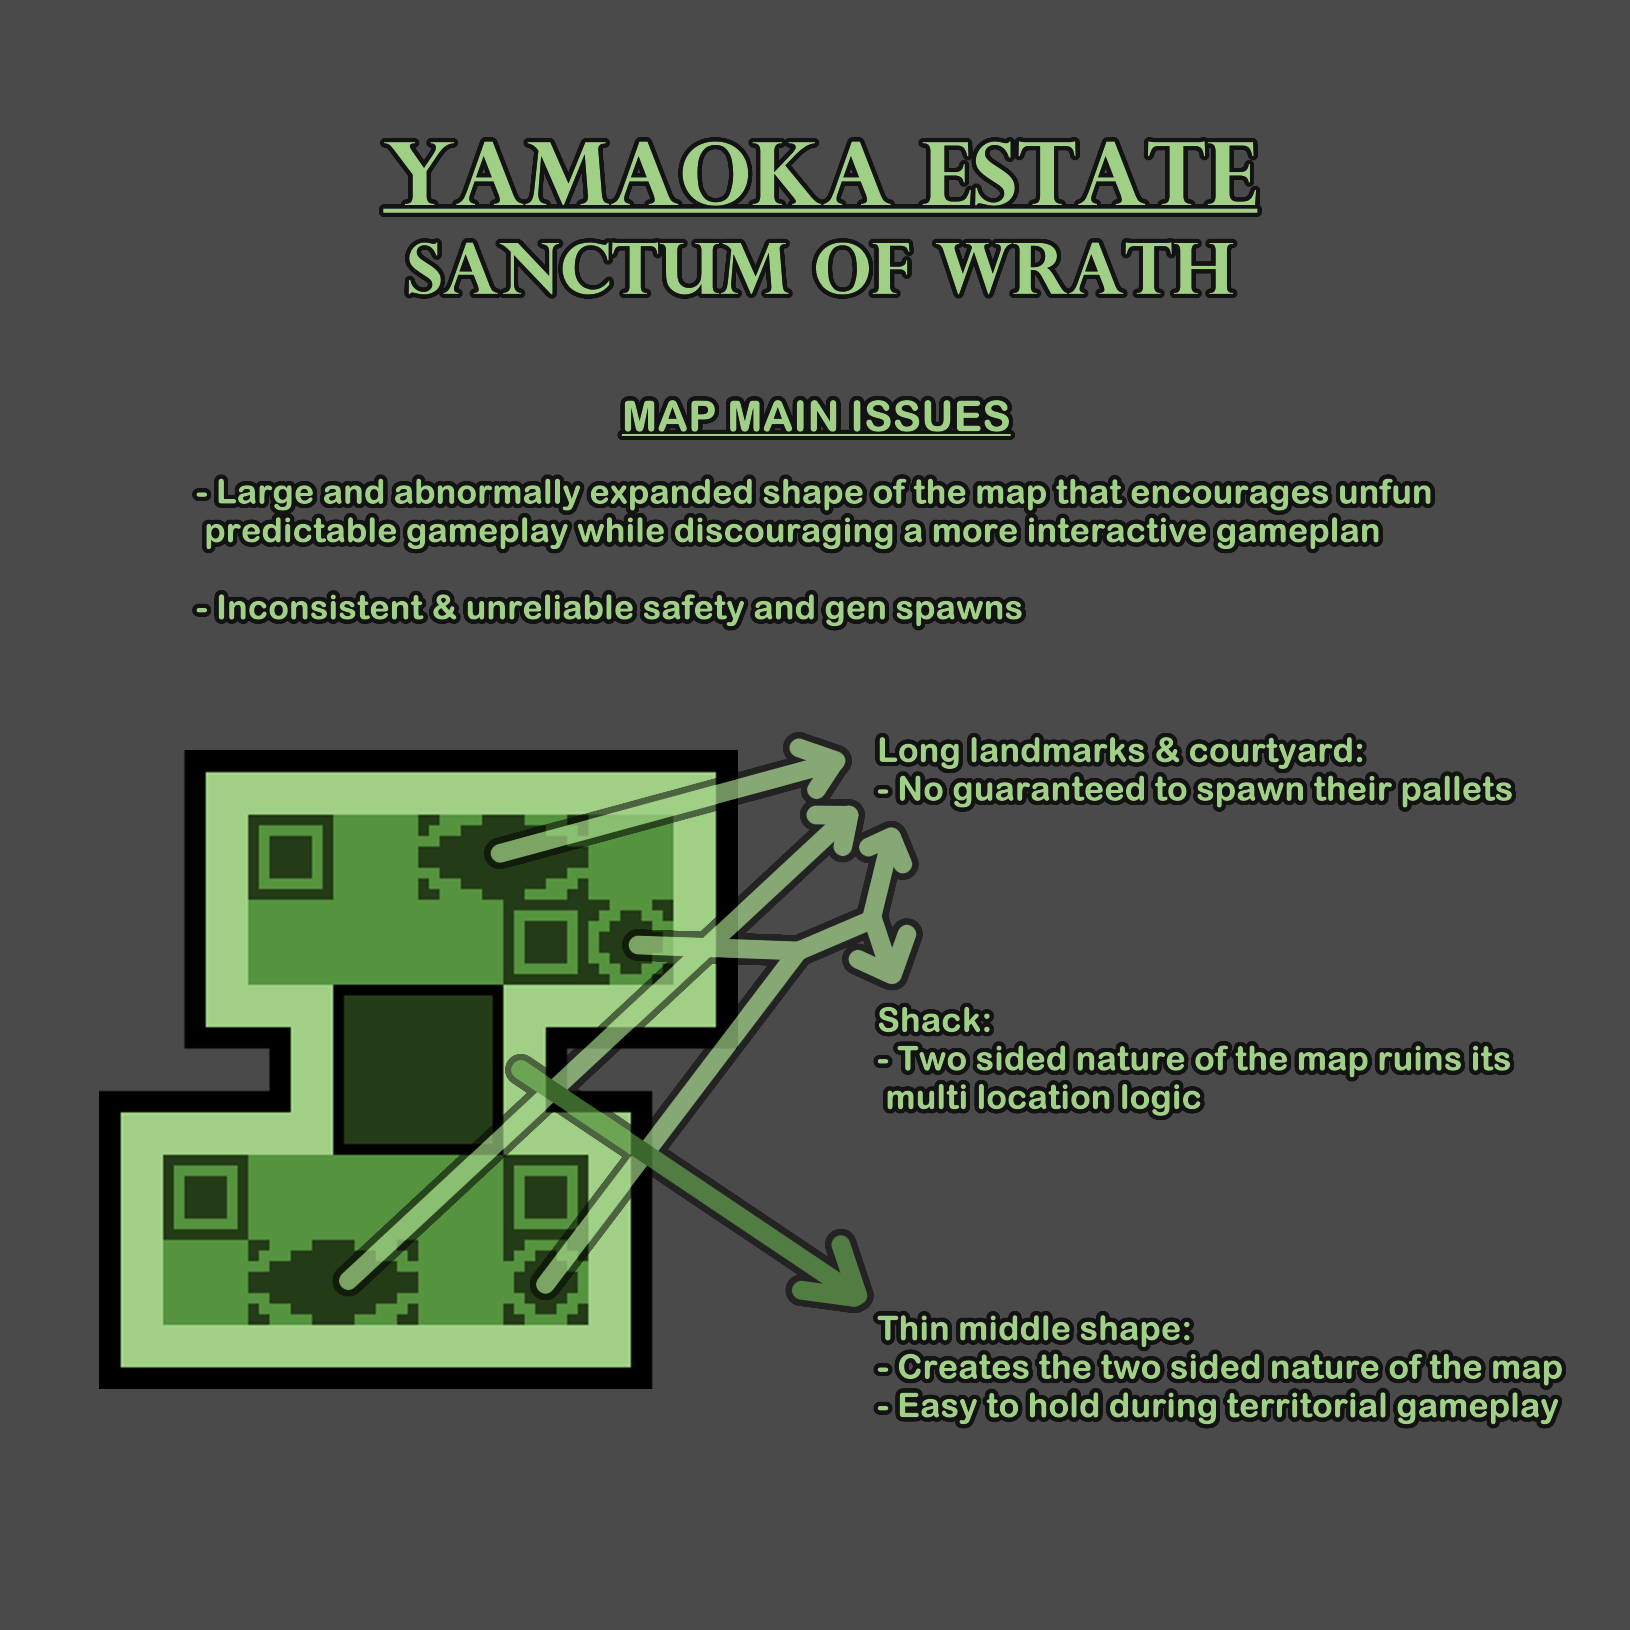
The map itself, Sanctum of Wrath, requires a massive overhaul to its shape and layout, otherwise many of its charming points (like shack having multiple locations) pale in comparison to the poor gameplay it encourages.
The realm, Yamaoka Estate, needs its landmarks to start providing consistent pallets and on a peculiar note: one of the 7 types of mazetiles has no lockers, which is awkward for some killers and those survivors trying to make use of lockers (it is the one commonly tagged as "Labyrinth Gym" and "Maze Gym"), which is an exclusive issue of this realm.
-
Family Residence can be considered more or less a balanced map, but not because it is well designed but rather because it is very bad for both sides.
Most killers can't afford to constantly traverse the map due to its vast length, limiting their options to more territorial playstyles that aren't guaranteed to work out or be favorable (specially when the map's length still gets in the way by providing survivors with undesirable chases far away from the killer's territory); or unrealistic strategies such as killing all survivors faster than they can recover & repair the generators, which only the very strongest killers can opt to attempt and not even them can replicate such performance consistently. On top of the general gameplan, survivors can also use the length of the map in chase to keep running away in a straight path from the killer for a long time before allowing the killer to cut them off (specially effective against many killers that rely on corralling survivors to proficiently end chases).
Survivors on their end have to deal with mostly inconsistent & unreliable safety (and therefore forced to capitalize on the unfun strat of using the length of the map to delay the killer) as well as dealing with the incentivized territorial playstyles from the killer which may involve having to rescue a defended hook in a very thin map that allows the killer to not let you go through comfortably.
In a closer inspection to the safety of the map (to understand why it is inconsistent & unreliable) we first see main building which always provides 2 windows (3 possible pairs) that aren't too strong and that aren't exactly user-friendly for the survivors, while main building being on the weaker side of the spectrum is not necesarily a bad thing, it has to be taken into account when balancing the other resources in the map. The other "stable" resources are shack and the 4 mazetiles which do provide their fair share of safety (the mazetiles should remain 4, a lesser amount would result in inconsistent safety given than its 7 types are not all equally strong and less than 4 would introduce radical shifts of strength between trials).
Then we have the landmarks. The 1x1 landmarks are located around the main building and would be the courtyard loop and the gateway & log loop; while the window in the courtyard is fixed, the pallet in both landmarks is not, meaning that survivors can run to these loops and find nothing despite noone else spending the pallets (note that main building has no pallets, so in an area that you find main building, 2 mazetiles and 2 landmarks, you can see from 1 to 4 pallets, such inconsistency is not to be taken lightly).
The 1x2 landmarks are also inconsistent and will not spawn their pallet at random. The Gazebo (the old looking one) has a variable window that keeps its strength from one version to the other, but the window on itself is hardly a challenge for the killer without the pallet (2 possible spots). The Shrine (the tall modern looking one) has 3 patterns of windows, 2 are pairs of symetrical dropdown windows, while the 3rd is a single middle window that is very weak; either way the loop is vastly weaker without its pallet (2 possible spots too).
The filler loops resemble Ormond's, focusing on rock loops that are overall not too strong nor weak. While the general concept is not bad, Family Residence only gets from 8 to 13 pallets (aprox.), a very scarce amount that isn't even properly distributed all the time. From those pallets we know 1 will be at shack and 3-4 at the mazetiles, but the rest are randomly distributed between the landmarks and filler loops, with no consistency to be expected.
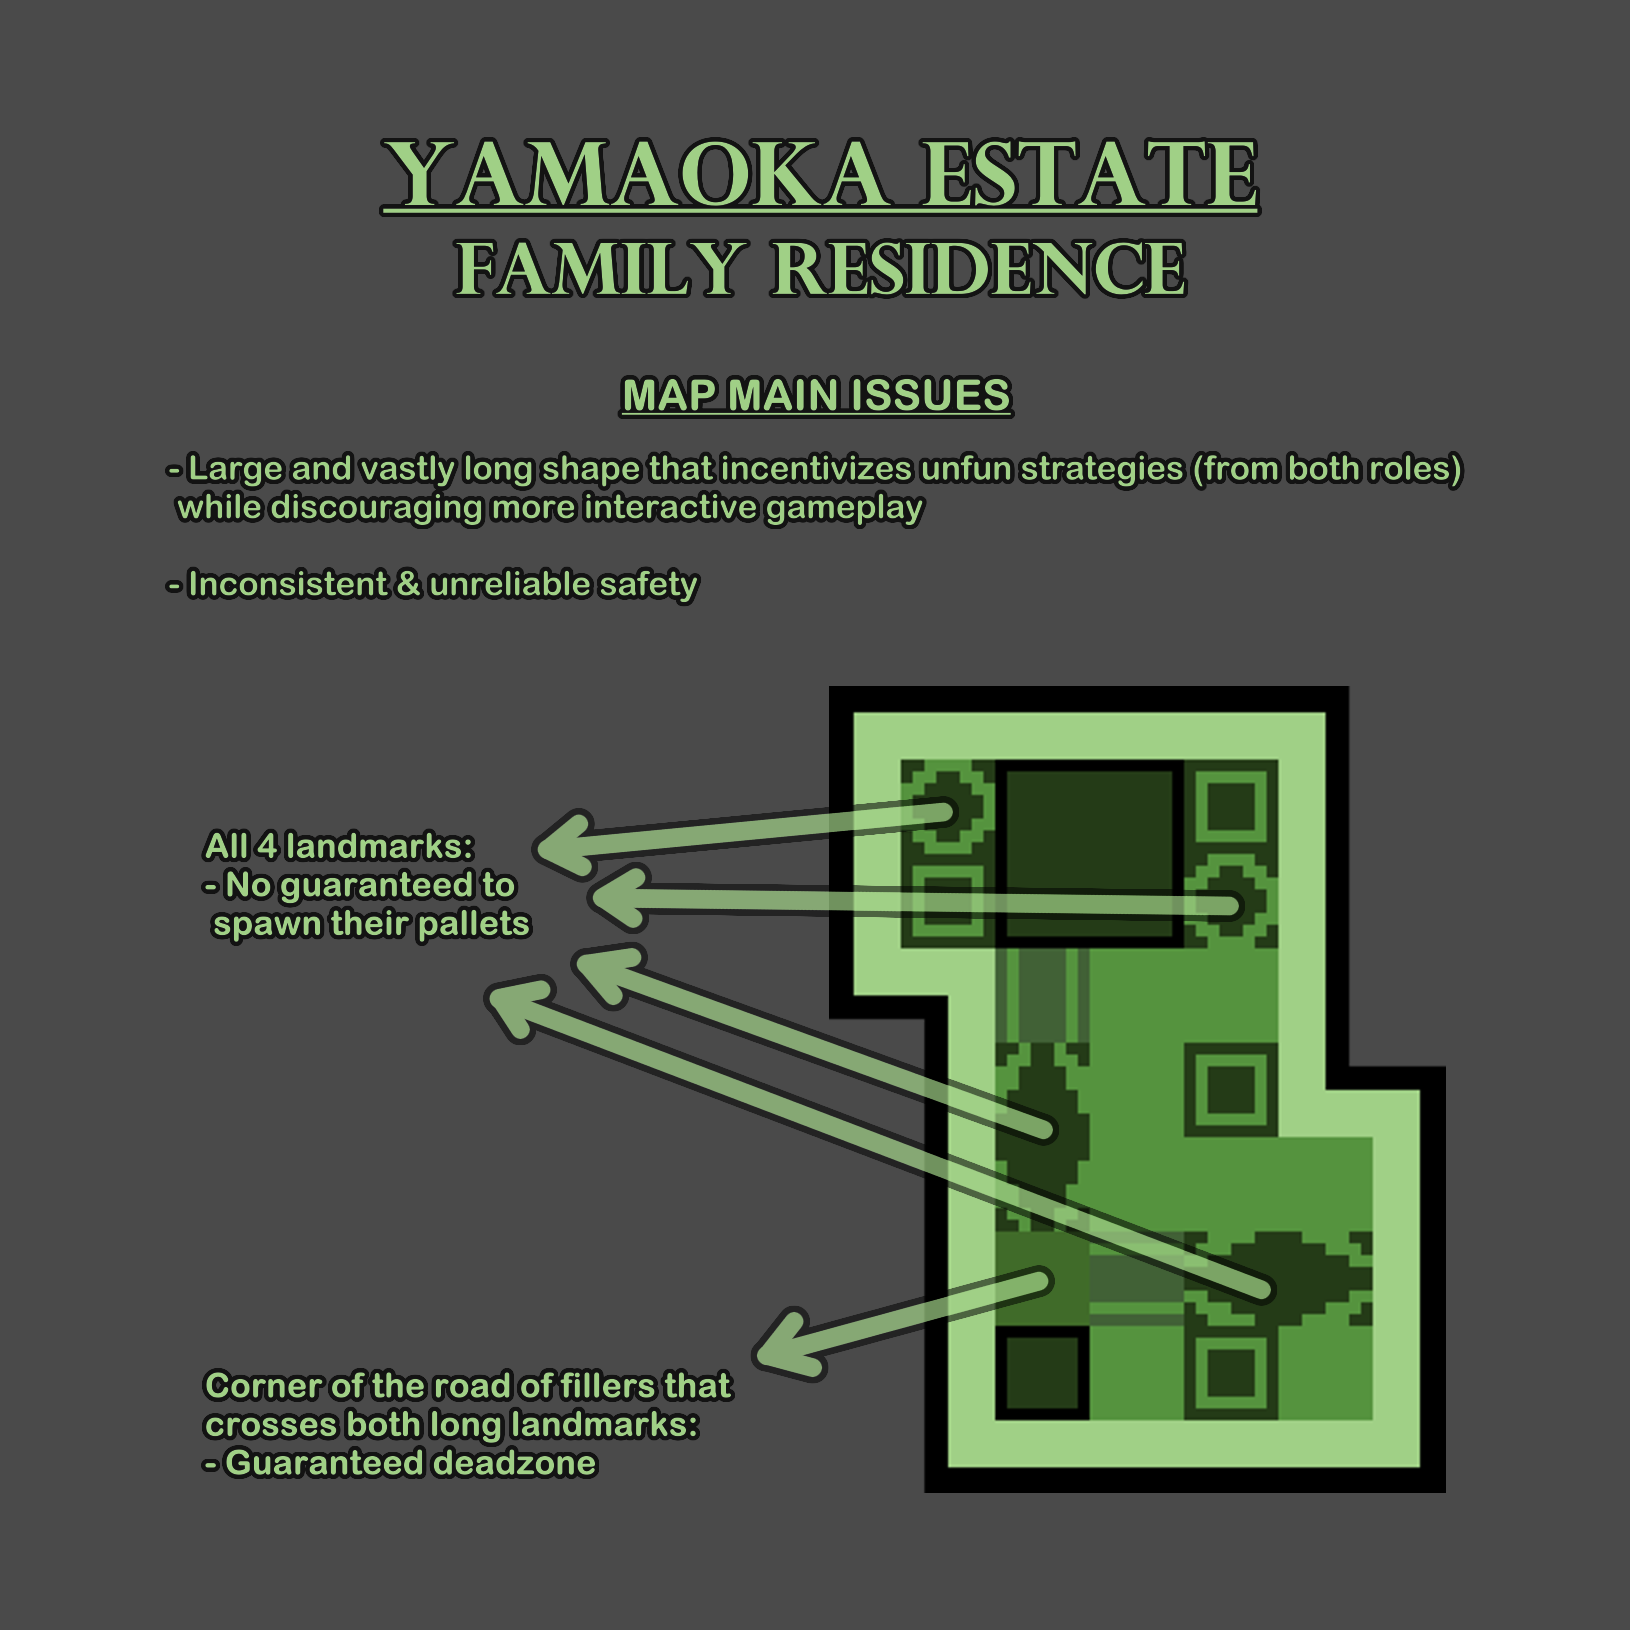
The map itself, Family Residence, needs a massive overhaul to its shape & layout, otherwise it will remain uninteractive regardless of any other change.
The realm, Yamaoka Estate, needs its landmarks to start providing consistent pallets and on a peculiar note: one of the 7 types of mazetiles has no lockers, which is awkward for some killers and those survivors trying to make use of lockers (it is the one commonly tagged as "Labyrinth Gym" and "Maze Gym"), which is an exclusive issue of this realm.
-
Mount Ormond Resort is a map that as of right now favors survivor, not because the safety is problematic and unbalanced but rather due to how the large size of the map is used.
During an usual game in Ormond the generators can be very hard to defend (specially if the killer lacks mobility) given the size and length of the map, supported by the large main building in the middle and the generators being located mostly near the edge of the map. At the start of the trial, the size issue is felt the most, depending on the spawns of the players and their loadouts, the killer might lose a generator or two without finding anyone because they patrolled the wrong corner and took too long before navigating to the actual location of the survivors.
On top of the already large size, the map counts with 2 opposite corners with small pockets where a mazetile and shack can be found, allowing survivors to perform a last ditch effort to delay the killer while being as far as possible from everything else in the map (and therefore contributing to the crippling downtime the killer has to go through before their next move). While these spots are tactically strong for survivor, they can be used against them in an equally unfun way (specially if basement is in shack), since the killer can defend a hook in said corners while keeping a patrol that is far enough to bypass the anti-facecamp mechanic and therefore make it really hard to rescue against (also taking advantage of how open the map is).
To expand on the "camping" issue, as of the minor update that the map received recently, main building counts with 1 hook upstairs that may or may not be problematic given how the paths to the hook converge at the main staircase and the killer can easily defend it while keeping their distance.
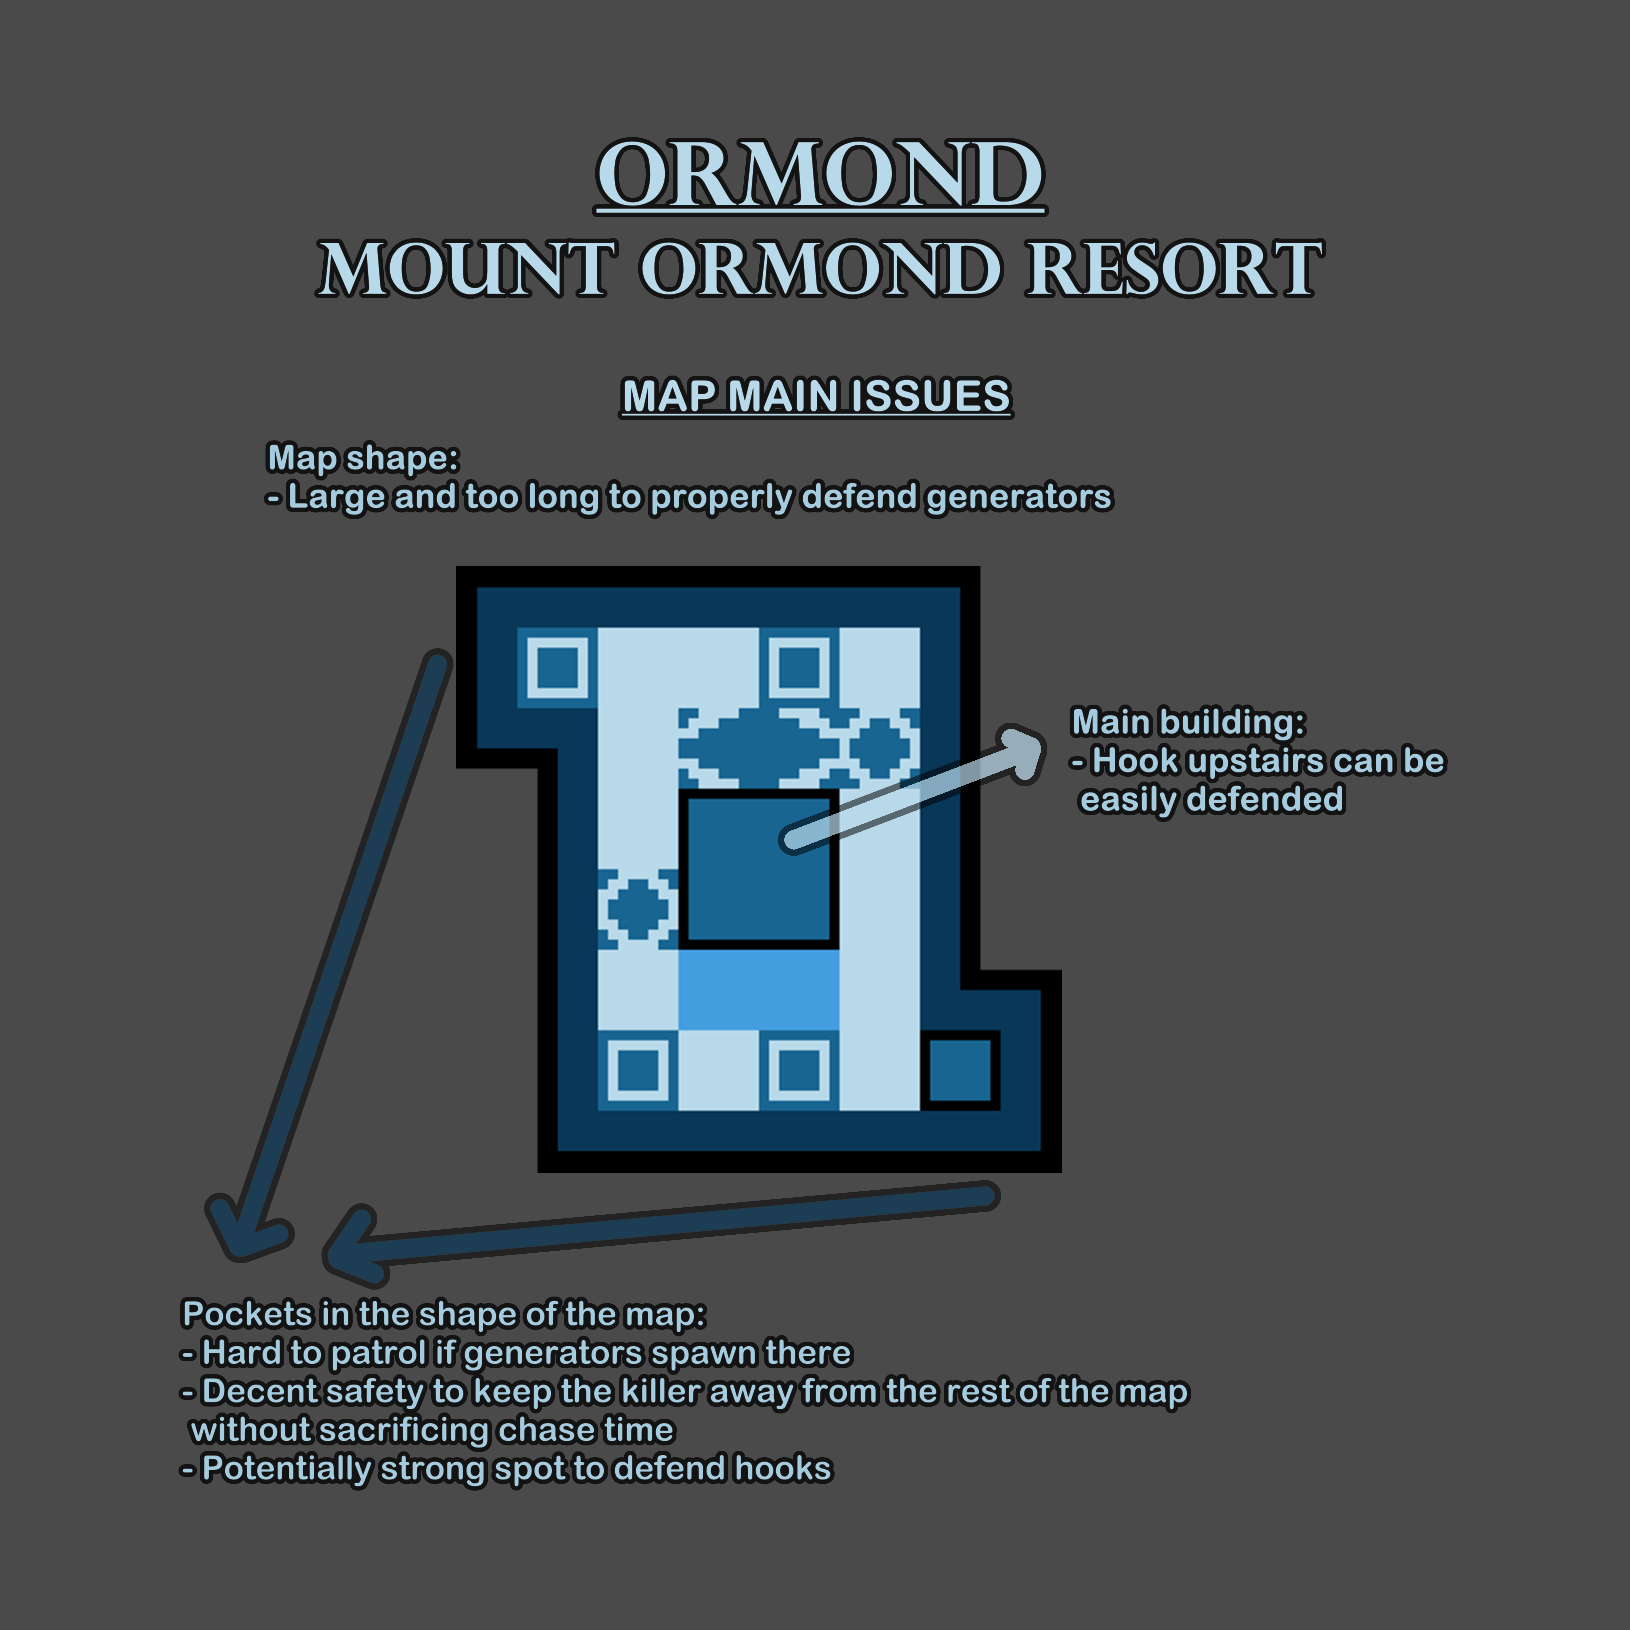
On the other hand, Ormond has some of the most balanced safety in the many realms that the game has, eventhough the filler loops can be awkwardly distributed sometimes. Main building has consistent resources with some variability (always 2 pallets upstairs and 2 downstairs, always 2 windows upstairs and 1 downstairs + 1 downstairs if basement spawns there), it is strong but not absurdly oppressive; the chairlift landmark is weak and the snowcat landmark is strong but can't be recycled due to its lack of window; the recently modified landmark of the chalet entrance is now like a fixed filler loop that may or may not spawn a pallet.
There are 4 mazetiles and the types that the realm uses has increased from 8 to 10 in the recent update, making it by far the richest map when it comes to variety in mazetile design (and there is no specific problem with any of them). The amount is ideal and should be kept the same (reducing the amount of mazetiles would hurt the consistency they provide and it would fail to showcase the many types the map can spawn).
The filler loops, while sometimes awkwardly spread and while often referred as dull due to the designs being only rock loops, they are overall neither too safe nor too unsafe. The picnic area was updated recently too but unlike the chalet entrance and the 2 new mazetile types, it didn't seem to improve much from the previous iteration of the tiles (and given that dream pallets can be placed at spots that don't spawn pallets, the picnic area update may not be finished yet).
The pallet count of the map seems to vary from 15 to 18 and the average is estimated around 17 pallets. From these we know 4 will be at main, 1 at shack, 1 at snowcat, 3-4 at mazetiles and the rest at the filler loops (about 6 to 8). While the amount may seem alarmingly high, I don't think it requires a direct change since reducing the map size will passively reduce the pallet count already.
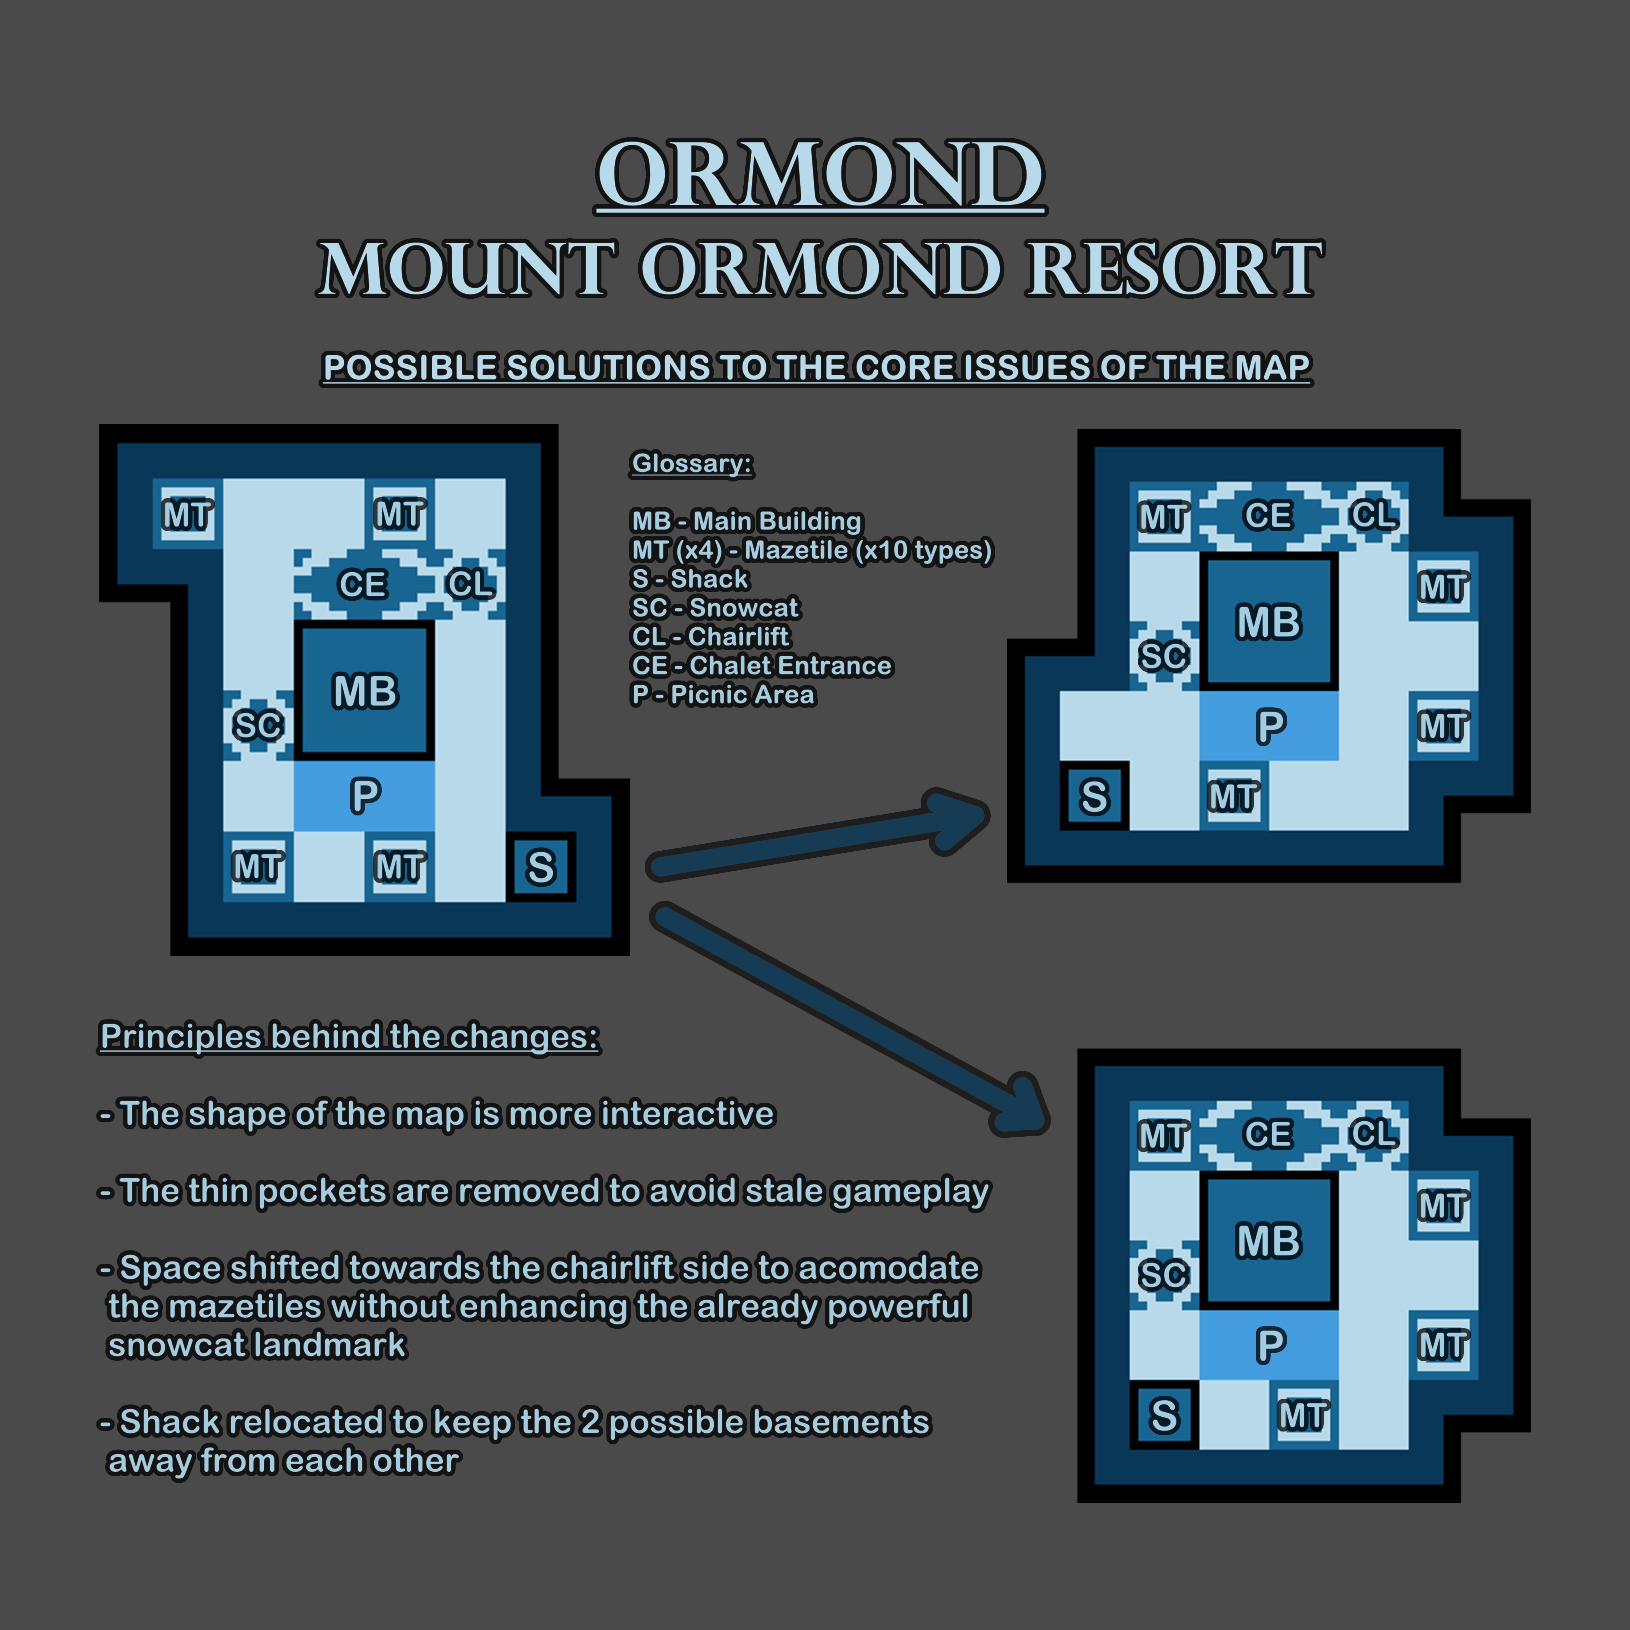
If changes are due to happen, I believe most will agree that the safety should remain the same while the size, shape and part of the layout should shift to mitigate the downtime killers are forced to take when traversing and patrolling the map (and therefore incentivizing interactive gameplay).
At the same time, the "pocket corners" could also be addressed and since there wouldn't be enough space to fit the mazetiles and landmarks, the side of the chairlift could be expanded (like in the graphic) to fulfill that task (the snowcat side should be left the same since the landmark's strength would skyrocket if more loops spawned around it). If the new layout is anything similar to either of the 2 I suggest, maybe shack could be relocated slightly so it isn't too close to the corner of main that spawn basement (since otherwise both possible basements would be in the same area).